Neardi Camera Demos
目录
1. Basic Demo
1.1 概述
这个 Demo 是基于 Rockchip 平台,使用 Neardi 的 rk3588 / rk3576 / rk3568 系列产品,采用 C++ 开发摄像头应用。整体框架如下:
OpenCV -> GStreamer -> Camera -> HDMI
1.2 数据流
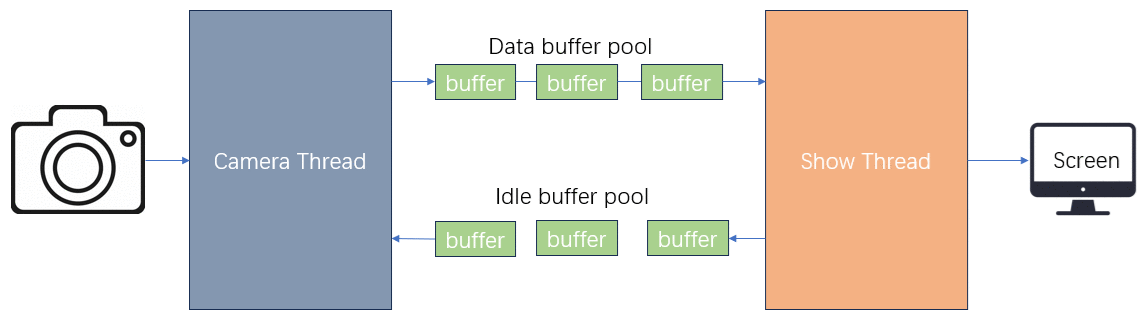
使用 两个线程 并行处理:
- 一个线程负责打开和采集摄像头数据(camera thread)
- 另一个线程负责显示图像(show thread)
采集与显示并行运行,数据流如下:
1.3 AHD/Mipi camera
Neardi设备使用了AHD模拟信号转换成Mipi数字信号的芯片, 在Rockchip平台上面, 可以使用如下命令来查看摄像头节点:
neardi@LPA3588:~$ v4l2-ctl --list-devices
rkcif (platform:rkcif-mipi-lvds):
        /dev/video0
        /dev/video1
        /dev/video2
        /dev/video3
        /dev/video4
        /dev/video5
        /dev/video6
        /dev/video7
        /dev/video8
        /dev/video9
        /dev/video10
        /dev/media0

rkcif (platform:rkcif-mipi-lvds1):
        /dev/video11
        /dev/video12
        /dev/video13
        /dev/video14
        /dev/video15
        /dev/video16
        /dev/video17
        /dev/video18
        /dev/video19
        /dev/video20
        /dev/video21
        /dev/media1
这是在LPA3588设备上面, 使用了2颗AHD转换Mipi的芯片, 节点分别是/dev/video0 ~ /dev/video3和/dev/video11 ~ /dev/video14.
在获取摄像头视频流数据之前, 需要了解摄像头的数据格式, 使用如下命令查询:
neardi@LPA3588:~$ v4l2-ctl -d /dev/video0 --list-formats-ext
ioctl: VIDIOC_ENUM_FMT
        Type: Video Capture Multiplanar

        [0]: 'NV16' (Y/UV 4:2:2)
                Size: Stepwise 64x64 - 1920x1080 with step 8/8
        [1]: 'NV61' (Y/VU 4:2:2)
                Size: Stepwise 64x64 - 1920x1080 with step 8/8
        [2]: 'NV12' (Y/UV 4:2:0)
                Size: Stepwise 64x64 - 1920x1080 with step 8/8
        [3]: 'NV21' (Y/VU 4:2:0)
                Size: Stepwise 64x64 - 1920x1080 with step 8/8
        [4]: 'YUYV' (YUYV 4:2:2)
                Size: Stepwise 64x64 - 1920x1080 with step 8/8
        [5]: 'YVYU' (YVYU 4:2:2)
                Size: Stepwise 64x64 - 1920x1080 with step 8/8
        [6]: 'UYVY' (UYVY 4:2:2)
                Size: Stepwise 64x64 - 1920x1080 with step 8/8
        [7]: 'VYUY' (VYUY 4:2:2)
                Size: Stepwise 64x64 - 1920x1080 with step 8/8
那如何使用C++编程调用OpenCV + Gstreamer打开摄像头呢? 如下:
    std::string capfmt = "v4l2src device=/dev/video"
                          + std::to_string(cam_id)
                          + " ! video/x-raw,format=NV12,width="
                          + std::to_string(width) + ",height="
                          + std::to_string(height)
                          + ",framerate=30/1 ! appsink";
    VideoCapture cap(capfmt, CAP_GSTREAMER);
    if (!cap.isOpened()) {
        cerr << "Failed to open camera!" << endl;
        return;
    }

    Mat first_frame;
    cap >> first_frame;
1.4 USB camera
USB摄像头通常支持2种格式的数据, 'MJPG' (Motion-JPEG, compressed)和'YUYV' (YUYV 4:2:2)。 如下:
neardi@LPA3588:~$ v4l2-ctl -d /dev/video22 --list-formats-ext
ioctl: VIDIOC_ENUM_FMT
        Type: Video Capture

        [0]: 'MJPG' (Motion-JPEG, compressed)
                Size: Discrete 1920x1080
                        Interval: Discrete 0.033s (30.000 fps)
                        Interval: Discrete 0.033s (30.000 fps)
                Size: Discrete 1280x720
                        Interval: Discrete 0.033s (30.000 fps)
                Size: Discrete 1600x900
                        Interval: Discrete 0.033s (30.000 fps)
                Size: Discrete 2304x1296
                        Interval: Discrete 0.033s (30.000 fps)
                Size: Discrete 2560x1440
                        Interval: Discrete 0.033s (30.000 fps)
                Size: Discrete 2688x1512
                        Interval: Discrete 0.033s (30.000 fps)
                Size: Discrete 3840x2160
                        Interval: Discrete 0.040s (25.000 fps)
                Size: Discrete 640x360
                        Interval: Discrete 0.033s (30.000 fps)
                Size: Discrete 800x450
                        Interval: Discrete 0.033s (30.000 fps)
                Size: Discrete 848x480
                        Interval: Discrete 0.033s (30.000 fps)
                Size: Discrete 960x540
                        Interval: Discrete 0.033s (30.000 fps)
                Size: Discrete 1024x576
                        Interval: Discrete 0.033s (30.000 fps)
                Size: Discrete 640x480
                        Interval: Discrete 0.033s (30.000 fps)
                Size: Discrete 800x600
                        Interval: Discrete 0.033s (30.000 fps)
                Size: Discrete 960x720
                        Interval: Discrete 0.033s (30.000 fps)
                Size: Discrete 1024x768
                        Interval: Discrete 0.033s (30.000 fps)
                Size: Discrete 1280x960
                        Interval: Discrete 0.033s (30.000 fps)
                Size: Discrete 1600x1200
                        Interval: Discrete 0.033s (30.000 fps)
                Size: Discrete 2048x1536
                        Interval: Discrete 0.033s (30.000 fps)
                Size: Discrete 2592x1944
                        Interval: Discrete 0.033s (30.000 fps)
                Size: Discrete 1920x1080
                        Interval: Discrete 0.033s (30.000 fps)
                        Interval: Discrete 0.033s (30.000 fps)
        [1]: 'YUYV' (YUYV 4:2:2)
                Size: Discrete 1920x1080
                        Interval: Discrete 0.200s (5.000 fps)
                        Interval: Discrete 0.200s (5.000 fps)
                Size: Discrete 1280x720
                        Interval: Discrete 0.100s (10.000 fps)
                Size: Discrete 1600x900
                        Interval: Discrete 0.200s (5.000 fps)
                Size: Discrete 640x360
                        Interval: Discrete 0.033s (30.000 fps)
                Size: Discrete 800x450
                        Interval: Discrete 0.050s (20.000 fps)
                Size: Discrete 848x480
                        Interval: Discrete 0.050s (20.000 fps)
                Size: Discrete 960x540
                        Interval: Discrete 0.050s (20.000 fps)
                Size: Discrete 1024x576
                        Interval: Discrete 0.067s (15.000 fps)
                Size: Discrete 640x480
                        Interval: Discrete 0.033s (30.000 fps)
                Size: Discrete 800x600
                        Interval: Discrete 0.050s (20.000 fps)
                Size: Discrete 960x720
                        Interval: Discrete 0.067s (15.000 fps)
                Size: Discrete 1024x768
                        Interval: Discrete 0.100s (10.000 fps)
                Size: Discrete 1280x960
                        Interval: Discrete 0.133s (7.500 fps)
                Size: Discrete 1600x1200
                        Interval: Discrete 0.200s (5.000 fps)
                Size: Discrete 1920x1080
                        Interval: Discrete 0.200s (5.000 fps)
                        Interval: Discrete 0.200s (5.000 fps)
这里我们使用Gstreamer + RKMPP来获取MJPG格式的数据。 在Neardi设备系统里, 已经适配好Gstreamer + RKMPP, 如下命令查看:
neardi@LPA3588:~$ gst-inspect-1.0 | grep mpp
rockchipmpp:  mpph264enc: Rockchip Mpp H264 Encoder
rockchipmpp:  mpph265enc: Rockchip Mpp H265 Encoder
rockchipmpp:  mppjpegdec: Rockchip's MPP JPEG image decoder
rockchipmpp:  mppjpegenc: Rockchip Mpp JPEG Encoder
rockchipmpp:  mppvideodec: Rockchip's MPP video decoder
rockchipmpp:  mppvp8enc: Rockchip Mpp VP8 Encoder
rockchipmpp:  mppvpxalphadecodebin: VP8/VP9 Alpha Decoder
typefindfunctions: audio/x-musepack: mpc, mpp, mp+
上面log显示可以使用mppjpegdec插件对JPEG数据进行解码, 下面是C++代码里打开USB MJPG数据格式的代码片段:
    /**
     * below is for USB camera.
     */
    string capfmt = "v4l2src device=/dev/video" + to_string(cam_id)
					+ " ! image/jpeg,width=" + to_string(width)
					+ ",height=" + to_string(height)
					+ ",framerate=30/1 ! mppjpegdec ! videoconvert ! video/x-raw,format=BGR ! appsink";
    VideoCapture cap(capfmt, CAP_GSTREAMER);
    if (!cap.isOpened()) {
        cerr << "Failed to open camera!" << endl;
        return;
    }

    Mat first_frame;
    cap >> first_frame;
1.5 完整代码
/*
 * main.cpp
 *
 *  Created on: 2023/3/15
 *      Author: Linx
 *       Email: linx.wu@neardi.com
 */
#include <opencv2/opencv.hpp>
#include <thread>
#include <atomic>
#include <chrono>
#include <vector>
#include <mutex>
#include <condition_variable>
#include <iostream>

using namespace cv;
using namespace std;

// Queue implementation
template <typename T>
class Queue {
public:
    explicit Queue(size_t capacity) : capacity_(capacity), front_(0), rear_(0), size_(0) {
        buffer_.resize(capacity);
    }

    // Disable copy and assignment
    Queue(const Queue&) = delete;
    Queue& operator=(const Queue&) = delete;

    // Add an item to the queue (producer)
    bool push(const T& item) {
        std::unique_lock<std::mutex> lock(mutex_);
        if (size_ == capacity_) {
            return false; // Queue is full
        }
        buffer_[rear_] = item;
        rear_ = (rear_ + 1) % capacity_;
        ++size_;
        cond_var_.notify_one();
        return true;
    }

    // Remove an item from the queue (consumer)
    bool pop(T& item) {
        std::unique_lock<std::mutex> lock(mutex_);
        //cond_var_.wait(lock, [this] { return size_ > 0; });
        if (size_ == 0) {
            return false; // Queue is empty
        }
        item = std::move(buffer_[front_]); // Use move semantics to avoid unnecessary copies
        front_ = (front_ + 1) % capacity_;
        --size_;
        return true;
    }

    // Get the current size of the queue
    size_t size() const {
        std::lock_guard<std::mutex> lock(mutex_);
        return size_;
    }

    // Check if the queue is empty
    bool empty() const {
        std::lock_guard<std::mutex> lock(mutex_);
        return size_ == 0;
    }

    // Check if the queue is full
    bool full() const {
        std::lock_guard<std::mutex> lock(mutex_);
        return size_ == capacity_;
    }

private:
    size_t capacity_;                // Maximum queue capacity
    size_t front_;                   // Index of the front element
    size_t rear_;                    // Index of the next available slot
    size_t size_;                    // Current number of elements in the queue
    std::vector<T> buffer_;          // Circular buffer to hold the elements
    mutable std::mutex mutex_;       // Mutex for thread safety
    std::condition_variable cond_var_; // Condition variable for synchronization
};

// Global queues and exit flag
constexpr int max_img_count = 4;
Queue<cv::Mat> _idleimgbuf(max_img_count);
Queue<cv::Mat> _imgdata(max_img_count);
atomic<bool> g_exit(false);

/**
 * Camera thread: Captures frames from the camera and stores them in the queue.
 */
void camera_thread(int cam_id, int width, int height) {
    /**
     * load image from camera
     */
    /**
     *   this is for AHD camera:
     */
    std::string capfmt = "v4l2src device=/dev/video"
                          + std::to_string(cam_id)
                          + " ! video/x-raw,format=NV12,width="
                          + std::to_string(width) + ",height="
                          + std::to_string(height)
                          + ",framerate=30/1 ! videoconvert ! video/x-raw,format=BGR ! appsink";


    /**
     * load hdmiin
     * RK3588: gst-launch-1.0 v4l2src device=/dev/video40 ! kmssink plane-id=54 -v
     */
    /** std::string capfmt = "v4l2src device=/dev/video"
                          + std::to_string(cam_id)
                          + " ! videoconvert ! video/x-raw,format=BGR ! appsink";
    */
#if 0
    /**
     * below is for USB camera.
     */
    string capfmt = "v4l2src device=/dev/video" + to_string(cam_id) + " ! image/jpeg,width=" + to_string(width) + ",height=" + to_string(height) + ",framerate=30/1 ! mppjpegdec ! videoconvert ! video/x-raw,format=BGR ! appsink";
#endif
    VideoCapture cap(capfmt, CAP_GSTREAMER);
    if (!cap.isOpened()) {
        cerr << "Failed to open camera!" << endl;
        return;
    }

    Mat first_frame;
    cap >> first_frame;

    // Pre-fill the idle buffer
    for (int i = 0; i < max_img_count; ++i) {
        _idleimgbuf.push(first_frame.clone());
    }

    // Main loop for capturing frames
    while (!g_exit) {
        Mat frame;
        if (!_idleimgbuf.pop(frame)) {
            cap.grab(); // skip this frame
            this_thread::sleep_for(chrono::milliseconds(10));
            continue;
        }

        cap >> frame;
        if (frame.empty()) {
            _idleimgbuf.push(frame);
        } else {
            _imgdata.push(frame);
        }
    }

    cap.release();
}

/**
 * Main function: Initializes the camera thread and displays captured frames.
 */
int main(int argc, char** argv) {
    if (argc != 2) {
        printf("Usage: %s <camera_id>\n", argv[0]);
        return -1;
    }

    int cam_id = stoi(argv[1]);
    thread camera_thread_instance(camera_thread, cam_id, 1920, 1080);

    string window_name = "Camera Demo Application";
    namedWindow(window_name);

    // Main loop for displaying frames
    while (true) {
        Mat frame;
        if (!_imgdata.pop(frame)) {
            this_thread::sleep_for(chrono::milliseconds(10));
            continue;
        }


        imshow(window_name, frame);
        _idleimgbuf.push(frame);

        if (waitKey(30) >= 0) {
            g_exit = true;
            break;
        }
#if 1
        //if (getWindowProperty(window_name, WND_PROP_VISIBLE) < 1) // If the window is closed, exit the loop
        if (getWindowProperty(window_name, WND_PROP_AUTOSIZE) < 0)
        {
			std::cout << "user close this window" << std::endl;
			g_exit = true;
            break;
        }
#endif
    }

    camera_thread_instance.join();

    cout << "Exiting program..." << endl;
    return 0;
}
1.6 编译
此代码依赖OpenCV, Neardi固件里已经包含OpenCV, 这里创建一个编译脚本build.sh, 内容如下:
# please below command to install gcc first, and then install opencv
# sudo apt install build-essential libopencv-dev
g++ main.cpp -o camera \
    `pkg-config --cflags --libs opencv4` \
    -std=c++17 \
    -pthread
更改build.sh为可执行属性即可, 如下:
neardi@LPA3588:~/neardi_cam_demo$ chmod +x build.sh
neardi@LPA3588:~/neardi_cam_demo$ ./build.sh
1.7 延时测试
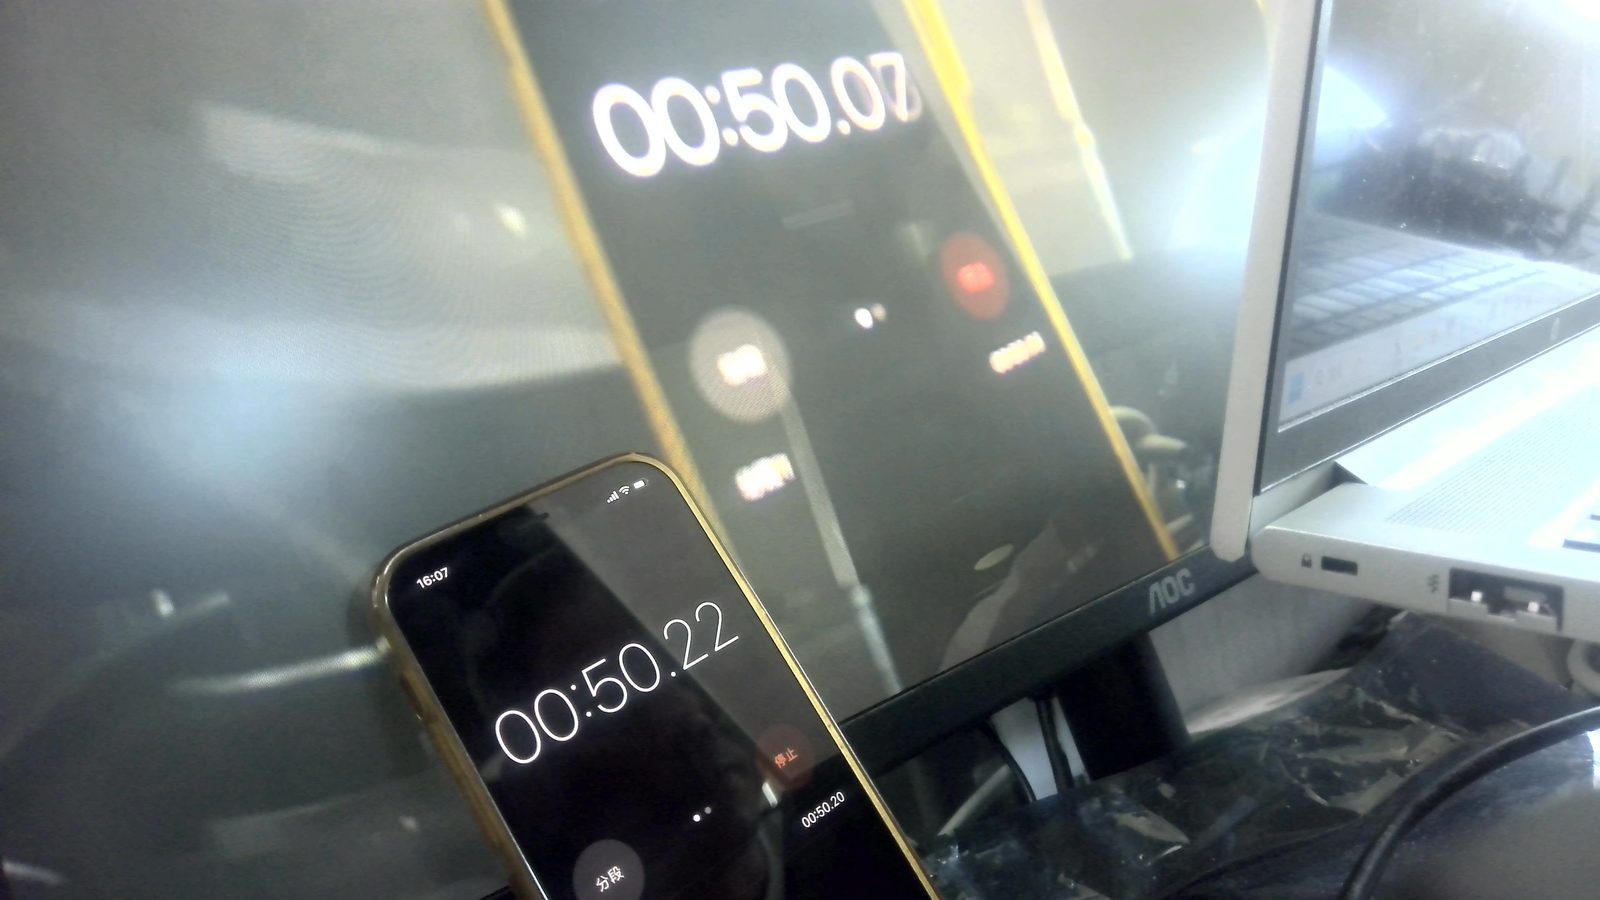
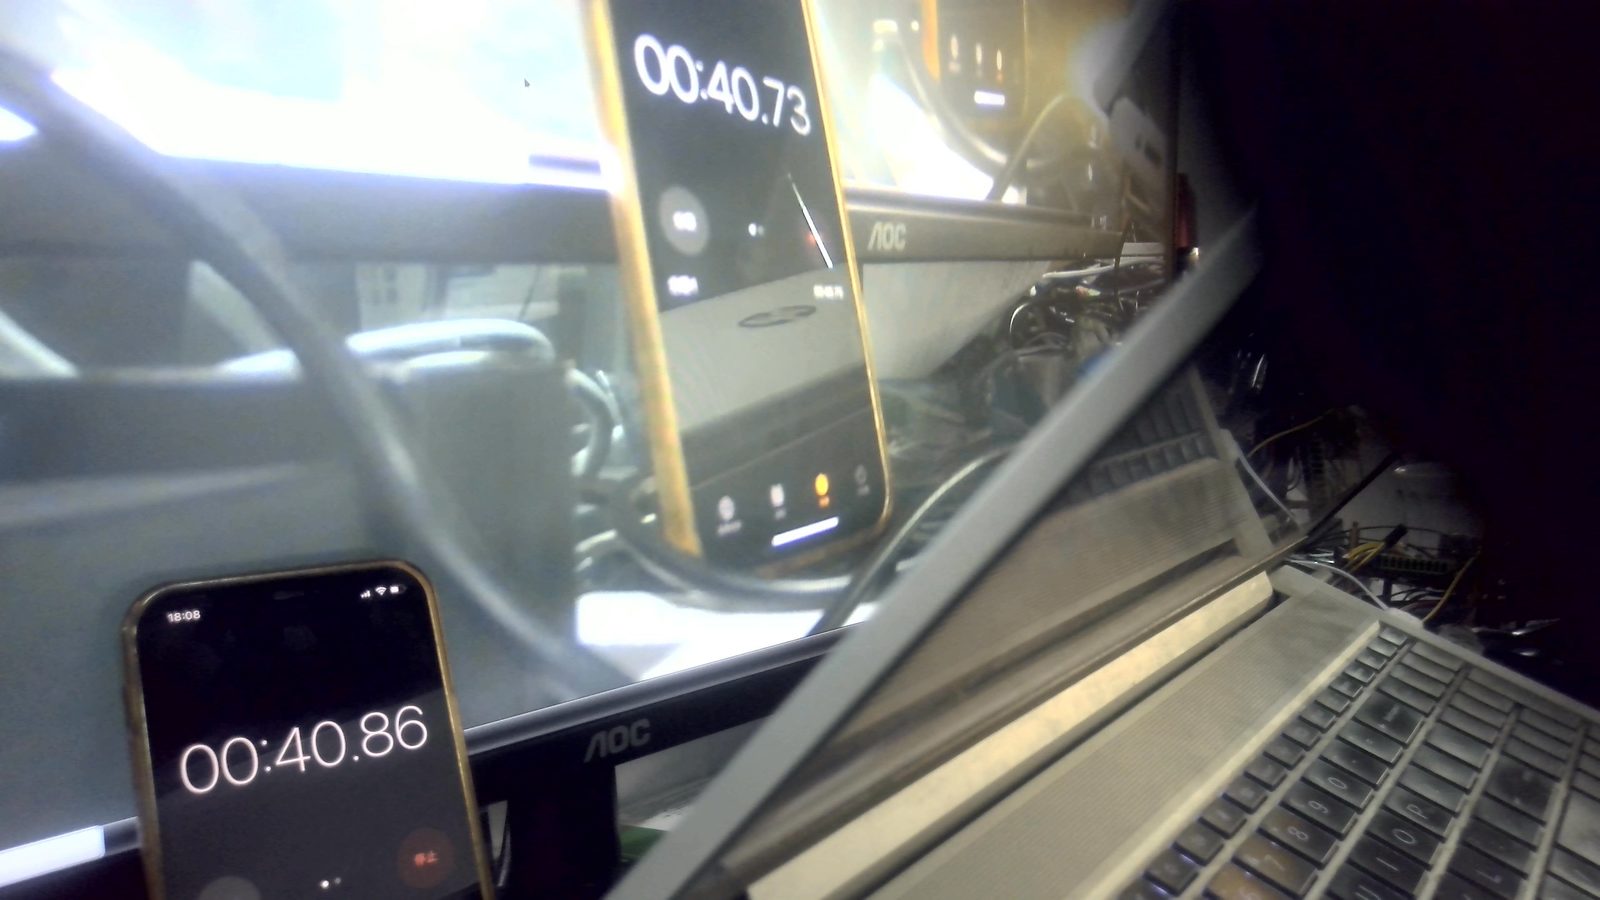
这里我们测试程序从打开摄像头获取视频流数据到显示在屏幕上的时间, 为此我们使用手机里的秒表来测试, 在摄像头镜头前启动秒表对比屏幕上面显示的秒表, 如下:
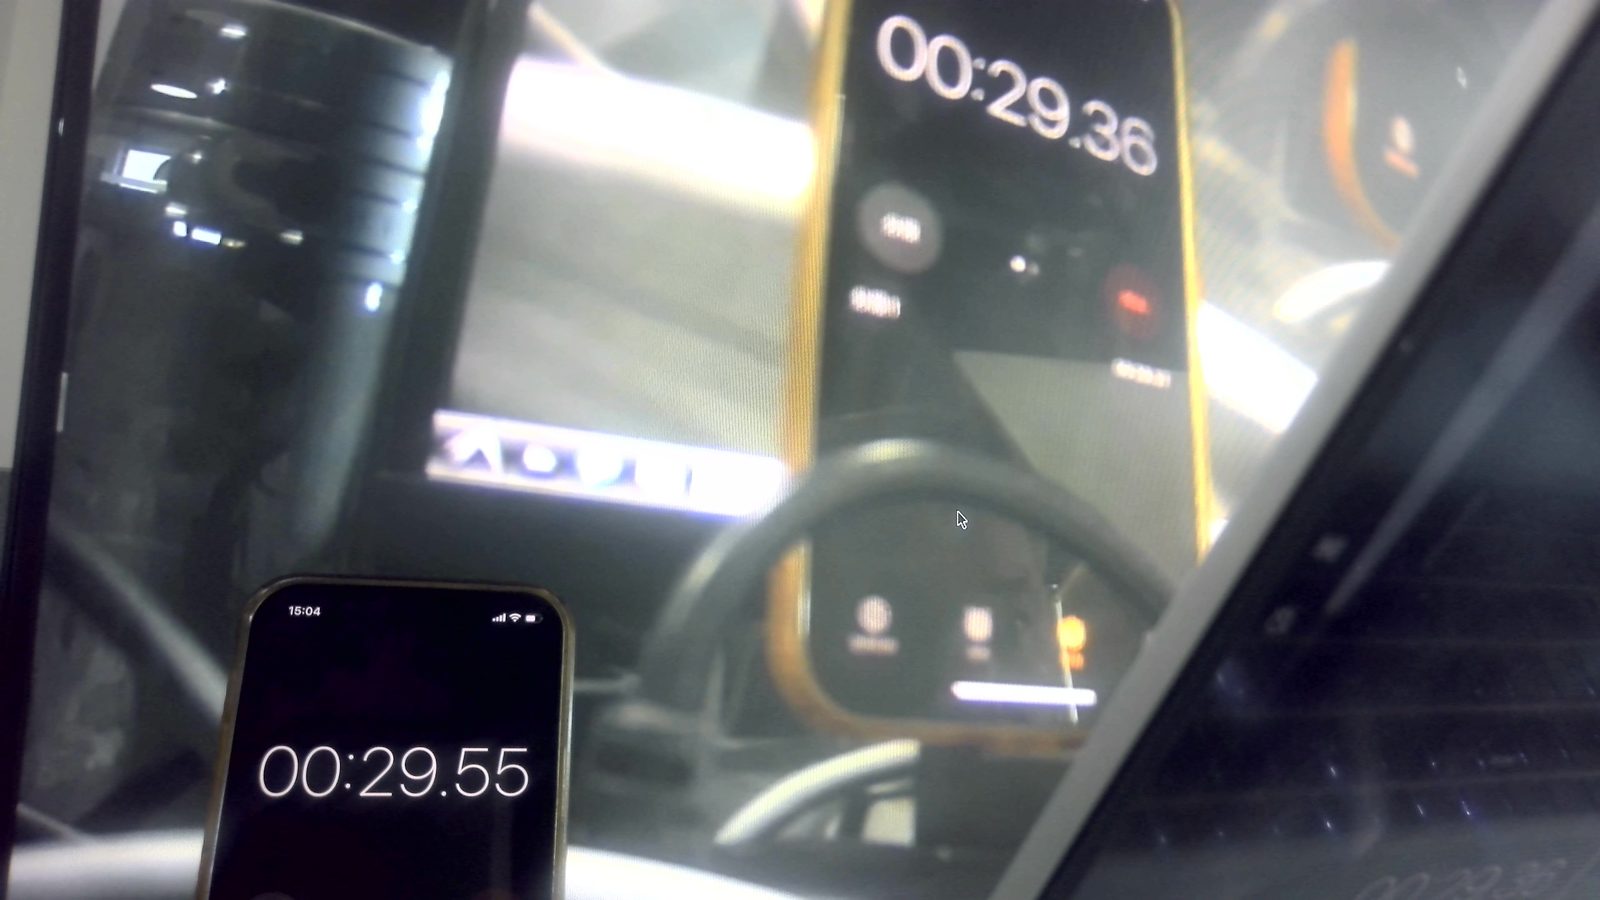 上面图片显示大概190毫秒, 也就是说打开摄像头190毫秒就显示了视频数据。
2. V4L2 + RGA
2.1 概述
V4L2(Video for Linux 2)是 Linux 系统中用于处理视频设备的标准接口框架。它提供了统一的 API,使得应用程序能够与各种视频设备(如摄像头、视频采集卡等)进行交互。V4L2 的设计目的是为了简化视频设备的管理和操作,提高设备驱动开发的效率。
2.2 Linux V4L2框架
Linux 视频设备涉及到很多方面, 驱动程序往往非常复杂,因为硬件本身的复杂性:大多数设备具有多个 IC,会在 /dev 中导出多个设备节点,并且还会创建非 V4L2 设备,如 DVB、ALSA、FB、I2C 和输入(红外)设备。
特别是 V4L2 驱动程序必须设置支持的 IC 来进行音视频的复用、编码和解码,这使得它比大多数驱动程序更为复杂。通常这些 IC 通过一个或多个 I2C 总线连接到主桥驱动程序,但也可以使用其他总线。这类设备被称为“子设备”。
因此,V4L2框架建立了所有驱动程序都需要的基本构建模块,这同样的框架应使得重构通用代码变得更为容易,能够将其转化为所有驱动程序共享的实用函数。
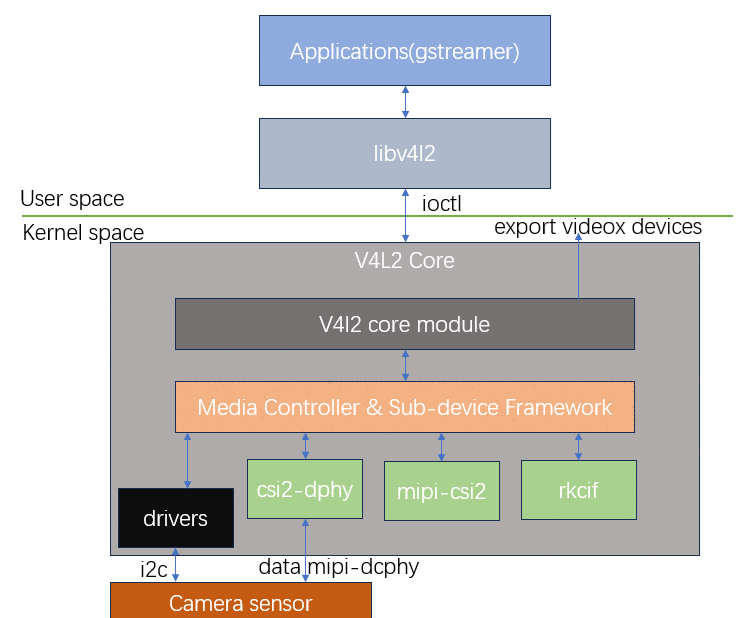
下面是Rockchip平台在Linux上面V4L2的框架:
2.3 APP如何调用V4l2
由上面的V4l2框图我们知道使用ioctl和kernel通信, 在kernel v4l2直接映射内存给userspace, 因此APP程序从映射好的内存里拷贝视频数据流。如下:

2.4 v4l2 c++代码
在读取v4l2视频数据之前, 需要做一些必要的初始化, 代码如下:
    bool init() {
        fd = ::open(dev.c_str(), O_RDWR | O_NONBLOCK);
        if (fd < 0) { perror("open dev"); return false; }

        v4l2_capability cap{};
        if (ioctl(fd, VIDIOC_QUERYCAP, &cap) < 0) { perror("VIDIOC_QUERYCAP"); close(fd); fd=-1; return false; }

        v4l2_format fmt{};
        fmt.type = V4L2_BUF_TYPE_VIDEO_CAPTURE_MPLANE;
        fmt.fmt.pix_mp.width = width;
        fmt.fmt.pix_mp.height = height;
        fmt.fmt.pix_mp.pixelformat = V4L2_PIX_FMT_NV12;
        fmt.fmt.pix_mp.field = V4L2_FIELD_NONE;
        fmt.fmt.pix_mp.num_planes = 2;
        if (ioctl(fd, VIDIOC_S_FMT, &fmt) < 0) { perror("VIDIOC_S_FMT"); close(fd); fd=-1; return false; }

        v4l2_requestbuffers req{};
        req.count = bufcount;
        req.type = V4L2_BUF_TYPE_VIDEO_CAPTURE_MPLANE;
        req.memory = V4L2_MEMORY_MMAP;
        if (ioctl(fd, VIDIOC_REQBUFS, &req) < 0) { perror("VIDIOC_REQBUFS"); close(fd); fd=-1; return false; }

        v4l2bufs.resize(req.count);
        for (unsigned i = 0; i < (unsigned)req.count; ++i) {
            v4l2_buffer buf{};
            v4l2_plane planes[2]{};
            buf.type = V4L2_BUF_TYPE_VIDEO_CAPTURE_MPLANE;
            buf.memory = V4L2_MEMORY_MMAP;
            buf.index = i;
            buf.length = 2;
            buf.m.planes = planes;
            if (ioctl(fd, VIDIOC_QUERYBUF, &buf) < 0) { perror("VIDIOC_QUERYBUF"); cleanup(); return false; }

            // Many drivers present NV12 as single continuous in plane[0] (Y + UV),
            // therefore mapping plane[0] length is enough.
            v4l2bufs[i].length = buf.m.planes[0].length;
            v4l2bufs[i].start = mmap(nullptr, buf.m.planes[0].length, PROT_READ | PROT_WRITE, MAP_SHARED, fd, buf.m.planes[0].m.mem_offset);
            if (v4l2bufs[i].start == MAP_FAILED) { perror("mmap"); cleanup(); return false; }

            // queue it
            if (ioctl(fd, VIDIOC_QBUF, &buf) < 0) { perror("VIDIOC_QBUF"); cleanup(); return false; }
        }

        // start stream
        v4l2_buf_type type = V4L2_BUF_TYPE_VIDEO_CAPTURE_MPLANE;
        if (ioctl(fd, VIDIOC_STREAMON, &type) < 0) { perror("STREAMON"); cleanup(); return false; }

        return true;
    }
2.5 RGA 转换NV12数据
由于V4l2读取到的数据格式是NV12, OpenCV无法直接显示, 这里使用RGA把NV12转换成BGR格式以便显示在屏幕上面。 需要注意的是RGA对内存要求需要连续而且在DDR 4G范围内, 这里使用DMA内存, 如下:
int rga_nv12_fd_to_bgr_fd(int src_fd, int src_size, int dst_fd, int dst_size, int width, int height) {
    // 计算对齐后的 wstride(水平 stride)
    int wstride = (width + 15) & ~15;  // 对齐到 16 像素

    rga_buffer_handle_t src_handle = importbuffer_fd(src_fd, src_size);
    rga_buffer_handle_t dst_handle = importbuffer_fd(dst_fd, dst_size);
    if (!src_handle || !dst_handle) {
        if (src_handle) releasebuffer_handle(src_handle);
        if (dst_handle) releasebuffer_handle(dst_handle);
        cerr << "importbuffer_fd failed\n";
        return -1;
    }

    // 使用 wrapbuffer_handle 初始化基本字段(width, height, fd, handle 等)
    rga_buffer_t src = wrapbuffer_handle(src_handle, width, height, RK_FORMAT_YCbCr_420_SP);
    rga_buffer_t dst = wrapbuffer_handle(dst_handle, width, height, RK_FORMAT_BGR_888);

    src.wstride = wstride;        // 水平行跨距(Y 和 UV 平面都用这个)
    src.hstride = height;         // 垂直 stride,通常等于 height(除非特殊对齐要求)

    dst.wstride = wstride;
    dst.hstride = height;

    // 设置色彩空间
    imsetColorSpace(&src, IM_YUV_BT709_LIMIT_RANGE);
    imsetColorSpace(&dst, IM_RGB_FULL);

    // 检查参数
    int ret = imcheck(src, dst, {}, {});
    if (IM_STATUS_NOERROR != ret) {
        cerr << "imcheck error: " << imStrError((IM_STATUS)ret) << endl;
        releasebuffer_handle(src_handle);
        releasebuffer_handle(dst_handle);
        return -1;
    }

    // 执行颜色转换
    ret = imcvtcolor(src, dst, RK_FORMAT_YCbCr_420_SP, RK_FORMAT_BGR_888);
    if (ret != IM_STATUS_SUCCESS) {
        cerr << "imcvtcolor failed: " << imStrError((IM_STATUS)ret) << endl;
        releasebuffer_handle(src_handle);
        releasebuffer_handle(dst_handle);
        return -1;
    }

    // 释放 handle(DMA-BUF 引用不受影响)
    releasebuffer_handle(src_handle);
    releasebuffer_handle(dst_handle);
    return 0;
}
2.6 编译
如下编译脚本:
g++ -std=c++17 main.cpp dma_alloc.cpp -o camera `pkg-config --cflags --libs opencv4` -lrga
2.7 RGA负载
这里使用RGA把NV12转换成BGR格式, 当前使用一个摄像头的情况下, RGA的负载很低, 如下:
root@LPA3588:/sys/kernel/debug/rkrga# cat load
num of scheduler = 3
================= load ==================
scheduler[0]: rga3
         load = 2%
-----------------------------------
scheduler[1]: rga3
         load = 0%
-----------------------------------
scheduler[2]: rga2
         load = 0%
-----------------------------------
=========================================
<session>  <status>  <tgid>  <process>
26         active    5928    ./camera 12 1920 1080
root@LPA3588:/sys/kernel/debug/rkrga# cat load
num of scheduler = 3
================= load ==================
scheduler[0]: rga3
         load = 2%
-----------------------------------
scheduler[1]: rga3
         load = 0%
-----------------------------------
scheduler[2]: rga2
         load = 0%
-----------------------------------
=========================================
<session>  <status>  <tgid>  <process>
26         active    5928    ./camera 12 1920 1080
2.7 延时测试
引入RGA转换, 延时变小了, 大概130毫秒的样子, 如下:
2.8 总结
针对AHD/mipi摄像头, 可以直接使用v4l2获取视频流, 有些需要把NV12数据推向RTSP时可以使用此方法; 而且使用RGA转换比gstreamer里的videoconvert插件效率更高。
3 DRM
3.1 概述
DRM(Direct Rendering Manager)是 Linux 内核中用于管理图形硬件(尤其是 GPU 和显示控制器)的核心子系统。它最初是为了支持 OpenGL 的直接渲染而设计,但现在已经演变为支持现代图形栈(如 Wayland、X11、KMS、GEM、DMA-BUF 等)的基础。
DRM 的主要功能包括:
- 显示模式设置(KMS:Kernel Mode Setting)
- 帧缓冲管理(GEM:Graphics Execution Manager)
- 内存共享与零拷贝(DMA-BUF)
- 多平面合成(Plane Composition)
- 热插拔检测(Hotplug)
- 多显示器支持(Multi-head)
- 电源管理与上下电控制
3.2 DRM 框架
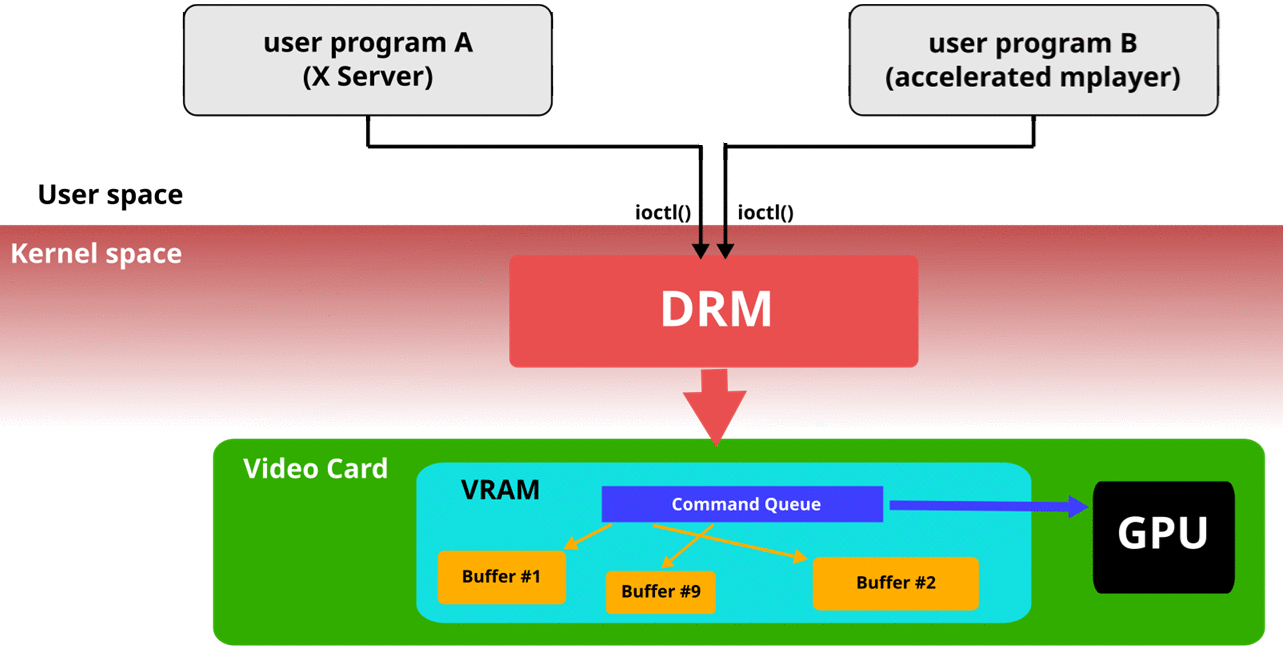
Linux 内核原本已经有一个名为 fbdev 的 API,用于管理图形适配器的帧缓冲区,但它无法满足现代基于 GPU 的 3D 加速显卡的复杂需求。这类设备通常需要在显卡自身的内存中设置和管理一个命令队列,以便向 GPU 发送指令,同时还需管理该内存中的缓冲区以及空闲空间。最初,这些资源由用户空间程序(例如 X 服务器)直接管理,但这些程序通常假定自己是唯一访问这些硬件资源的主体。当两个或多个程序同时尝试控制同一硬件,并各自以不同的方式配置资源时,大多数情况下会导致系统崩溃或严重错误。
DRM(Direct Rendering Manager)的创建旨在允许多个程序协同使用视频硬件资源。DRM 拥有对 GPU 的独占访问权限,负责初始化并维护命令队列、显存以及其他各类硬件资源。当应用程序需要使用 GPU 时,它们向 DRM 发送请求,而 DRM 充当资源仲裁者,协调各程序之间的访问,有效避免潜在的资源冲突,确保硬件被安全、高效地共享和使用。
3.3 DRM 系统组成
DRM 子系统由以下核心组件构成:
| 组件 | 说明 |
|---|---|
| KMS (Kernel Mode Setting) | 负责设置分辨率、刷新率、颜色格式等显示模式 |
| GEM (Graphics Execution Manager) | 管理 GPU 内存对象的分配与共享 |
| DMA-BUF | 实现跨设备的内存共享(如 GPU → VPU → Display) |
| Atomic Mode Setting | 支持原子化配置多个显示参数(避免闪烁) |
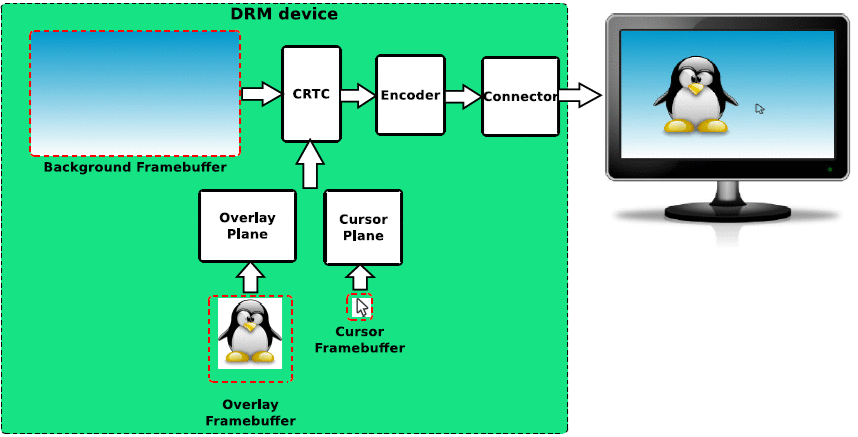
| CRTC (Cathode Ray Tube Controller) | 抽象的扫描控制器,负责时序生成 |
| Encoder | 将 CRTC 输出编码为特定接口信号(如 HDMI、DP) |
| Connector | 物理连接器(如 HDMI、eDP、MIPI DSI) |
| Plane | 图层(如 Primary、Cursor、Overlay),支持图层合成 |
各组件之间的关系如下:
3.4 DRM APP
DRM APP相对复杂一些, 需要调用到libdrm, 代码结构如下:
├── build.sh
├── display
│   ├── display.c
│   ├── drmDsp.c
│   ├── rga_control.c
│   ├── rkdrm_display.c
│   └── rkRgaApi.cpp
├── drmDsp
│   ├── bo.c
│   ├── dev.c
│   └── modeset.c
├── drm_func.c
├── include
│   ├── bo.h
│   ├── dev.h
│   ├── display.h
│   ├── drmDsp.h
│   ├── drm_func.h
│   ├── modeset.h
│   ├── rga_control.h
│   ├── rga.h
│   ├── RkAvm.h
│   ├── rkdrm_display.h
│   └── rkRgaApi.h
├── main.cpp
└── README.md
3.5 编译
编译脚本如下:
# please below command to install gcc first, and then install opencv
# sudo apt install build-essential libopencv-dev
aarch64-linux-gnu-g++ -std=c++11 -O3  -o camera main.cpp drm_func.c ./display/drmDsp.c ./drmDsp/modeset.c ./drmDsp/dev.c ./drmDsp/bo.c ./display/rkRgaApi.cpp -lpthread -lopencv_core -lopencv_videoio -lopencv_imgcodecs -lopencv_highgui -lopencv_imgproc  -ldrm -lrga -lmali -I/usr/include/libdrm -I/usr/include/rga -I./include -I/usr/include/opencv4  -L/usr/lib/aarch64-linux-gnu -L/usr/local/lib/aarch64-linux-gnu/gstreamer-1.0 -DISPDEMO_ENABLE_RGA=1
3.5 运行及测试
编译生成可执行文件, 如下:
neardi@LPA3588:~/src/camera-drm$ ./build.sh
neardi@LPA3588:~/src/camera-drm$ ls
build.sh  camera  display  drmDsp  drm_func.c  include  main.cpp  README.md
运行结果如下:
neardi@LPA3588:~/src/camera-drm$ ./camera 12
rga_api version 1.10.1_[4]
create_sp_dev: get num srtcs is 2
initDrmDsp:cur crtcs is 0
drm init success
Using mplane plugin for capture
[ WARN:0] global ./modules/videoio/src/cap_gstreamer.cpp (1100) open OpenCV | GStreamer warning: Cannot query video position: status=0, value=-1, duration=-1
drmDspFrameBuf:bo widthxheight:1920x1088