图像数据处理
TCIM支持调整图像大小、裁剪、以及填充等操作。
TCIM 根据不同使用场景提供“固定输入尺寸”处理方式。除在 TCIM 中配置图像预处理参数外,用户也可在量化阶段通过HMQuantool工具设置图像预处理参数,用于量化过程及后续推理复用。
上述方式均在模型推理前完成图像预处理,但配置方式、灵活性与适用场景存在差异,如下表所示:
| 表 4.2 图像数据处理方式对比 方式 | 应用场景 | 操作 | 处理时机 | 对比 |
|---|---|---|---|---|
| 量化时图像预处理 | 原始输入图像尺寸固定,且模型输入尺寸固定的场景。 | 设置 ResizerScheme 中的图像处理参数。 | 根据图像处理参数设置,在量化生成的模型文件中添加相关算子,推理时自动处理。 | 若想获得更好的性能,可结合使用 TCIM固定输入尺寸方式。 |
| TCIM固定输入尺寸方式 | 原始输入图像尺寸固定的场景,如单路视频流中,每帧图像的尺寸相同。 | 通过模型编译参数配置,模型推理时输入原始图像数据,TCIM自动完成图像预处理,如图 。 | 推理前手动设置,推理时自动处理。 | 由于处理后的图像数据存储在推理内存中,可直接用于模型推理,减少了内存拷贝带来的开销,因此性能表现优于 TCIM可变输入尺寸方式。 |
4.1.7.1. 量化时图像预处理
该方式下,主要操作步骤如下:
- 使用HMQuantool量化工具设置图像预处理参数。示例如下:
resizer_config = ResizerScheme(
    size=(512,512),
    align_corners=False,
    fmt="rgb",
    int_trans=True,
    crop_size=(0, 0),
    crop_offset=(0, 0),
    pad_size=(0, 0, 0, 0),
    pad_value=0,
    mean=[0.0,0.0,0.0],
    std=[1.0/255,1.0/255,1.0/255],
    dynamic_crop=False,
    model_inp_fmt="rgb",
).to_dict()

calib_dataset = [
    torch.randint(low=0, high=255, size=input_shape, dtype=torch.uint8),
]
更多参数说明可参看 《HMQuantool量化工具用户手册》。
- 设置模型输入和输出。示例如下:
onnx_model = onnx.load(onnx_model_path)
input_names = [_input.name for _input in onnx_model.graph.input]
output_names = [_output.name for _output in onnx_model.graph.output]

dims = onnx_model.graph.input[0].type.tensor_type.shape.dim
input_shape = [dim.dim_value for dim in dims]
- 完成模型量化阶段图像预处理。示例如下:
quant_scheme = QuantScheme(
    target_device=DeviceType.XH2a,
    quant_type=w8a8h1_sefp,
    inupt_ppc_config=[
        resizer_config
    ]
)
quant_config = create_quant_config(quant_scheme)
quant_config = ConfigDict(quant_config)
convert_onnx_to_hmonnx(
    onnx_model,
    calib_dataset,
    device_type=DeviceType.XH2a,
    out_hmonnx_file="hm.onnx",
    quant_config=quant_config,
    input_names=input_names,
    output_names=output_names,
)
- 使用 TCIM 提供的
tcim.builder.api.build_from_hmonnxPython接口编译模型。需根据实际batch数设置batch参数值。
tcim.build_from_hmonnx(
        model,
        output_name="dynmaic_multi_roi",
        output_dir="./output_dyn1v4",
        work_dir="./output_dyn1v4/tcim",
        target="xh2",
        ncore=1,
        batch=n,
        opt_level="02",
        enable_profile=False
 )
详情参看 《TCIM开发者手册》。
- 模型推理。
4.1.7.2. 固定输入尺寸
该方式下,用户可在模型编译时设置是否启用动态图像处理,编译生成的二进制模型文件中将包含用于图像处理的相关输入。在模型推理前,用户可通过该模型输入传递图像预处理配置,TCIM会在推理时完成图像预处理。
固定输入尺寸动态裁剪方式下,输入图像尺寸相同,推理前设置图像处理配置后,图像预处理作为模型推理的一部分,在执行推理时自动完成,如下图所示:
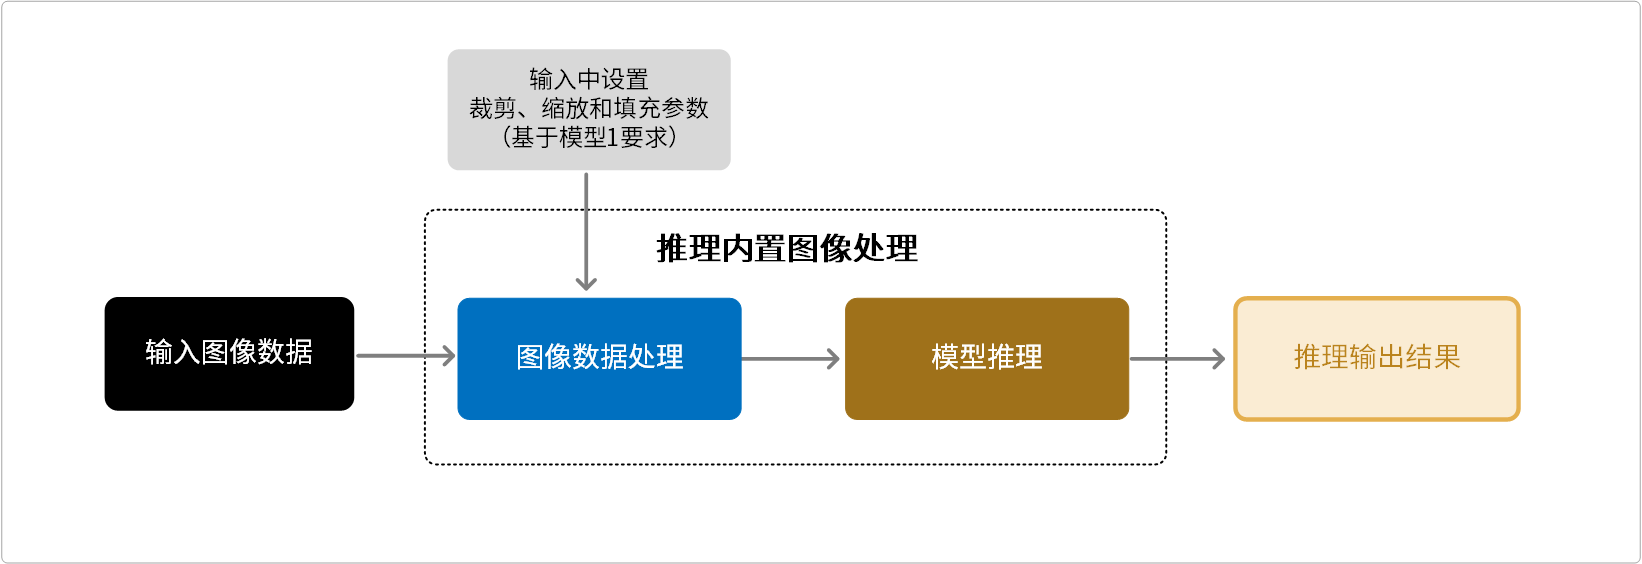
图 4.6 固定输入尺寸开发处理流程
4.1.7.2.1. 图像处理流程和限制
图像处理过程为:先对原始图像做裁剪、再在裁剪后的图像上做缩放,最后做图像填充,如下图所示:
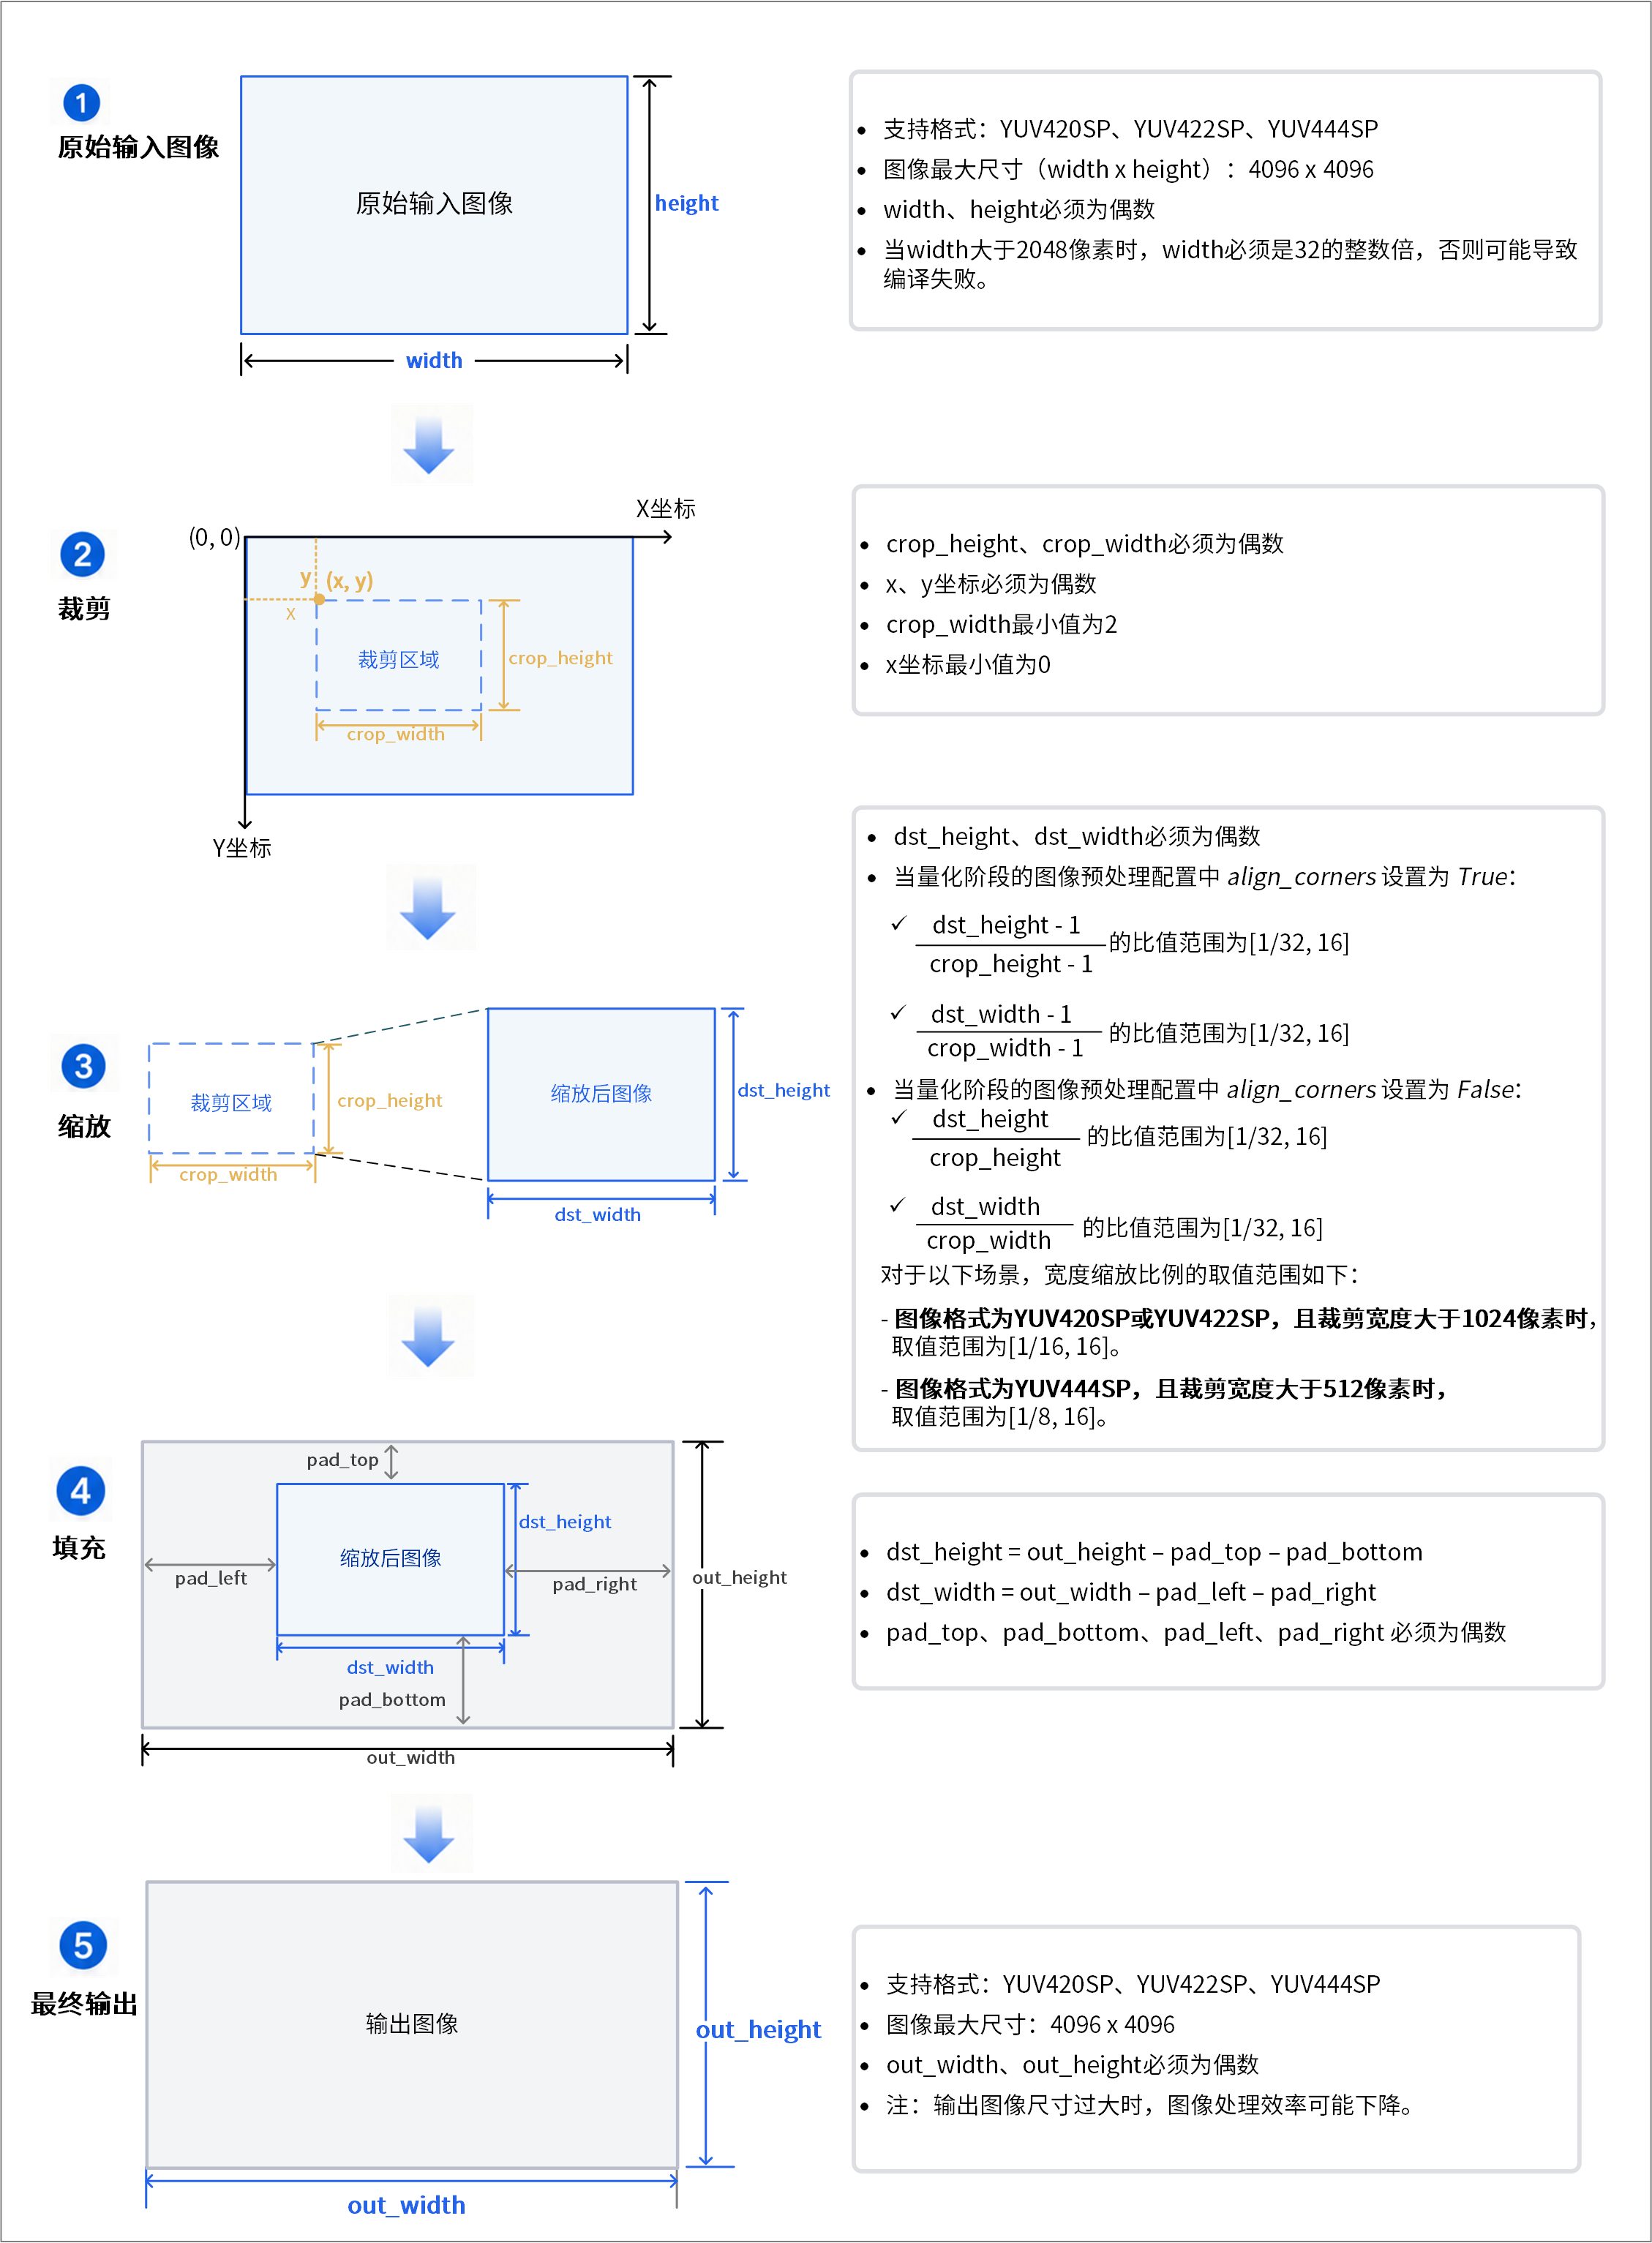
图 4.7 图像数据处理流程和限制
使用限制如下,用户需调整图像处理的参数值(单位为像素),以满足要求:
输入图像
输入图像限制如下:
-
图像的高度和宽度必须是偶数。
-
支持格式:YUV420SP、YUV422SP、YUV444SP。
-
图像最大尺寸(width x height):4096 x 4096
-
当宽度大于2048像素时,宽度必须是32的整数倍,否则可能导致编译失败。
输出图像
输出图像限制如下:
-
图像的高度和宽度必须是偶数。
-
支持格式:YUV420SP、YUV422SP、YUV444SP。
-
图像最大尺寸(width x height):4096 x 4096
注:输出图像尺寸过大时,图像处理效率可能下降。
裁剪
裁剪限制如下:
-
裁剪X和Y坐标必须是偶数。
-
裁剪的宽度和高度必须是偶数。
-
裁剪的宽度最小值为2。
-
裁剪的X坐标最小值为0。
缩放
缩放限制如下:
-
缩放倍数要求:
-
当量化阶段的图像预处理配置中
align_corners设置为True:- 高度:
-
(缩放后图像高度 - 1) / (缩放前图像高度 - 1) 的取值范围为[1/32,16]
其中缩放前图像高度指裁剪后的图像高度。
* **宽度:**
(缩放后图像宽度 - 1) / (缩放前图像宽度 - 1) 的取值范围为[1/32, 16]
其中缩放前图像宽度指裁剪后的图像宽度。
* 当量化阶段的图像预处理配置中 `align_corners` 设置为 `False`:

  * **高度:**
缩放后图像高度 / 缩放前图像高度 的取值范围为[1/32,16]
其中缩放前图像高度指裁剪后的图像高度。
* **宽度:**
缩放后图像宽度 / 缩放前图像宽度 的取值范围为[1/32,16]
其中缩放前图像宽度指裁剪后的图像宽度。
* 对于以下场景,宽度缩放比例的取值范围如下:

  * 图像格式为YUV420SP或YUV422SP,且裁剪宽度大于1024像素时,取值范围为[1/16, 16]。

  * 图像格式为YUV444SP,且裁剪宽度大于512像素时,取值范围为[1/8, 16]。
-
缩放后图像的高度和宽度必须是偶数。
-
缩放后图像的高度和宽度需满足下面要求:
-
高度:
dst_height = out_height - pad_top - pad_bottom -
宽度:
dst_width = out_width - pad_left - pad_right
-
其中:
* `dst_height` 和 `dst_width` 分别表示缩放后图像的高度和宽度。

* `out_height` 和 `out_width` 分别表示填充后输出图像的高度和宽度。

* `pad_top`、`pad_bottom`、`pad_left` 和 `pad_right` 分别表示图像上、下、左、右方向的填充值。
填充
填充限制如下:
-
图像图像顶部的垂直填充(
pad_top)、图像底部的垂直填充(pad_bottom)、图像左侧的水平填充(pad_left)、图像右侧的水平填充(pad_right)的值必须是偶数。 -
水平方向左侧填充参数(
pad_left)必须小于32。
4.1.7.2.2. 参数说明
输入tensor形状维度说明如下,参数单位均为像素:
-
cropY: 裁剪区域左上角的垂直坐标。 -
cropX: 裁剪区域左上角的水平坐标。 -
crop_height: 裁剪区域的高度。 -
crop_width: 裁剪区域的宽度。 -
resize_height: 调整图像大小输出的目标高度。 -
resize_width: 调整图像大小输出的目标宽度。 -
pad_top: 图像顶部的垂直填充。 -
pad_left: 图像左侧的水平填充。 -
pad_bottom: 图像底部的垂直填充。 -
pad_right: 图像右侧的水平填充。
4.1.7.2.3. 单图单区域动态裁剪
该场景适用于对一张输入图像裁剪出一个 ROI区域。图像处理尺寸设置需在模型编译完成后至推理开始前完成。步骤如下:
使用该方法动态处理图像的主要流程如下:
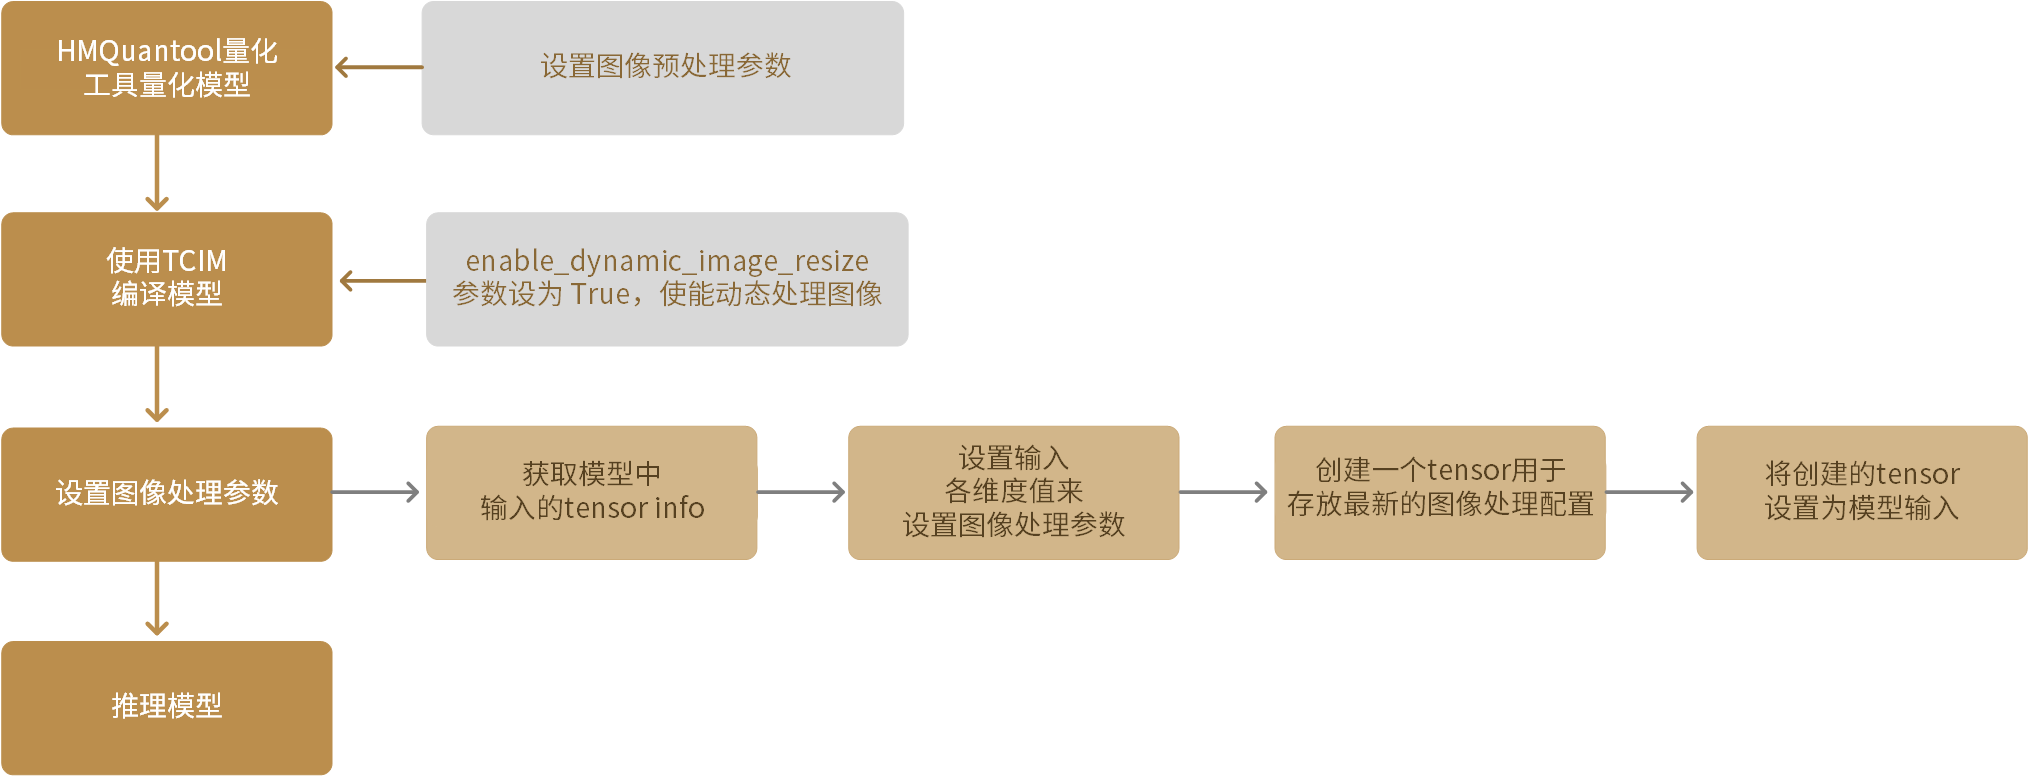
图 4.8 固定输入尺寸主要开发流程
- 使用HMQuantool量化工具量化模型。量化前,需设置图像预处理参数
dynamic_crop为True使能图像动态裁剪功能:
resizer_config = ResizerScheme(
    size=(224, 224),
    mode="nearest",
    align_corners=False,
    fmt="yuv420",
    int_trans=True,
    crop_size=(0, 0),
    crop_offset=(0, 0),
    pad_size=(0, 0, 0, 0),
    pad_value=0,
    mean=[0.485, 0.456, 0.406],
    std=[0.229, 0.224, 0.225],
    dynamic_crop=True,
    model_inp_fmt="rgb",
).to_dict()

dims = onnx_model.graph.input[0].type.tensor_type.shape.dim
input_shape = [dim.dim_value for dim in dims]
params = [[0, 0, dst_h, dst_w, dst_h, dst_w, 0, 0, 0, 0]]
crop_input = torch.tensor(params)
calib_dataset = [
    torch.randint(low=0, high=255, size=input_shape, dtype=torch.uint8),
    crop_input,
]
params 参数表示动态裁剪输入,表示为 [cropY, cropX, crop_height, crop_width, resize_height, resize_width, pad_top, pad_left, pad_bottom, pad_right]
更多参数说明可参看 《HMQuantool量化工具用户手册》。
- 加载要量化的ONNX模型,并设置模型输入和输出。示例如下:
注意
用户需在模型输入名称列表 input_names 末尾使用 append() 添加一个自定义名称,该名称用于标识预处理输入tensor,以便在后续推理前方便定位该tensor,并对其进行动态图像处理。
onnx_model = onnx.load(onnx_model_path)
input_names = [_input.name for _input in onnx_model.graph.input]
output_names = [_output.name for _output in onnx_model.graph.output]
input_names.append("dyn_info")
示例中,输入名称列表末尾添加 dyn_info 名称。
- 完成模型量化阶段图像预处理。示例如下:
quant_scheme = QuantScheme(
    target_device=DeviceType.XH2a,
    quant_type=w8a8h1_sefp,
    inupt_ppc_config=[
        resizer_config
    ]
)
quant_config = create_quant_config(quant_scheme)
quant_config = ConfigDict(quant_config)
convert_onnx_to_hmonnx(
    onnx_path,
    calib_dataset,
    device_type=DeviceType.XH2a,
    out_hmonnx_file="hm.onnx",
    quant_config=quant_config,
    input_names=input_names,
    output_names=output_names,
)
- 使用 TCIM 提供的
tcim.builder.api.build_from_hmonnxPython接口编译模型。需设置one_img_multi_roi参数为True,并将batch参数设置为1。
tcim.build_from_hmonnx(
        model,
        output_name="dynmaic_multi_roi",
        output_dir="./",
        work_dir="./work_space",
        target="xh2",
        ncore=1,
        batch=1,
        opt_level="02",
        enable_profile=False,
        one_img_multi_roi=True
 )
详情参看 《TCIM开发者手册》。
- 设置图像处理参数。编译后模型中会包含一个输入tensor,用于表示图像的所有处理配置。上面示例中,该输入tensor名为上面设置的
dyn_info,其形状为 [1, 10]:
[cropY, cropX, crop_height, crop_width, resize_height, resize_width, pad_top, pad_left, pad_bottom, pad_right]
通过设置该输入的每个维度的值来设置 图像处理参数,参数限制参看 图像处理流程和限制。Python示例如下:
注意
dyn_info 中设置的裁剪、缩放和填充参数将覆盖第一步中 ResizerScheme 的相应的配置,但 ResizerScheme 中其他图像处理配置,如 align_corners 等仍在图像预处理中生效。
# Get the information of dyn_info tensor
dyn_info_name = "dyn_info"
dyn_info_tensor_info = model.get_input_info(dyn_info_name)
# Set the configurations for image crop, resize, and padding
dyn_info_data = np.array([0, 0, crop_height, crop_width, resize_height, 0, 0, 0, 0, 0], dtype=np.int32)
# Set the dyn_info tensor as model input
dyn_info_input_tensor = tcim_lite.runtime.Tensor(dyn_info_tensor_info, dyn_info_data)
model.set_input(dyn_info_name, dyn_info_input_tensor)
- 模型推理。
4.1.7.2.4. 单图多区域动态裁剪
该场景针对单张输入图像,裁剪出多个 ROI区域。
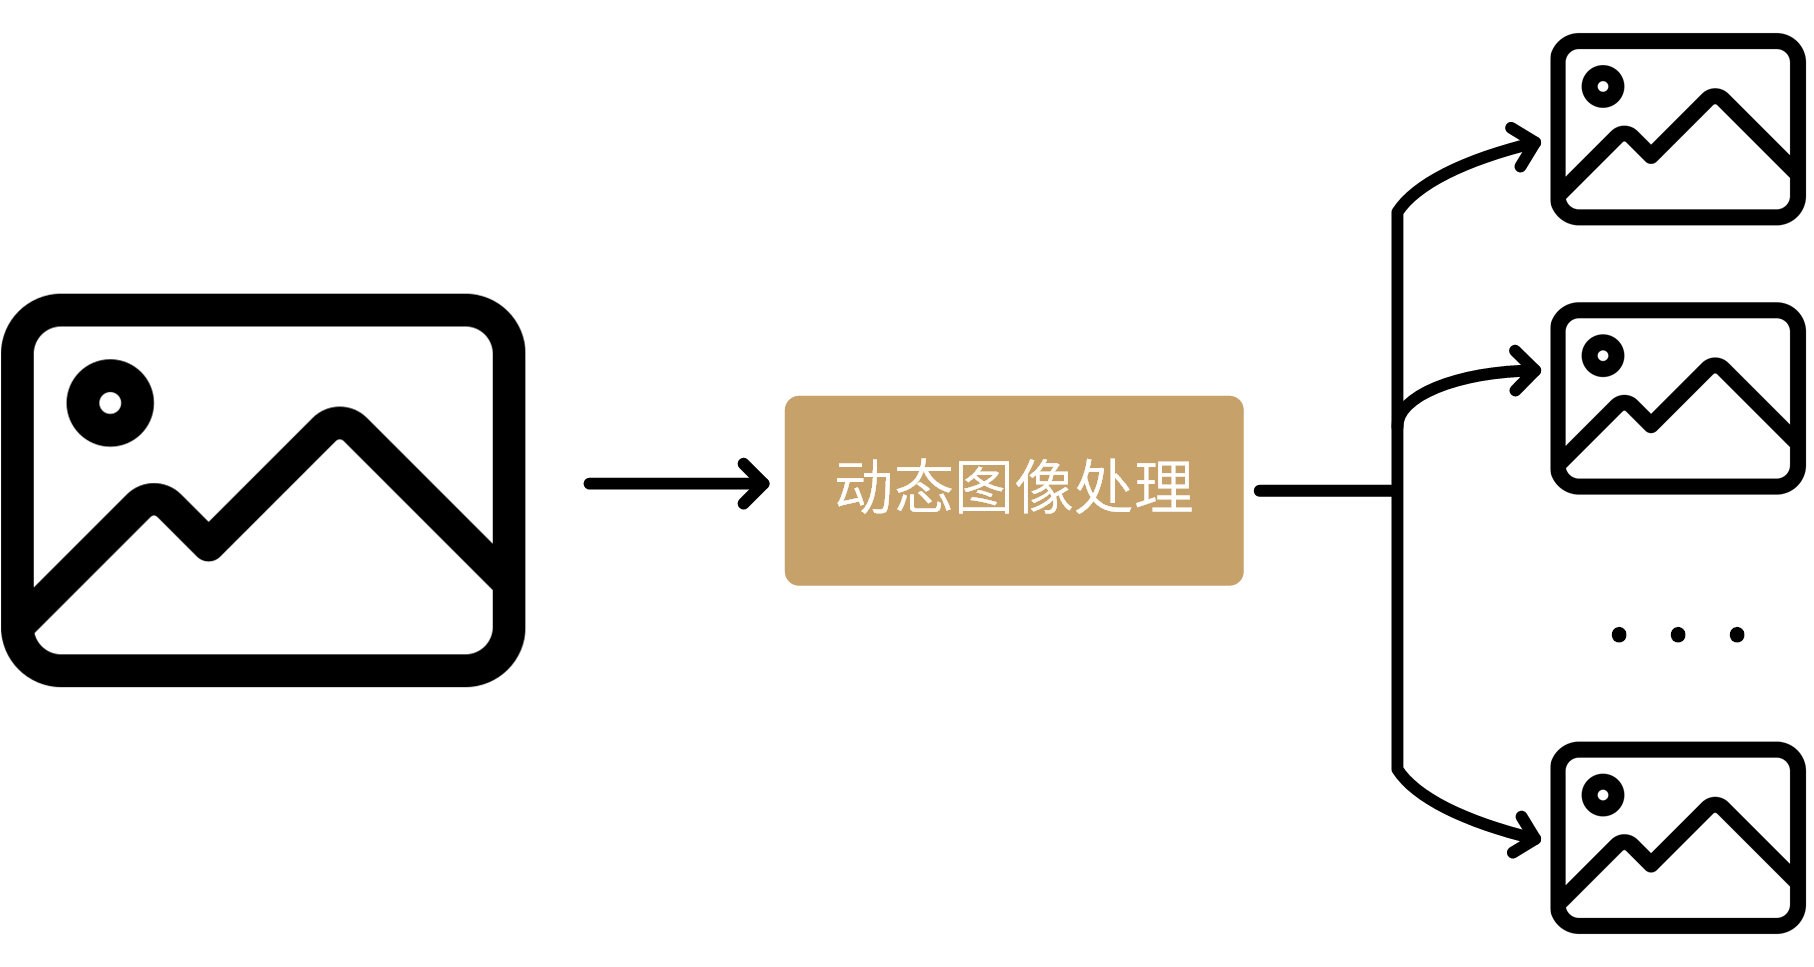
图 4.9 单图多区域动态裁剪
量化阶段仅支持为所有图像设置相同的图像处理参数,模型编译完成后至推理开始前,可为图像单独设置每个ROI处理参数。
主要步骤如下:
- 使用HMQuantool量化工具量化模型。量化前,需设置图像预处理参数
dynamic_crop为True使能图像动态裁剪功能:
resizer_config = ResizerScheme(
    size=(224, 224),
    mode="nearest",
    align_corners=False,
    fmt="yuv420",
    int_trans=True,
    crop_size=(0, 0),
    crop_offset=(0, 0),
    pad_size=(0, 0, 0, 0),
    pad_value=0,
    mean=[0.485, 0.456, 0.406],
    std=[0.229, 0.224, 0.225],
    dynamic_crop=True,
    model_inp_fmt="rgb",
).to_dict()

dims = onnx_model.graph.input[0].type.tensor_type.shape.dim
input_shape = [dim.dim_value for dim in dims]
params = [[0, 0, dst_h, dst_w, dst_h, dst_w, 0, 0, 0, 0]]
crop_input = torch.tensor(params)
calib_dataset = [
    torch.randint(low=0, high=255, size=input_shape, dtype=torch.uint8),
    crop_input,
]
params 参数表示动态裁剪输入,表示为 [cropY, cropX, crop_height, crop_width, resize_height, resize_width, pad_top, pad_left, pad_bottom, pad_right]
更多参数说明可参看 《HMQuantool量化工具用户手册》。
- 加载要量化的ONNX模型,并设置模型输入和输出。示例如下:
注意
用户需在模型输入名称列表 input_names 末尾使用 append() 添加一个自定义名称,该名称用于标识预处理输入tensor,以便在后续推理前方便定位这些 tensor,并对其进行动态图像处理。
onnx_model = onnx.load(onnx_model_path)
input_names = [_input.name for _input in onnx_model.graph.input]
output_names = [_output.name for _output in onnx_model.graph.output]
input_names.append("dyn_info")
示例中,输入名称列表末尾添加 dyn_info 名称。
- 完成模型量化阶段图像预处理。示例如下:
quant_scheme = QuantScheme(
    target_device=DeviceType.XH2a,
    quant_type=w8a8h1_sefp,
    inupt_ppc_config=[
        resizer_config
    ]
)
quant_config = create_quant_config(quant_scheme)
quant_config = ConfigDict(quant_config)
convert_onnx_to_hmonnx(
    onnx_path,
    calib_dataset,
    device_type=DeviceType.XH2a,
    out_hmonnx_file="hm.onnx",
    quant_config=quant_config,
    input_names=input_names,
    output_names=output_names,
)
- 使用 TCIM 提供的
tcim.builder.api.build_from_hmonnxPython接口编译模型。需设置one_img_multi_roi参数为True,并将batch参数设置为所需的 ROI 数量。
下面示例设置ROI的数量为 n,用户应根据实际需求进行替换:
tcim.build_from_hmonnx(
        model,
        output_name="dynmaic_multi_roi",
        output_dir="./",
        work_dir="./work_space",
        target="xh2",
        ncore=1,
        batch=n,
        opt_level="02",
        enable_profile=False,
        one_img_multi_roi=True
 )
详情参看 《TCIM开发者手册》。
- 设置图像处理参数。编译后模型中会包含一个输入tensor,用于表示图像的所有处理配置。上面示例中,该输入tensor名为上面设置的
dyn_info,其形状为 [1, 10],表示共 n 组图像处理配置,与上一步设置的 batch 值相同。
[cropY, cropX, crop_height, crop_width, resize_height, resize_width, pad_top, pad_left, pad_bottom, pad_right]
通过设置该输入的每个维度的值来设置 图像处理参数,参数限制参看 图像处理流程和限制。
注意
- 用户必须设置与模型输入 batch 数一致的 n 组图像处理参数。否则图像处理过程将失败。
- 输出图像的尺寸建议小于 512 x 512,否则可能导致图像处理失败。
- 模型推理。
4.1.7.2.5. 多图多区域动态裁剪
该场景适用于对多张图像处理,每张图像仅裁剪一个ROI区域。
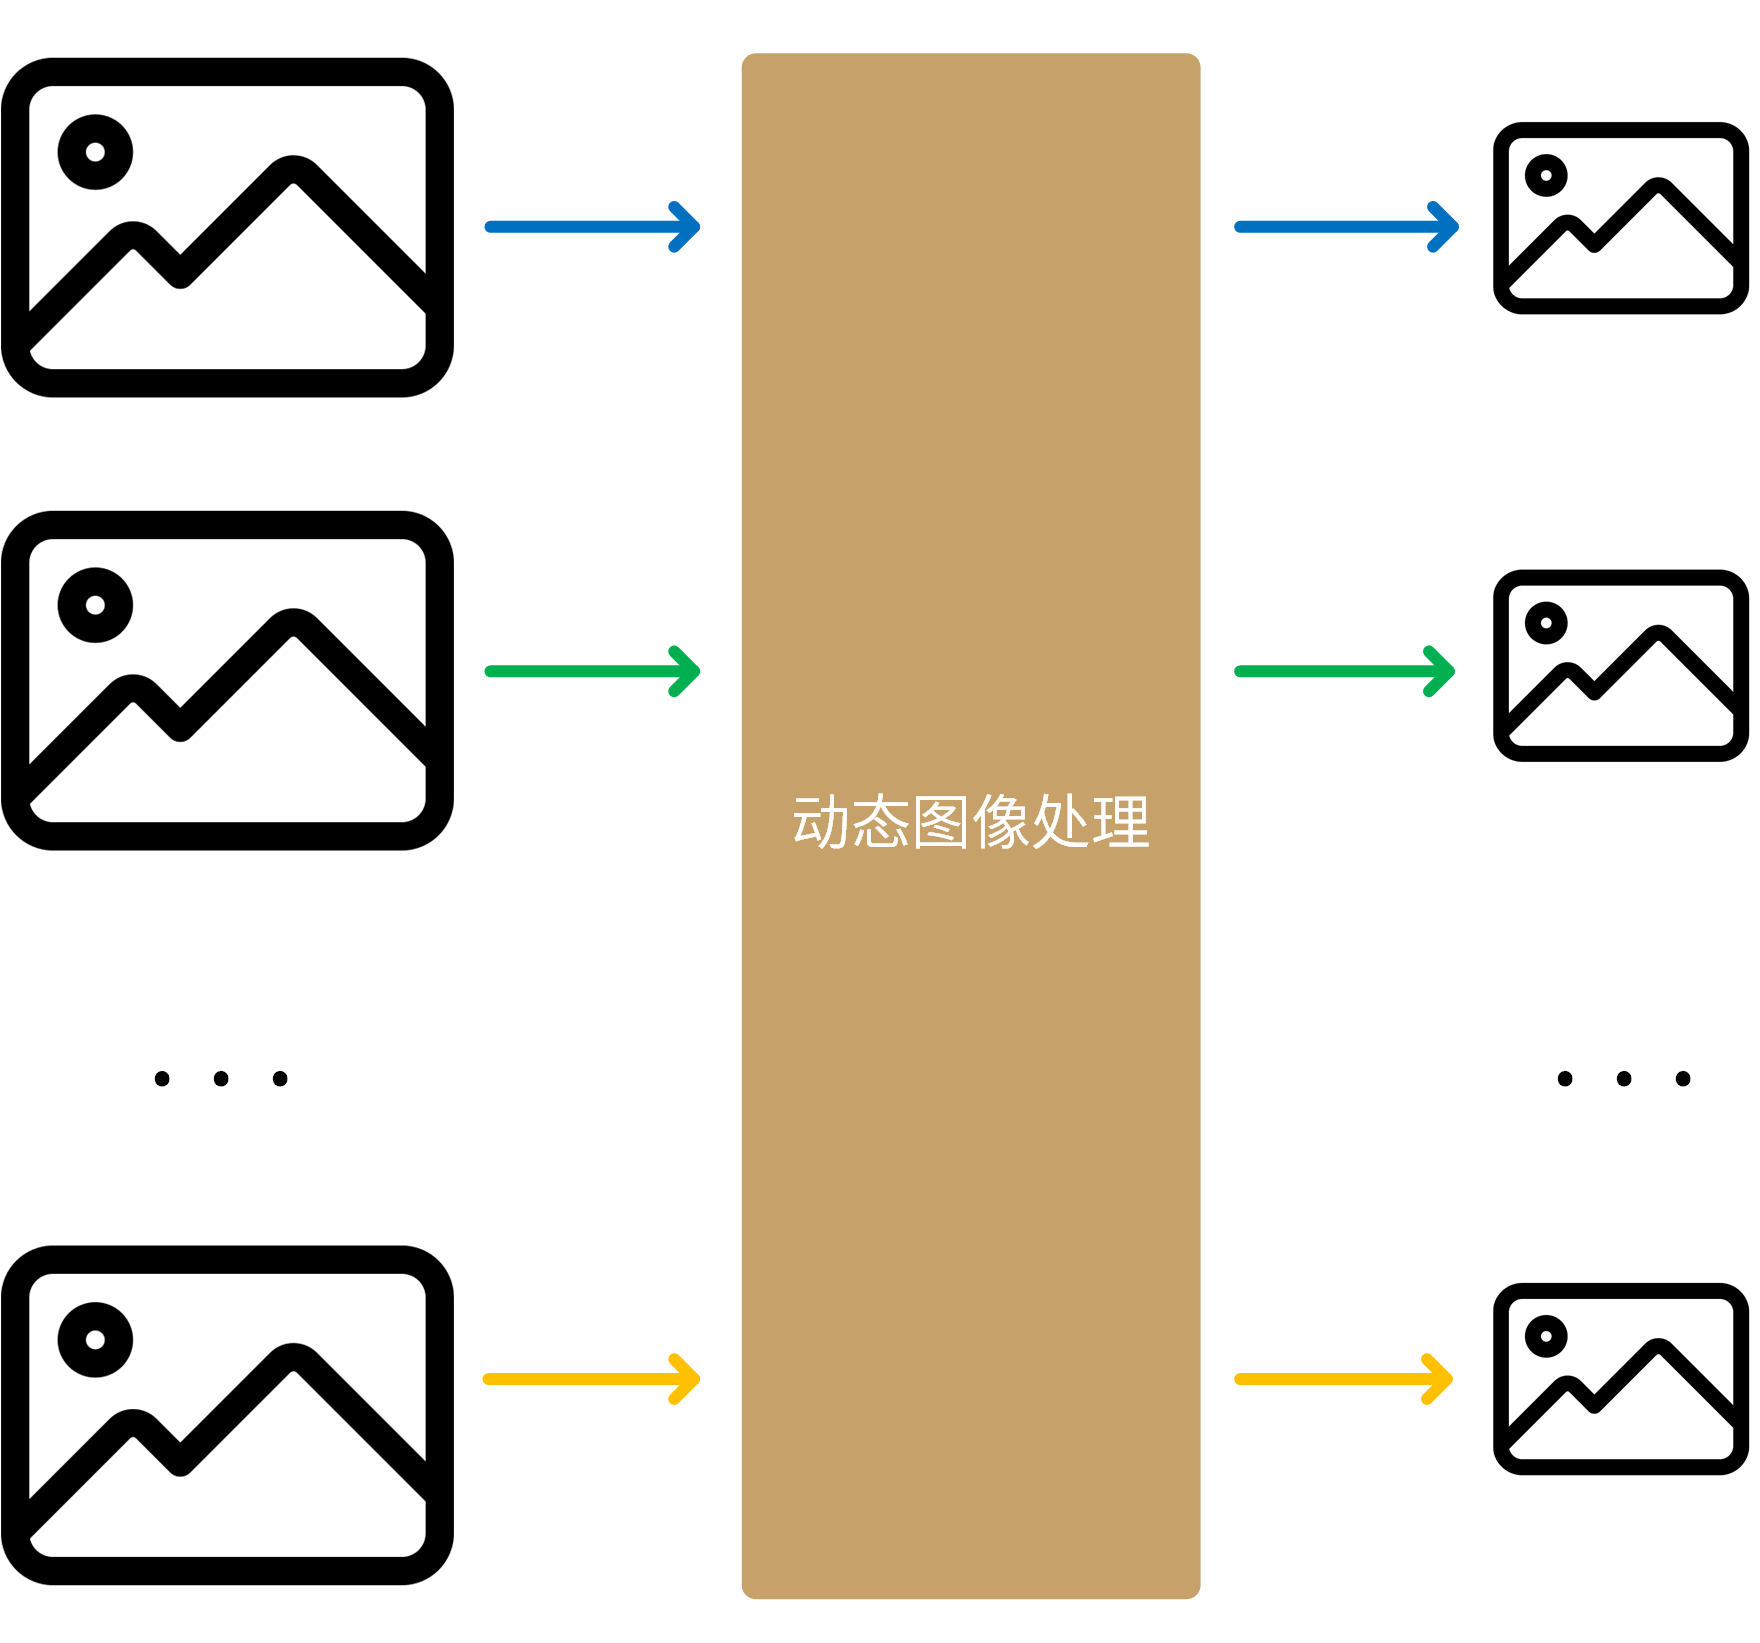
图 4.10 多图多区域动态裁剪
量化阶段仅支持为所有图像设置相同的图像处理参数,模型编译完成后至推理开始前,可为每张图像单独设置图像处理参数。主要步骤如下:
- 使用HMQuantool量化工具量化模型。量化前,需设置图像预处理参数
dynamic_crop为True使能图像动态裁剪功能:
resizer_config = ResizerScheme(
    size=(224, 224),
    mode="nearest",
    align_corners=False,
    fmt="yuv420",
    int_trans=True,
    crop_size=(0, 0),
    crop_offset=(0, 0),
    pad_size=(0, 0, 0, 0),
    pad_value=0,
    mean=[0.485, 0.456, 0.406],
    std=[0.229, 0.224, 0.225],
    dynamic_crop=True,
    model_inp_fmt="rgb",
).to_dict()

dims = onnx_model.graph.input[0].type.tensor_type.shape.dim
input_shape = [dim.dim_value for dim in dims]
params = [[0, 0, dst_h, dst_w, dst_h, dst_w, 0, 0, 0, 0]]
crop_input = torch.tensor(params)
calib_dataset = [
    torch.randint(low=0, high=255, size=input_shape, dtype=torch.unit8),
    crop_input,
]
params 参数表示动态裁剪输入,表示为 [cropY, cropX, crop_height, crop_width, resize_height, resize_width, pad_top, pad_left, pad_bottom, pad_right]
更多参数说明可参看 《HMQuantool量化工具用户手册》。
- 加载要量化的ONNX模型,并设置模型输入和输出。示例如下:
注意
用户需在模型输入名称列表 input_names 末尾使用 append() 添加一个自定义名称,该名称用于标识预处理输入tensor,以便在后续推理前方便定位这些 tensor,并对其进行动态图像处理。
onnx_model = onnx.load(onnx_model_path)
input_names = [_input.name for _input in onnx_model.graph.input]
output_names = [_output.name for _output in onnx_model.graph.output]
input_names.append("dyn_info")
示例中,输入名称列表末尾添加 dyn_info 名称。
- 完成模型量化阶段图像预处理。示例如下:
quant_scheme = QuantScheme(
    target_device=DeviceType.XH2a,
    quant_type=w8a8h1_sefp,
    inupt_ppc_config=[
        resizer_config
    ]
)
quant_config = create_quant_config(quant_scheme)
quant_config = ConfigDict(quant_config)
convert_onnx_to_hmonnx(
    onnx_path,
    calib_dataset,
    device_type=DeviceType.XH2a,
    out_hmonnx_file="hm.onnx",
    quant_config=quant_config,
    input_names=input_names,
    output_names=output_names,
)
- 使用 TCIM 提供的
tcim.builder.api.build_from_hmonnxPython接口编译模型。需设置one_img_multi_roi参数为False,并将batch参数设置为所需的输入图像和ROI的数量。
下面示例设置输入图像和ROI的数量为 n,用户应根据实际需求进行替换:
tcim.build_from_hmonnx(
        model,
        output_name="dynmaic_multi_roi",
        output_dir="./",
        work_dir="./work_space",
        target="xh2",
        ncore=1,
        batch=n,
        opt_level="02",
        enable_profile=False,
        one_img_multi_roi=False
 )
- 设置图像处理参数。编译后模型中会包含一个输入tensor,用于表示图像的所有处理配置。上面示例中,该输入tensor名为上面设置的
dyn_info,其形状为 [n, 10],表示共 n 组图像处理配置,与上一步设置的 batch 值相同。
[cropY, cropX, crop_height, crop_width, resize_height, resize_width, pad_top, pad_left, pad_bottom, pad_right]
通过设置该输入的每个维度的值来设置 图像处理参数,参数限制参看 图像处理流程和限制。
注意
- 用户必须设置与模型输入 batch 数一致的 n 组图像处理参数。否则图像处理过程将失败。
- 输出图像的尺寸建议小于 512 x 512,否则可能导致图像处理失败。
- 模型推理。