ONNX 模型部署指南
简介
本指南面向希望部署 ONNX 模型进行图像分类任务的开发者。假设读者具备基本的 Python 编程和机器学习概念知识,但不需要有 ONNX Runtime 的使用经验。
依赖安装
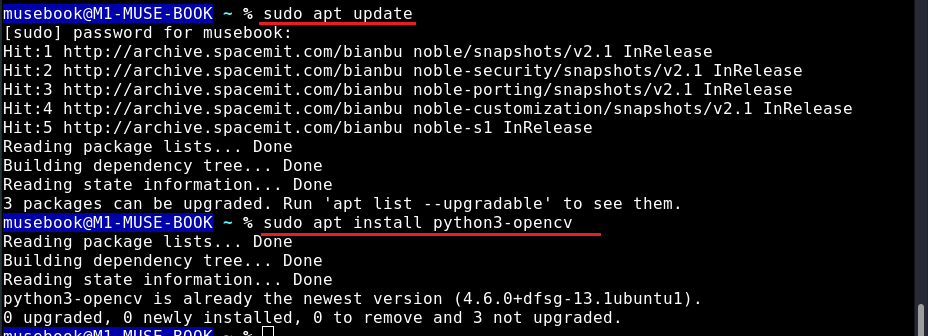
在运行 ONNX 模型之前,需要安装必要的依赖项。
# 更新软件包列表
sudo apt update
# OpenCV 用于计算机视觉操作
sudo apt install python3-opencv
更新和安装结果如下图。
准备模型部署代码
准备以下代码,以便后续拷贝到对应的运行程序中
import numpy as np
import onnxruntime as ort
import spacemit_ort  # SpacemiT acceleration library
from PIL import Image
import cv2
import time

# Load and convert image to RGB format
def get_image(path):
    with Image.open(path) as img:
        img = np.array(img.convert('RGB'))  # Convert image to RGB numpy array
    return img

# Image preprocessing function
def preprocess(img):
    # Normalize pixel values to the range [0, 1]
    img = img / 255.

    # Resize image to 256x256 pixels
    img = cv2.resize(img, (256, 256))

    # Center crop to 224x224 pixels
    h, w = img.shape[0], img.shape[1]
    y0 = (h - 224) // 2  # Compute vertical crop offset
    x0 = (w - 224) // 2  # Compute horizontal crop offset
    img = img[y0 : y0+224, x0 : x0+224, :]  # Perform cropping

    # Apply ImageNet mean and standard deviation normalization
    img = (img - [0.485, 0.456, 0.406]) / [0.229, 0.224, 0.225]

    # Change dimension order to Channel-Height-Width
    img = np.transpose(img, axes=[2, 0, 1])

    # Convert to float32 data type
    img = img.astype(np.float32)

    # Add batch dimension (required for model input)
    img = np.expand_dims(img, axis=0)

    return img

# Prediction function
def predict(path):
    img = get_image(path)
    img = preprocess(img)

    # Create input dictionary for ONNX Runtime
    ort_inputs = {session.get_inputs()[0].name: img}

    # Measure inference time
    start = time.time()

    # Run model inference
    preds = session.run(None, ort_inputs)[0]

    end = time.time()

    # Process prediction results
    preds = np.squeeze(preds)  # Remove unnecessary dimensions
    a = np.argsort(preds)[::-1]  # Sort predictions by confidence

    # Print results
    print('time=%.2fms; class=%s' % (round((end-start) * 1000, 2), labels[a[0]]))

# Load class labels from ImageNet
with open('classification/synset.txt', 'r') as f:
    labels = [l.rstrip() for l in f]

# Configure ONNX Runtime session options
session_options = ort.SessionOptions()
session_options.intra_op_num_threads = 2  # Set number of threads for internal operations

# Initialize inference session with a custom hardware provider
session = ort.InferenceSession('classification/resnet50.q.onnx',
                              sess_options=session_options,
                              providers=["SpaceMITExecutionProvider"])  # Custom execution provider

# Perform prediction on a sample image
img_path = 'classification/kitten.jpg'
predict(img_path)
执行指南
第 1 步:准备环境
运行代码之前,请确保您已经:
- 安装了 Python 3.x
- 进行 依赖安装 中的命令安装了所需软件包
- 为项目创建了工作目录
第 2 步:下载并解压资源
首先,下载样本数据包:
classification.tar.gz
然后,解压文件:
# 解压下载的文件
tar xzvf classification.tar.gz

# 验证解压后的文件
ls classification/
# 预期输出:resnet50.q.onnx  synset.txt  kitten.jpg
如下图,解压后目录结构如下:

classification/
├── resnet50.q.onnx    # 量化 ONNX 模型
├── synset.txt         # ImageNet 类别标签
└── kitten.jpg         # 示例输入图片
请确保这些文件存在,然后再进行下一步。
第 3 步:创建部署脚本
# 进入项目目录
cd your_project_directory

# 创建一个新的 Python 文件
touch model_deploy.py

# 用文本编辑器打开文件(例如 VS Code、Nano 或其他你喜欢的编辑器)
# 然后将第 1.2 节中的完整部署代码复制并粘贴到此文件 model_deploy.py 中
如下图,此例子的项目目录为 onnx

第 4 步:运行推理脚本
# 确保你在正确的目录中
cd your_project_directory

# 执行部署脚本
python3 model_deploy.py
如果成功,你应该会看到类似的输出如下图:

第 5 步:解释结果
输出将显示以下内容:
- 推理时间(毫秒)
- 预测的类别 ID 和标签(来自 ImageNet 的 1000 个类别)
- 对于样本图像 "kitten.jpg",它应正确识别为虎斑猫
注意事项:
- 如果看到关于文件缺失的错误,请验证是否正确解压了 classification.tar.gz 文件,并确保 classification 目录中存在所有所需文件。
- 如果遇到 OpenCV 导入错误,可能需要使用
pip install opencv-python重新安装该软件包。- 如果onnxruntime无法成功导入,请参考文档 onnxruntime安装
- 可以通过调整会话配置中的
intra_op_num_threads值来解决性能问题,使其更适合你的硬件能力。