15、ROS2时间相关API
1、时间相关API简介
ros2涉及时间相关的API有Rate,Time,Duration,Time与Duration的运算等,下面分别讲解。
- 首先,创建一个功能包,用来存放相关的程序文件
xxxxxxxxxx ros2 pkg create learning_time \--build-type ament_python \--dependencies rclpy
2、create_rate
ROS2 中还提供了create_rate函数,用于控制循环执行频率 的工具,其核心作用是让一段代码按照固定频率周期性执行 ,Rate 通过控制循环的 “休眠时间” 来保证循环执行频率的稳定性。切记 ,Rate一般不能直接用于主线程,否则会永久阻塞回调事件,一般只用于带有多线程回调的程序或子线程中使用。
具体工作原理:
- 记录每次循环开始的时间;
- 执行循环内的代码;
- 计算当前循环实际耗时与 “目标间隔时间” 的差值;
- 自动休眠对应的差值时间,确保从一次循环开始到下一次循环开始的间隔严格等于 “目标间隔”(如 100 毫秒)。
虽然 Rate 和 Timer 都能实现周期性执行,但适用场景不同:
| 特性 | Rate | Timer |
|---|---|---|
| 实现方式 | 基于循环内主动休眠(阻塞当前线程) | 基于回调函数(非阻塞,由 ROS 2 事件循环触发) |
| 适用场景 | 适用于需要在同一线程 内按固定频率执行的循环(如主控制逻辑) | 适用于需要异步执行 的周期性任务(不阻塞主线程) |
| 灵活性 | 循环内可直接控制流程(如 break 退出) | 需通过标志位等方式控制回调执行 |
-
以下是
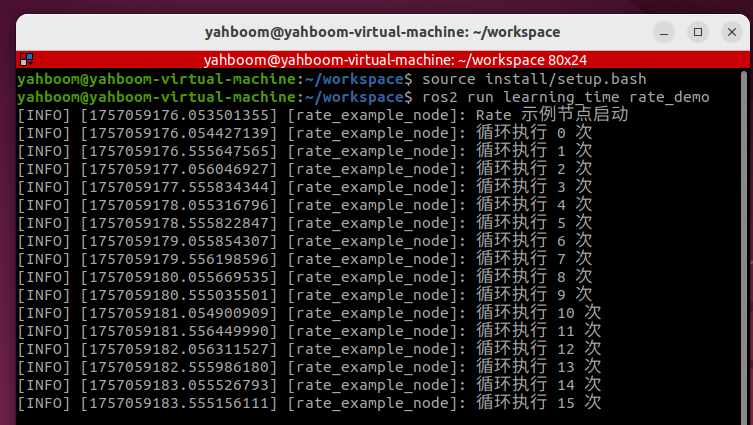
Rate的基本用法,实现一个每秒执行 2 次的循环:- 功能包中新建一个文件rate_demo.py
xxxxxxxxxx import rclpy from rclpy . node import Node import threading class RateExampleNode ( Node ): def __init__ ( self ): super (). __init__ ( "rate_example_node" ) self . get_logger (). info ( "Rate 示例节点启动" ) def run_loop ( self ): # 使用节点的create_rate()创建2Hz的Rate rate = self . create_rate ( 2 ) count = 0 try : while rclpy . ok (): self . get_logger (). info ( f"循环执行 {count} 次" ) count += 1 rate . sleep () # 休眠到下一个周期(0.5秒) except KeyboardInterrupt : self . get_logger (). info ( "循环被中断" ) def main ( args = None ): rclpy . init ( args = args ) node = RateExampleNode () # 创建线程运行循环(避免阻塞主线程) loop_thread = threading . Thread ( target = node . run_loop ) loop_thread . start () # 主线程执行spin,维持ROS 2节点运行 try : rclpy . spin ( node ) except KeyboardInterrupt : pass finally : loop_thread . join () # 等待线程结束 node . destroy_node () rclpy . shutdown () if __name__ == "__main__" : main ()
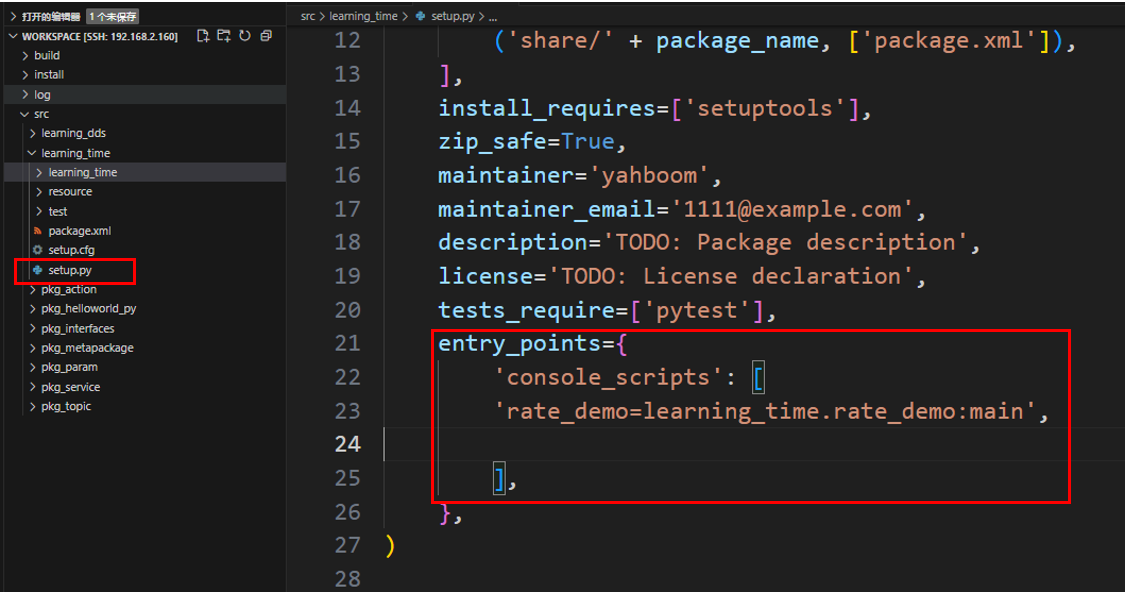
- 配置对应的setup.py配置文件,在console_scripts中添加
xxxxxxxxxx 'rate_demo=learning_time.rate_demo:main'
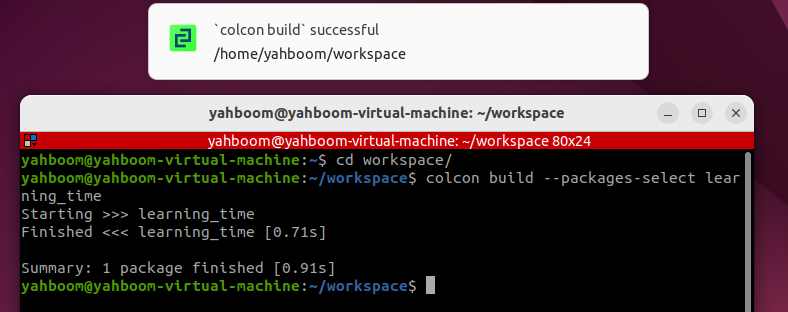
- 编译功能包
xxxxxxxxxx colcon build \-- packages \- select learning_time
- 刷新工作空间环境并运行节点
xxxxxxxxxx source ./install/setup.bash xxxxxxxxxx ros2 run learning_time rate_demo
3 、Timer定时器应用
- Timer用于创建一个定时触发的定时器来执行一些周期性任务
- 示例:创建两个定时器一个1秒执行一次打印执行次数,一个0.5秒执行一次打印当前时间
- 新建一个程序文件Timer_demo.py
xxxxxxxxxx import rclpy from rclpy . node import Node class TimerDemoNode ( Node ): def __init__ ( self ): super (). __init__ ( 'timer_demo_node' ) # 计数器,用于演示定时器执行次数 self . counter = 0 # 创建定时器:每1秒执行一次callback函数 self . timer = self . create_timer ( 1.0 , self . timer_callback ) # 创建一个更快的定时器:每0.5秒执行一次 self . fast_timer = self . create_timer ( 0.5 , self . fast_timer_callback ) self . get_logger (). info ( "定时器节点已启动" ) def timer_callback ( self ): """1秒定时器回调函数""" self . counter += 1 current_time = self . get_clock (). now () # 打印当前时间和计数器值 self . get_logger (). info ( f"[1秒定时器] 第 {self.counter} 次执行,当前时间: {current_time.seconds_nanoseconds()}" ) def fast_timer_callback ( self ): """0.5秒定时器回调函数""" # 打印当前时间戳(纳秒) self . get_logger (). info ( f"[0.5秒定时器] 当前时间戳: {self.get_clock().now().nanoseconds}" ) def main ( args = None ): # 初始化ROS 2 rclpy . init ( args = args ) # 创建节点 node = TimerDemoNode () # 运行节点 rclpy . spin ( node ) # 关闭ROS 2 node . destroy_node () rclpy . shutdown () if __name__ == '__main__' : main ()
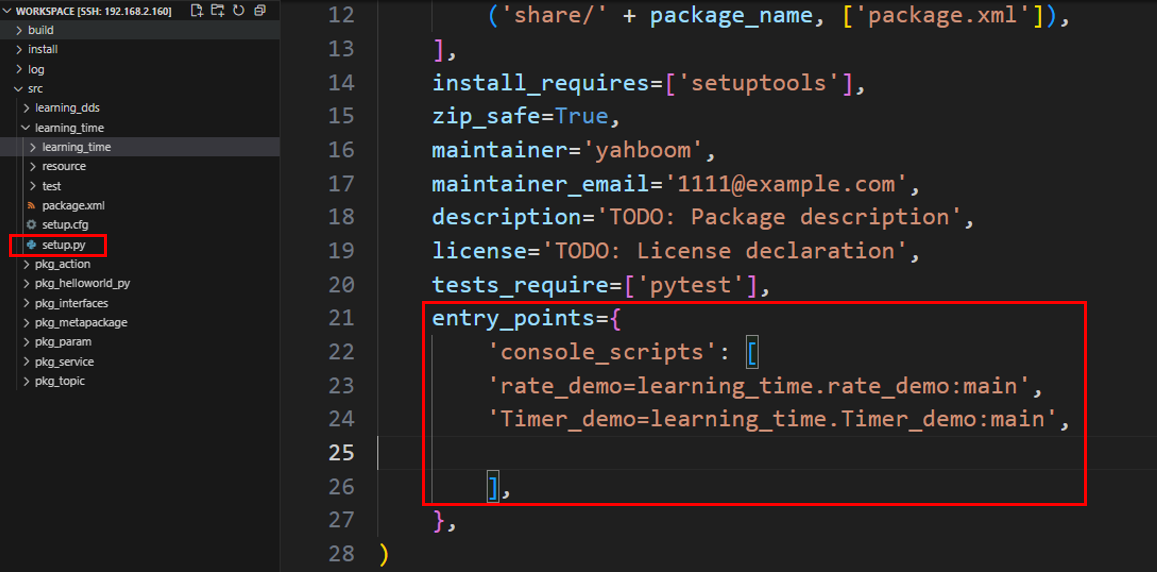
- 配置对应的setup.py配置文件,在console_scripts中添加
xxxxxxxxxx 'Timer_demo=learning_time.Timer_demo:main'
- 编译功能包
xxxxxxxxxx colcon build \-- packages \- select learning_time
- 刷新工作空间环境并运行节点
xxxxxxxxxx source ./install/setup.bash xxxxxxxxxx ros2 run learning_time Timer_demo
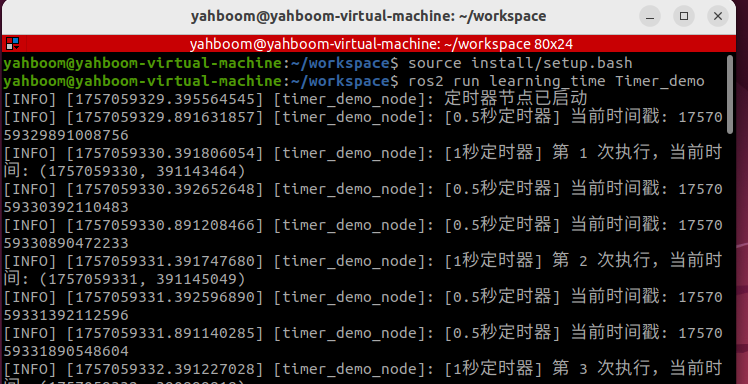
- 可以看出定时器按照设定的定时时间触发,在各自的回调函数中打印对应的日志信息
4 、get_clock获取当前时刻时间
- get_clock函数可以用来获取到时钟对象,再通过()方法获取到当前时刻时间
- 新建程序文件get_clock_demo.py,填入以下示例程序:
xxxxxxxxxx import rclpy from rclpy . node import Node from rclpy . time import Time class TimeExampleNode ( Node ): def __init__ ( self ): super (). __init__ ( "time_example_node" ) # 获取节点的时钟对象(默认使用系统时钟) self . clock = self . get_clock () # 获取当前时间(返回Time对象) current_time = self . clock . now () self . get_logger (). info ( f"当前时间:{current_time}" ) def main ( args = None ): rclpy . init ( args = args ) node = TimeExampleNode () rclpy . spin_once ( node ) # 运行一次节点 node . destroy_node () rclpy . shutdown () if __name__ == "__main__" : main ()
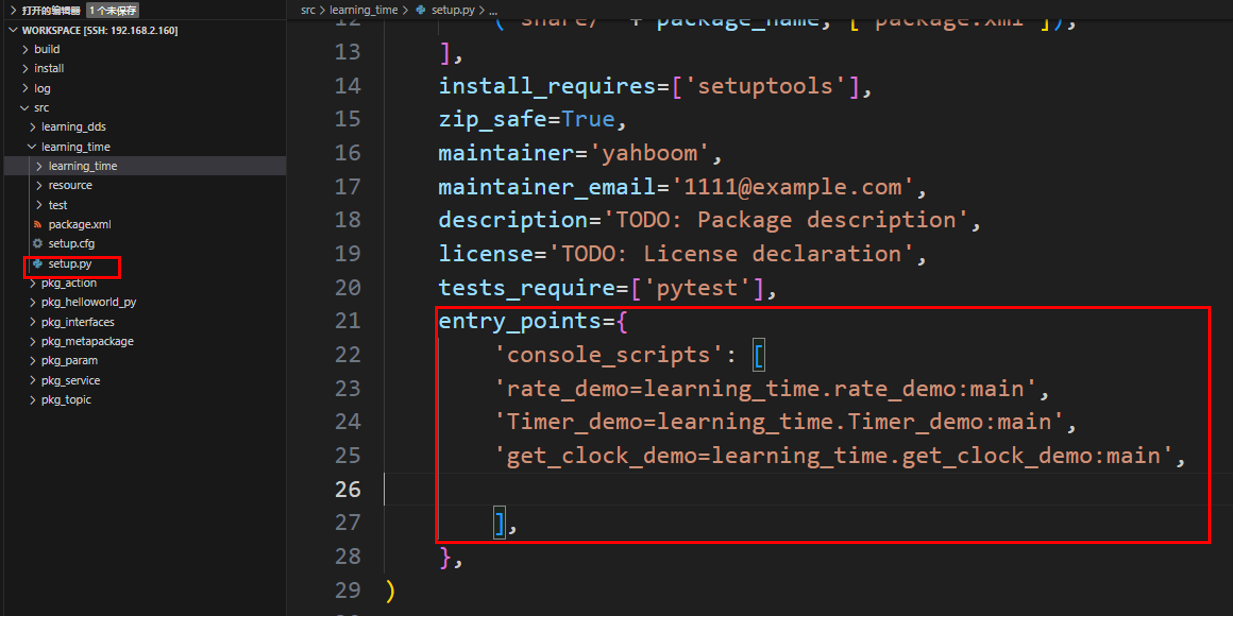
- 配置对应的setup.py配置文件,在console_scripts中添加
xxxxxxxxxx 'get_clock_demo=learning_time.get_clock_demo:main'
- 编译功能包
xxxxxxxxxx colcon build \-- packages \- select learning_time
- 刷新工作空间环境并运行节点
xxxxxxxxxx source ./install/setup.bash xxxxxxxxxx ros2 run learning_time get_clock_demo

5、Time 与 Duration
Time类在ros中用于表示一个具体的时间点 (如 "2023-10-01 12:00:00"),通常用于标记事件发生的时刻 。Duration类表示两个时间点之间的间隔 (如 "5 秒"),用于计算时间差或延迟。- 示例: Time 以及 Duration 应用
- 创建一个新的程序文件TimeDuration_demo.py
xxxxxxxxxx import rclpy from rclpy . time import Time from rclpy . duration import Duration def main (): rclpy . init () node = rclpy . create_node ( "time_opt_node" ) #time类的使用方法,创建‘时间点、时刻’ time1 = Time ( seconds = 10 ) time2 = Time ( seconds = 4 ) #Duration类使用方法,创建‘持续时间、一段时间’ duration1 = Duration ( seconds = 3 ) duration2 = Duration ( seconds = 5 ) # 时刻可以进行比较 node . get_logger (). info ( "time1 >= time2 ? %d" % ( time1 > = time2 )) node . get_logger (). info ( "time1 < time2 ? %d" % ( time1 < time2 )) # 时间段与时刻可以数学运算 t3 = time1 \+ duration1 t4 = time1 \- time2 t5 = time1 \- duration1 node . get_logger (). info ( "t3 = %d" % t3 . nanoseconds ) node . get_logger (). info ( "t4 = %d" % t4 . nanoseconds ) node . get_logger (). info ( "t5 = %d" % t5 . nanoseconds ) # 时间段可以进行比较 node . get_logger (). info ( "-" * 80 ) node . get_logger (). info ( "duration1 >= duration2 ? %d" % ( duration1 > = duration2 )) node . get_logger (). info ( "duration1 < duration2 ? %d" % ( duration1 < duration2 )) rclpy . shutdown () if __name__ == "__main__" : main ()
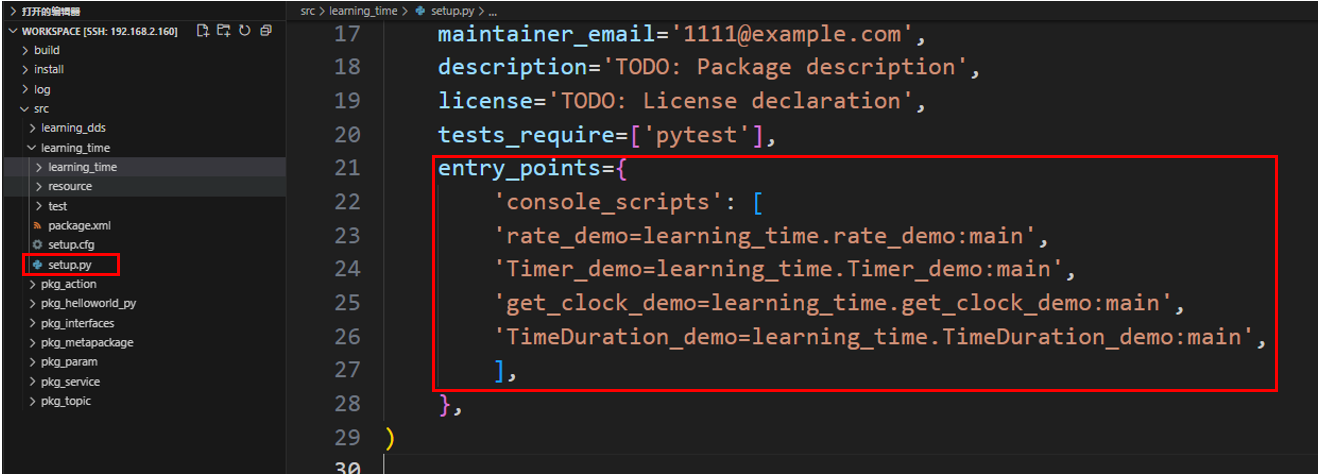
- 配置对应的setup.py配置文件,在console_scripts中添加
xxxxxxxxxx 'TimeDuration_demo=learning_time.TimeDuration_demo:main'
- 编译功能包
xxxxxxxxxx colcon build \-- packages \- select learning_time
- 刷新工作空间环境并运行节点
xxxxxxxxxx source ./install/setup.bash xxxxxxxxxx ros2 run learning_time TimeDuration_demo
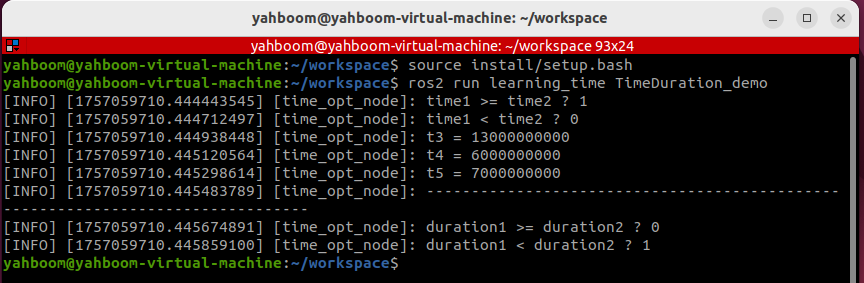
- 这个示例证明时间点和时间段可以进行数学运算,可以让我们灵活的对不同时间戳的数据进行查询和操作