接口定义
整机接口定义
LPB3588提供了丰富的接口,具体如下图:
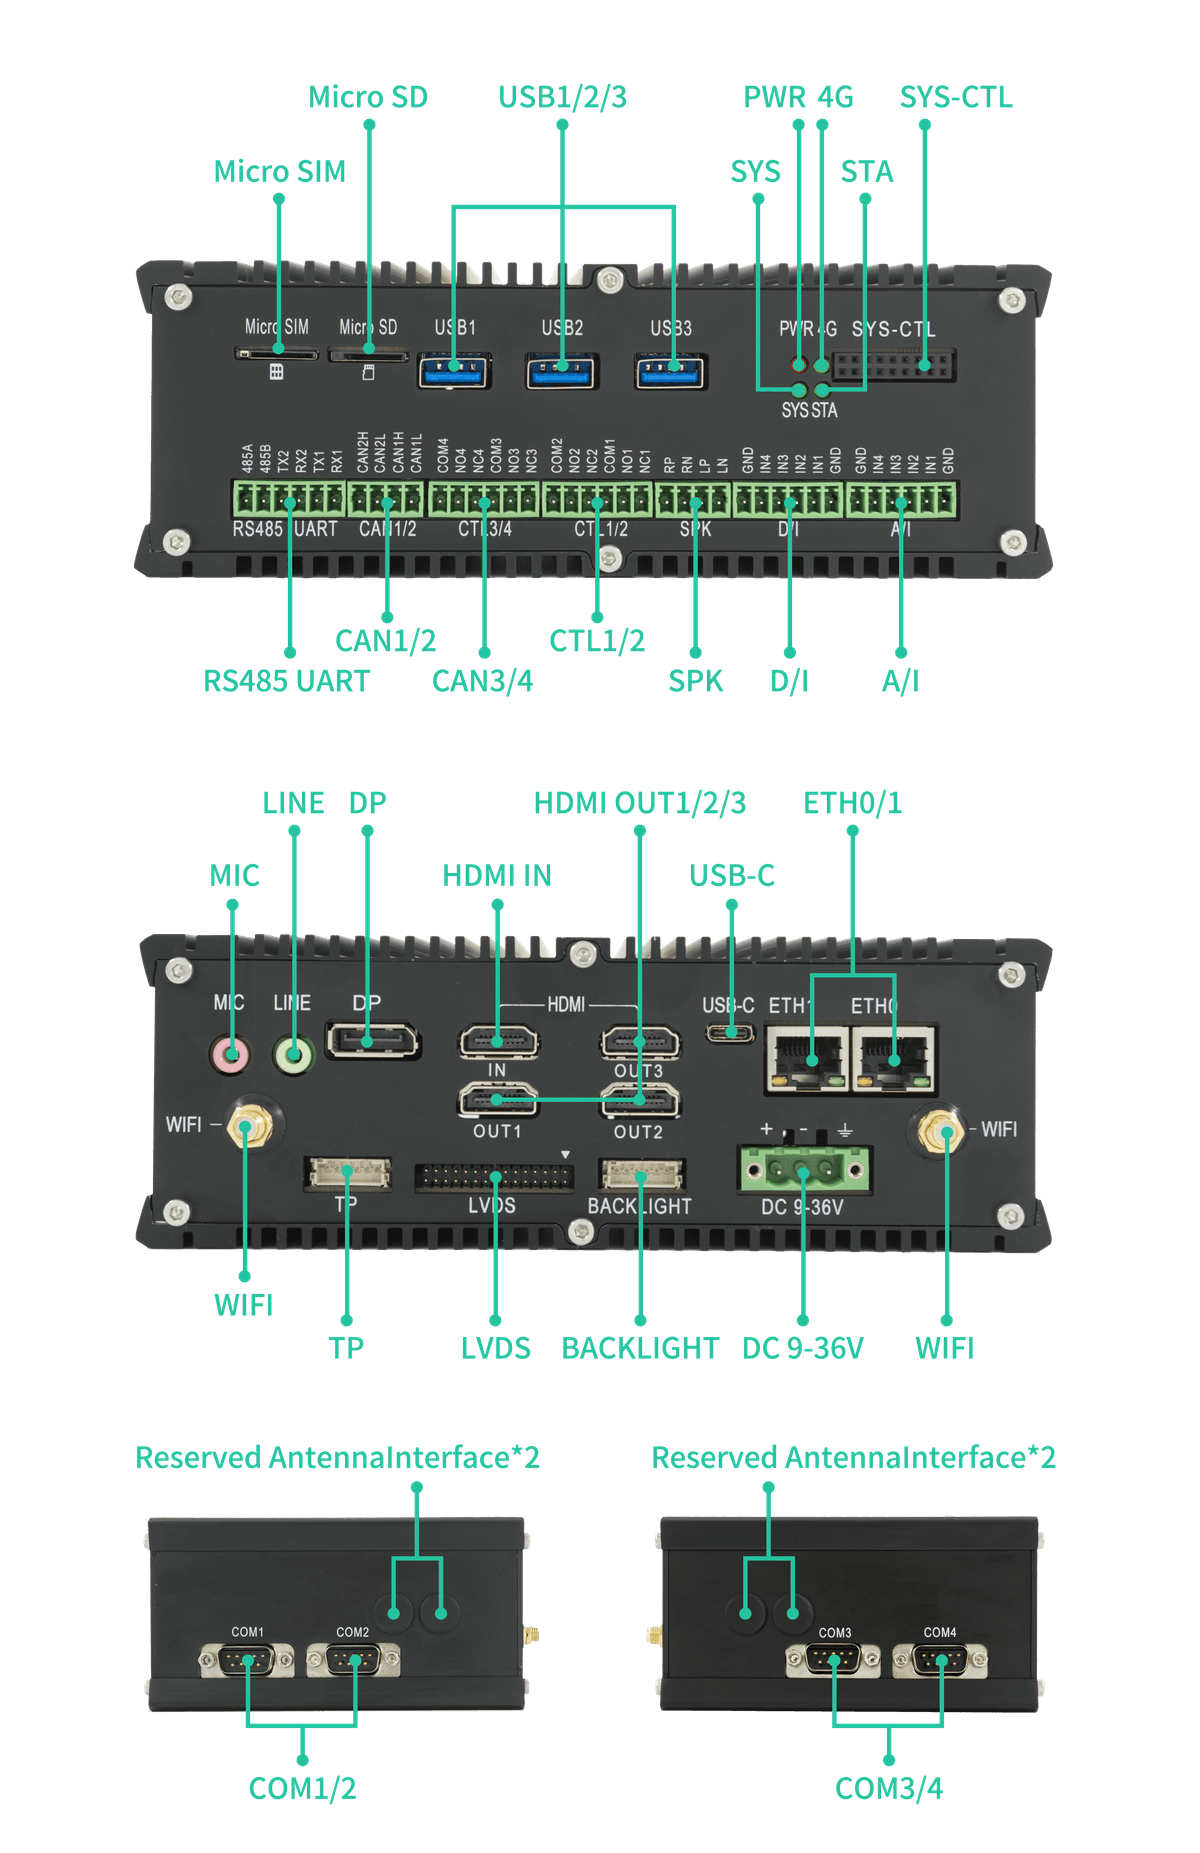
| 丝印 | 设备节点 | 备注 |
|---|---|---|
| USB1 | Type-A USB3.0 host,5V | |
| USB2 | Type-A USB3.0 host,5V | |
| USB3 | Type-A USB3.0 host,5V | |
| SYS-CTL | Debug&Key | 产品手册 J22 |
| PWR LED | 电源灯 | |
| 4G LED | 4G灯 4G/5G 拨号 | |
| SYS LED | work1 | 系统灯 |
| STA LED | work2 | STA灯 |
| RS485 | /dev/ttyS0 | 串口,默认波特率9600 |
| UART1 | /dev/ttyS7 | 串口,默认波特率9600 |
| UART2 | /dev/ttyS6 | 串口,默认波特率9600 |
| CAN1 | can1 | CAN总线 |
| CAN2 | can0 | CAN总线 |
| CTL1 | gpio40 | GPIO,输出模式,10A@250VAC / 10A@30VDC |
| CTL2 | gpio39 | GPIO,输出模式,10A@250VAC / 10A@30VDC |
| CTL3 | gpio503 | GPIO,输出模式,10A@250VAC / 10A@30VDC |
| CTL4 | gpio502 | GPIO,输出模式,10A@250VAC / 10A@30VDC |
| D/I IN1 | gpio36 | GPIO,输入模式,默认为1,输入5~36V为0 |
| D/I IN2 | gpio34 | GPIO,输入模式,默认为1,输入5~36V为0 |
| D/I IN3 | gpio41 | GPIO,输入模式,默认为1,输入5~36V为0 |
| D/I IN4 | gpio42 | GPIO,输入模式,默认为1,输入5~36V为0 |
| A/I IN1 | in_voltage7_raw | 模拟输入,用于接一些工业传感器 |
| A/I IN2 | in_voltage6_raw | 模拟输入,用于接一些工业传感器 |
| A/I IN3 | in_voltage2_raw | 模拟输入,用于接一些工业传感器 |
| A/I IN4 | in_voltage4_raw | 模拟输入,用于接一些工业传感器 |
| COM1 | /dev/ttysWK2 | 串口RS232,默认波特率9600 |
| COM2 | /dev/ttysWK0 | 串口RS232,默认波特率9600 |
| COM3 | /dev/ttysWK1 | 串口RS232,默认波特率9600 |
| COM4 | /dev/ttysWK3 | 串口RS232,默认波特率9600 |
| DP | card0-DP-2 | DP输出,最高支持4K@60fps |
| HDMIIN | /dev/video0 | HDMI输入,最高支持4K@30fps的分辨率 |
| HDMI1 | card0-HDMI-A-1 | HDMI输出,最高支持4K@60fps |
| HDMI2 | card0-HDMI-A-2 | HDMI输出,最高支持4K@60fps |
| HDMI3 | card0-DSI-1 | HDMI输出,最高支持4K@30fps |
| Type-C | 可转接USB和DP信号 | |
| MIC | 输入声音,录制音频文件 | |
| LINE | 播放音频文件 | |
| SPK | 播放音频文件 | |
| ETH0 | enP2p33s0 | 千兆网卡 |
| ETH1 | eth0 | 千兆网卡 |
| WIFI | wlan0 | 2.4/5GHz |
| RTC | /dev/rtc0 | RTC时钟 |
UART 使用
串口是一种常见的通信接口,用于与外部设备进行串行通信。LPB3588提供了多个串口,分别对应不同的设备节点。在使用串口之前,需要确保串口连接正确,以及波特率和其他参数设置一致。
RS485设备文件为/dev/ttyS0。在开发板设备上运行下列命令:
发送字符串到主机
- Cmd
- C
echo "neardi RS485 test..." > /dev/ttyS0
create serial_send.c
   #include <stdio.h>
   #include <fcntl.h>
   #include <unistd.h>
   #include <termios.h>
   #include <string.h>
   #include <stdlib.h>

   void usage(const char *prog_name) {
       printf("Usage: %s <port> <message> [baudrate] [timeout]\n", prog_name);
       printf("  <port>      - The serial port to use (e.g., /dev/ttyS0)\n");
       printf("  <message>   - The message to send\n");
       printf("  [baudrate]  - The baud rate (optional, default is 9600)\n");
       printf("  [timeout]   - The timeout in seconds (optional, default is 1)\n");
   }

   int main(int argc, char *argv[]) {
       if (argc < 3) {
         usage(argv[0]);
         return 1;
   }

    const char *port = argv[1];
    const char *message = argv[2];
    int baudrate = (argc > 3) ? atoi(argv[3]) : 9600;
    int timeout = (argc > 4) ? atoi(argv[4]) : 1;

    int fd = open(port, O_WRONLY | O_NOCTTY | O_SYNC);
    if (fd == -1) {
        perror("Unable to open serial port");
        return 1;
    }

    // Set serial port configuration
    struct termios tty;
    if (tcgetattr(fd, &tty) != 0) {
        perror("Error getting serial port attributes");
        close(fd);
        return 1;
    }

    // Set baud rate
    cfsetospeed(&tty, baudrate);
    cfsetispeed(&tty, baudrate);

    // Set serial port mode
    tty.c_cflag &= ~PARENB; // No checksum
    tty.c_cflag &= ~CSTOPB; // 1 stop bit
    tty.c_cflag &= ~CSIZE;  // Clear character bit settings
    tty.c_cflag |= CS8;     // 8 data bits
    tty.c_cflag |= CREAD | CLOCAL; // Start the receiver, ignore control lines

    // Set timeout
    tty.c_cc[VTIME] = timeout;  // Read operation timeout (10ms unit)
    tty.c_cc[VMIN] = 0;         // Read without waiting for characters

    // Apply serial port settings
    if (tcsetattr(fd, TCSANOW, &tty) != 0) {
        perror("Error setting serial port attributes");
        close(fd);
        return 1;
    }

    // Send data
    write(fd, message, strlen(message));
    printf("Message sent: %s\n", message);

    // Close serial port
    close(fd);
    return 0;
}
gcc -o serial_send serial_send.c
./serial_send /dev/ttyS0 "neardi RS485 test ..." 9600 1
主机中的串口终端即可接收到字符串 “neardi RS485 test…” 开发板接收数据:
接收主机发送的字符串
- Cmd
- C
cat /dev/ttyS0
create serial_reader.c
#include <stdio.h>
#include <fcntl.h>
#include <unistd.h>
#include <termios.h>
#include <stdlib.h>
#include <errno.h>
#include <string.h>
#include <getopt.h>

#define DEFAULT_SERIAL_PORT "/dev/ttyS0"
#define DEFAULT_BAUD_RATE 115200

// Map baud rate string to corresponding baud rate constant
speed_t get_baud_rate(int baud) {
    switch (baud) {
        case 9600:
            return B9600;
        case 19200:
            return B19200;
        case 38400:
            return B38400;
        case 57600:
            return B57600;
        case 115200:
            return B115200;
        case 230400:
            return B230400;
        case 460800:
            return B460800;
        case 921600:
            return B921600;
        default:
            return B115200; // Default baud rate 115200
    }
}

// Print help information
void print_usage() {
    printf("Usage: serial_reader -p <port> -b <baud_rate>\n");
    printf("  -p <port>       Serial port device (default: /dev/ttyS0)\n");
    printf("  -b <baud_rate>  Baud rate (default: 115200)\n");
}

int main(int argc, char *argv[]) {
    int baud_rate = DEFAULT_BAUD_RATE;
    const char *serial_port = DEFAULT_SERIAL_PORT;

    // Parse command line arguments
    int opt;
    while ((opt = getopt(argc, argv, "p:b:h")) != -1) {
        switch (opt) {
            case 'p':
                serial_port = optarg;
                break;
            case 'b':
                baud_rate = atoi(optarg);
                if (baud_rate <= 0) {
                    fprintf(stderr, "Invalid baud rate: %s\n", optarg);
                    print_usage();
                    return 1;
                }
                break;
            case 'h':
            default:
                print_usage();
                return 0;
        }
    }

    // Open serial device
    int serial_fd = open(serial_port, O_RDONLY | O_NOCTTY);
    if (serial_fd == -1) {
        perror("Failed to open the serial port");
        return 1;
    }

    // Set serial port parameters
    struct termios tty;
    if (tcgetattr(serial_fd, &tty) != 0) {
        perror("Failed to get serial port attributes");
        close(serial_fd);
        return 1;
    }

    // Configure baud rate
    speed_t baud = get_baud_rate(baud_rate);
    cfsetospeed(&tty, baud);   // Set output baud rate
    cfsetispeed(&tty, baud);   // Set input baud rate

    // Configure serial port
    tty.c_cflag &= ~PARENB;       // Disable parity checking
    tty.c_cflag &= ~CSTOPB;       // 1 stop bit
    tty.c_cflag &= ~CSIZE;        // Clear data bit mask
    tty.c_cflag |= CS8;           // 8 data bits
    tty.c_cflag &= ~CRTSCTS;      // Disable hardware flow control
    tty.c_cflag |= CREAD | CLOCAL; // Enable receive and local connections
    tty.c_iflag &= ~(IXON | IXOFF | IXANY); // Disable software flow control
    tty.c_iflag &= ~ICANON;        // Disable canonical mode
    tty.c_iflag &= ~ECHO;          // Disable echo
    tty.c_iflag &= ~ECHOE;         // Disable echo input
    tty.c_iflag &= ~ISIG;          // Disable signal characters
    tty.c_oflag &= ~OPOST;         // Disable output processing
    tty.c_oflag &= ~ONLCR;         // Disable newline conversion

    // Application serial port configuration
    if (tcsetattr(serial_fd, TCSANOW, &tty) != 0) {
        perror("Failed to set serial port attributes");
        close(serial_fd);
        return 1;
    }

    // Loop to read serial port data and output
    char read_buffer[256];
    while (1) {
        int n = read(serial_fd, read_buffer, sizeof(read_buffer) - 1);
        if (n < 0) {
            perror("Failed to read from the serial port");
            close(serial_fd);
            return 1;
        } else if (n == 0) {
            continue;  // No data to read, continue looping
        }
        read_buffer[n] = '\0'; // Make sure the string ends
        printf("%s", read_buffer); // Output the read data
    }

    close(serial_fd);
    return 0;
}
gcc -o serial_reader serial_reader.c
./serial_reader -p /dev/ttyS0 -b 9600
同样,UART1和UART2设备文件分别是/dev/ttyS6和/dev/ttyS7。
CAN 使用
CAN是一种总线标准,用于实现设备之间的通信。LPB3588提供了两个CAN接口,分别对应can0和can1设备。在使用CAN之前,需要确保CAN设备连接正确,以及波特率和其他参数设置一致。 默认固件包含使用 candump 和 cansend 工具进行收发报文测试即可,若没有工具可以在 github 下载。
- Cmd
- C
#在收发端关闭can0设备
ip link set can0 down
#在收发端设置比特率
ip link set can0 up type can bitrate 1000000
#在接收端执行candump,阻塞等待报文
candump can0
#在发送端执行cansend,发送报文
cansend can0 123#1122334455667788
create can_listener.c
#include <stdio.h>
#include <stdlib.h>
#include <unistd.h>
#include <string.h>
#include <errno.h>
#include <sys/ioctl.h>
#include <linux/can.h>
#include <linux/can/raw.h>
#include <net/if.h>
#include <sys/socket.h>
#include <netinet/in.h>

#define DEFAULT_CAN_INTERFACE "can0"
#define DEFAULT_BAUD_RATE 1000000

// Execute system commands
int exec_command(const char *cmd) {
    int ret = system(cmd);
    if (ret != 0) {
        fprintf(stderr, "Command failed: %s\n", cmd);
        return -1;
    }
    return 0;
}

// Set CAN interface and baud rate
int setup_can_interface(const char *can_interface, int baud_rate) {
    char cmd[128];

    // Close interface
    snprintf(cmd, sizeof(cmd), "ip link set %s down", can_interface);
    if (exec_command(cmd) != 0) {
        return -1;
    }

    // Set the baud rate and enable the interface
    snprintf(cmd, sizeof(cmd), "ip link set %s up type can bitrate %d", can_interface, baud_rate);
    if (exec_command(cmd) != 0) {
        return -1;
    }

    return 0;
}

// Listen to the CAN interface and print received CAN frames
void listen_can_interface(const char *can_interface) {
    int sockfd;
    struct sockaddr_can addr;
    struct can_frame frame;

    // Create CAN raw socket
    if ((sockfd = socket(PF_CAN, SOCK_RAW, CAN_RAW)) < 0) {
        perror("Socket creation failed");
        return;
    }

    // Configure the listening interface
    struct ifreq ifr;
    strcpy(ifr.ifr_name, can_interface);
    if (ioctl(sockfd, SIOCGIFINDEX, &ifr) < 0) {
        perror("Ioctl failed");
        close(sockfd);
        return;
    }

    addr.can_family = AF_CAN;
    addr.can_ifindex = ifr.ifr_ifindex;

    // bind socket
    if (bind(sockfd, (struct sockaddr *)&addr, sizeof(addr)) < 0) {
        perror("Bind failed");
        close(sockfd);
        return;
    }

    printf("Listening on %s...\n", can_interface);

    // Continuously receiving and printing CAN frames
    while (1) {
        int nbytes = read(sockfd, &frame, sizeof(struct can_frame));
        if (nbytes < 0) {
            perror("Read failed");
            break;
        }

        printf("Received CAN frame: can_id=0x%03X, dlc=%d, data=", frame.can_id, frame.can_dlc);
        for (int i = 0; i < frame.can_dlc; i++) {
            printf("%02X ", frame.data[i]);
        }
        printf("\n");
    }

    close(sockfd);
}

// Print help information
void print_usage() {
    printf("Usage: can_listener -p <port> -b <baud_rate>\n");
    printf("  -p <port>       CAN interface device (default: can0)\n");
    printf("  -b <baud_rate>  Baud rate (default: 1000000)\n");
}

int main(int argc, char *argv[]) {
    const char *can_interface = DEFAULT_CAN_INTERFACE;
    int baud_rate = DEFAULT_BAUD_RATE;

    // Parse command line arguments
    int opt;
    while ((opt = getopt(argc, argv, "p:b:h")) != -1) {
        switch (opt) {
            case 'p':
                can_interface = optarg;
                break;
            case 'b':
                baud_rate = atoi(optarg);
                if (baud_rate <= 0) {
                    fprintf(stderr, "Invalid baud rate: %s\n", optarg);
                    print_usage();
                    return 1;
                }
                break;
            case 'h':
            default:
                print_usage();
                return 0;
        }
    }

    // Set up and start the CAN interface
    if (setup_can_interface(can_interface, baud_rate) != 0) {
        return 1;
    }

    // Listen to the CAN interface and output received frames
    listen_can_interface(can_interface);

    return 0;
}
gcc -o can_listener can_listener.c
./can_listener -p can0 -b 1000000
create can_sender.c
#include <stdio.h>
#include <stdlib.h>
#include <unistd.h>
#include <string.h>
#include <errno.h>
#include <sys/ioctl.h>
#include <linux/can.h>
#include <linux/can/raw.h>
#include <net/if.h>
#include <sys/socket.h>
#include <netinet/in.h>

#define DEFAULT_CAN_INTERFACE "can0"
#define DEFAULT_BAUD_RATE 1000000

// Execute system commands
int exec_command(const char *cmd) {
    int ret = system(cmd);
    if (ret != 0) {
        fprintf(stderr, "Command failed: %s\n", cmd);
        return -1;
    }
    return 0;
}

// Set CAN interface and baud rate
int setup_can_interface(const char *can_interface, int baud_rate) {
    char cmd[128];

    // Close interface
    snprintf(cmd, sizeof(cmd), "ip link set %s down", can_interface);
    if (exec_command(cmd) != 0) {
        return -1;
    }

    // Set the baud rate and enable the interface
    snprintf(cmd, sizeof(cmd), "ip link set %s up type can bitrate %d", can_interface, baud_rate);
    if (exec_command(cmd) != 0) {
        return -1;
    }

    return 0;
}

// Send CAN frame
int send_can_frame(const char *can_interface, unsigned int can_id, const unsigned char *data, size_t data_len) {
    int sockfd;
    struct sockaddr_can addr;
    struct can_frame frame;

    // Create CAN raw socket
    if ((sockfd = socket(PF_CAN, SOCK_RAW, CAN_RAW)) < 0) {
        perror("Socket creation failed");
        return -1;
    }

    // Configure the listening interface
    struct ifreq ifr;
    strcpy(ifr.ifr_name, can_interface);
    if (ioctl(sockfd, SIOCGIFINDEX, &ifr) < 0) {
        perror("Ioctl failed");
        close(sockfd);
        return -1;
    }

    addr.can_family = AF_CAN;
    addr.can_ifindex = ifr.ifr_ifindex;

    // bind socket
    if (bind(sockfd, (struct sockaddr *)&addr, sizeof(addr)) < 0) {
        perror("Bind failed");
        close(sockfd);
        return -1;
    }

    // Set CAN frame ID and data
    frame.can_id = can_id;
    frame.can_dlc = data_len;
    memcpy(frame.data, data, data_len);

    // Send CAN frame
    if (send(sockfd, &frame, sizeof(struct can_frame), 0) != sizeof(struct can_frame)) {
        perror("Send failed");
        close(sockfd);
        return -1;
    }

    printf("Sent CAN frame: can_id=0x%03X, dlc=%d, data=", frame.can_id, frame.can_dlc);
    for (size_t i = 0; i < frame.can_dlc; i++) {
        printf("%02X ", frame.data[i]);
    }
    printf("\n");

    close(sockfd);
    return 0;
}

// Print help information
void print_usage() {
    printf("Usage: can_sender -p <port> -b <baud_rate> -d <data>\n");
    printf("  -p <port>       CAN interface device (default: can0)\n");
    printf("  -b <baud_rate>  Baud rate (default: 1000000)\n");
    printf("  -d <data>       CAN frame data (e.g., 123#1122334455667788)\n");
}

int main(int argc, char *argv[]) {
    const char *can_interface = DEFAULT_CAN_INTERFACE;
    int baud_rate = DEFAULT_BAUD_RATE;
    unsigned int can_id = 0;
    unsigned char data[8] = {0};  // CAN data maximum 8 bytes
    size_t data_len = 0;

    // Parse command line arguments
    int opt;
    while ((opt = getopt(argc, argv, "p:b:d:h")) != -1) {
        switch (opt) {
            case 'p':
                can_interface = optarg;
                break;
            case 'b':
                baud_rate = atoi(optarg);
                if (baud_rate <= 0) {
                    fprintf(stderr, "Invalid baud rate: %s\n", optarg);
                    print_usage();
                    return 1;
                }
                break;
            case 'd':
                {
                    // Parse CAN frame data (format: ID#DATA)
                    char *data_str = optarg;
                    char *id_str = strtok(data_str, "#");
                    char *data_hex = strtok(NULL, "");

                    if (id_str && data_hex) {
                        can_id = strtol(id_str, NULL, 16);  // Convert ID to hexadecimal
                        data_len = strlen(data_hex) / 2;

                        if (data_len > 8) {
                            fprintf(stderr, "Data length exceeds CAN frame size (max 8 bytes)\n");
                            return 1;
                        }

                        // Convert data from hex string to bytes
                        for (size_t i = 0; i < data_len; i++) {
                            sscanf(data_hex + 2 * i, "%2hhx", &data[i]);
                        }
                    } else {
                        fprintf(stderr, "Invalid data format. Use ID#DATA (e.g., 123#1122334455667788)\n");
                        return 1;
                    }
                }
                break;
            case 'h':
            default:
                print_usage();
                return 0;
        }
    }

    // Set up and start the CAN interface
    if (setup_can_interface(can_interface, baud_rate) != 0) {
        return 1;
    }

    // Send CAN frame
    if (send_can_frame(can_interface, can_id, data, data_len) != 0) {
        return 1;
    }

    return 0;
}
gcc -o can_sender can_sender.c
./can_sender -p can0 -b 1000000 -d 123#1122334455667788
更多指令
1、 ip link set canX down      //关闭can设备;
2、 ip link set canX up        //开启can设备;
3、 ip -details link show canX       //显示can设备详细信息;
4、 candump canX         //接收can总线发来数据;
5、 ifconfig canX down         //关闭can设备,以便配置;
6、 ip link set canX up type can bitrate 1000000 //设置can波特率
7、 conconfig canX bitrate + 波特率;
8、 canconfig canX start       //启动can设备;
9、 canconfig canX ctrlmode loopback on //回环测试;
10、canconfig canX restart     // 重启can设备;
11、canconfig canX stop     //停止can设备;
12、canecho canX         //查看can设备总线状态;
13、cansend canX --identifier=ID+数据  //发送数据;
14、candump canX --filter=ID:mask //使用滤波器接收ID匹配的数据
CTL 使用
控制CTL1为例:
echo 39 > /sys/class/gpio/export;
echo out > /sys/class/gpio/gpio39/direction;
#拉高
echo 1 > /sys/class/gpio/gpio39/value;
#拉低
echo 0 > /sys/class/gpio/gpio39/value;
D/I 使用
读取D/I IN1为例:
echo 36 > /sys/class/gpio/export;
echo in > /sys/class/gpio/gpio36/direction;
#读取
cat /sys/class/gpio/gpio36/value;
默认为1,输入5~36V为0。
A/I 使用
模拟输入是一种可以检测外部设备的电压或电流的接口,LPB3588提供了四路模拟输入,分别对应不同的设备节点。在使用模拟输入之前,需要确保外部设备连接正确,以及电压或电流的范围符合要求。
模拟输入测试,使用以下命令可以读取模拟输入的值:
电压值(V)=15/4096 * 读值;
电流值(MA)=30/4096 * 读值;
#读取A/I IN1值
cat /sys/devices/platform/fec10000.saradc/iio:device0/in_voltage7_raw
#读取A/I IN2值
cat /sys/devices/platform/fec10000.saradc/iio:device0/in_voltage6_raw
#读取A/I IN3值
cat /sys/devices/platform/fec10000.saradc/iio:device0/in_voltage2_raw
#读取A/I IN4值
cat /sys/devices/platform/fec10000.saradc/iio:device0/in_voltage4_raw
COM 使用
COM使用方法与RS485、UART1和UART2类似,只需替换设备文件即可。
HDMI/DP 说明
xrandx命令可以查看当前HDMI连接:
neardi@3588:~$ xrandr
Screen 0: minimum 320 x 200, current 1920 x 1080, maximum 16384 x 16384
HDMI-1 connected primary 1920x1080+0+0 (normal left inverted right x axis y axis) 0mm x 0mm
   1920x1080     60.00*+  60.00    50.00    30.00    24.00
   4096x2160     24.00
   3840x2160     30.00    25.00    24.00
   1920x1080i    60.00    50.00
   1280x720      60.00    60.00    50.00    50.00    30.00    24.00
   720x576       50.00    50.00
   720x480       59.94    59.94    59.94
HDMI-2 disconnected (normal left inverted right x axis y axis)
DSI-1 connected 1920x1080+0+0 (normal left inverted right x axis y axis) 0mm x 0mm
   1920x1080     60.00*+
DP-1 disconnected (normal left inverted right x axis y axis)
完整节点:
HDMI1:/sys/devices/platform/display-subsystem/drm/card0/card0-HDMI-A-1/
HDMI2:/sys/devices/platform/display-subsystem/drm/card0/card0-HDMI-A-2/
HDMI3:/sys/devices/platform/display-subsystem/drm/card0/card0-DSI-1/
DP:/sys/devices/platform/display-subsystem/drm/card0/card0-DP-2/
HDMIIN 使用
HDMI输入是一种可以接收外部HDMI信号,并转换为MIPI信号的接口,LPB3588提供了一路HDMI输入。在使用HDMI输入之前,需要确保HDMI设备连接正确,以及分辨率和帧率设置一致。
参考《HDMIIN》
ETH 说明
可以通过调试串口、ssh或者adb来查看IP地址,例如:
neardi@3588:~$ ifconfig -a
enP2p33s0: flags=4163<UP,BROADCAST,RUNNING,MULTICAST>  mtu 1500
        inet 192.168.1.65  netmask 255.255.255.0  broadcast 192.168.1.255
        inet6 fe80::7df7:e74d:497e:345d  prefixlen 64  scopeid 0x20<link>
        ether 62:ea:fb:ca:95:e7  txqueuelen 1000  (Ethernet)
        RX packets 2548  bytes 210938 (210.9 KB)
        RX errors 0  dropped 0  overruns 0  frame 0
        TX packets 338  bytes 46899 (46.8 KB)
        TX errors 0  dropped 0 overruns 0  carrier 0  collisions 0
        device interrupt 140  base 0xd000
Wi-Fi 说明
通过如下命令查看当前Wi-Fi型号:
cat /sys/bus/sdio/devices/mmc2\:0001\:1/vendor
cat /sys/bus/sdio/devices/mmc2\:0001\:1/device
0x02d0:0xaae8:AP6275S.0x024c:0xb852:RTL8852.0x024c:0xd723:RTL8723DS.0x024c:0xc821:RTL8821CS.0x1ffe:0x6316:FD7352S。
连接 Wi-Fi:
-
Cmd
-
C
-
Search Wi-Fi:
sudo nmcli device wifi rescan
- Show all Wi-Fi:
nmcli dev wifi list
- Connect Wi-Fi:
sudo nmcli device wifi connect neardi_5G password neardi_pwd
• neardi_5G 是WiFi 网络(SSID) 的名称。
• neardi_pwd 是连接到该WiFi 网络所需的密码。
• sudo 用于确保nmcli 具有管理网络连接所需的权限,因为在某些系统上连接到WiFi 网络可能需要管理权限。
create connect_wifi.c
#include <stdio.h>
#include <stdlib.h>
#include <string.h>
#include <unistd.h>

void connect_to_wifi(const char *ssid, const char *password) {
   char command[256];

   // Create the WPA configuration file without the -e option
   snprintf(command, sizeof(command), "echo 'network={\\n  ssid=\"%s\"\\n  psk=\"%s\"\\n}' | sudo tee /etc/wpa_supplicant/wpa_supplicant.conf", ssid, password);
   if (system(command) != 0) {
      perror("Failed to create wpa_supplicant.conf");
      return;
   }

   // Run wpa_supplicant
   if (system("sudo wpa_supplicant -B -i wlan0 -c /etc/wpa_supplicant/wpa_supplicant.conf") != 0) {
      perror("Failed to start wpa_supplicant");
      return;
   }

   // Obtain an IP address
   if (system("sudo dhclient wlan0") != 0) {
      perror("Failed to obtain an IP address");
   }
}

int main() {
   const char *ssid = "neardi_5G";
   const char *password = "neardi_pwd";

   connect_to_wifi(ssid, password);
   return 0;
}
gcc connect_wifi.c -o connect_wifi
sudo ./connect_wifi
LED 说明
完整节点:
SYS LED:cat /sys/devices/platform/leds/leds/work1/brightness
STA LED:cat /sys/devices/platform/leds/leds/work2/brightness
MIC 使用
使用以下命令可以录制音频文件,支持wav、mp3等格式。
录制双声道的16位小端格式的音频,采样率为48000Hz,然后保存为001.wav文件。
- Cmd
- C
- Python
arecord -Dhw:0,0 -r48000 -f S16_LE -c2 > 001.wav
• -Dhw:0,0 指定了录音设备,0,0 是card 0 device 0,也就是第一个声卡的第一个设备。
• -r48000 指定了采样率,单位是Hz,48000表示每秒采样48000次。
• -f S16_LE 指定了采样格式,S16_LE表示有符号的16位小端格式,也就是每个采样点占用2个字节,低位在前,高位在后。
• -c2 指定了声道数,2表示双声道,也就是立体声。
• > 001.wav 指定了输出文件,>表示重定向标准输出到文件,001.wav表示文件名,wav表示文件格式。
create audio_record.c
#include <stdio.h>
#include <stdlib.h>
#include <alsa/asoundlib.h>
#define SAMPLE_RATE 44100 // Replace SAMPLE_RATE with a local variable
#define CHANNELS 2 // Replace CHANNELS with a local variable
int main(int argc, char *argv[]) {
const char *device = "hw:0,0"; // Set the audio device
snd_pcm_t *pcm_handle;
snd_pcm_hw_params_t *params;
unsigned int sample_rate = SAMPLE_RATE; // Use a modifiable local variable
int channels = CHANNELS; // Use a modifiable local variable
int pcm, dir;
snd_pcm_uframes_t frames = 32;
FILE *file = fopen("001.wav", "wb");
if (!file) {
perror("Unable to create audio file");
return 1;
}
// Open PCM device
if ((pcm = snd_pcm_open(&pcm_handle, device, SND_PCM_STREAM_CAPTURE, 0)) < 0) {
fprintf(stderr, "Unable to open PCM device %s: %s\n", device, snd_strerror(pcm));
fclose(file);
return 1;
}
// Set hardware parameters
snd_pcm_hw_params_alloca(¶ms);
snd_pcm_hw_params_any(pcm_handle, params);
snd_pcm_hw_params_set_access(pcm_handle, params, SND_PCM_ACCESS_RW_INTERLEAVED);
snd_pcm_hw_params_set_format(pcm_handle, params, SND_PCM_FORMAT_S16_LE);
snd_pcm_hw_params_set_channels(pcm_handle, params, channels); // Use the variable channels
snd_pcm_hw_params_set_rate_near(pcm_handle, params, &sample_rate, &dir); // Use the variable sample_rate
// Apply parameters
if ((pcm = snd_pcm_hw_params(pcm_handle, params)) < 0) {
fprintf(stderr, "Unable to set hardware parameters: %s\n", snd_strerror(pcm));
snd_pcm_close(pcm_handle);
fclose(file);
return 1;
}
// Get buffer size
snd_pcm_hw_params_get_period_size(params, &frames, &dir);
int buffer_size = frames * channels * 2; // 2 bytes per channel
char *buffer = (char *)malloc(buffer_size);
// Write WAV file header
fwrite("RIFF", 1, 4, file);
fwrite("----", 1, 4, file); // Placeholder
fwrite("WAVE", 1, 4, file);
fwrite("fmt ", 1, 4, file);
int subchunk1_size = 16;
short audio_format = 1;
fwrite(&subchunk1_size, 4, 1, file);
fwrite(&audio_format, 2, 1, file);
fwrite(&channels, 2, 1, file); // Use the variable channels
fwrite(&sample_rate, 4, 1, file); // Use the variable sample_rate
int byte_rate = sample_rate * channels * 2;
fwrite(&byte_rate, 4, 1, file);
short block_align = channels * 2;
fwrite(&block_align, 2, 1, file);
short bits_per_sample = 16;
fwrite(&bits_per_sample, 2, 1, file);
// Write WAV data header
fwrite("data", 1, 4, file);
fwrite("----", 1, 4, file); // Placeholder
printf("Starting recording...\n");
// Start recording
int total_data_size = 0;
while (1) {
pcm = snd_pcm_readi(pcm_handle, buffer, frames);
if (pcm == -EPIPE) {
snd_pcm_prepare(pcm_handle);
} else if (pcm < 0) {
fprintf(stderr, "Recording failed: %s\n", snd_strerror(pcm));
break;
}
fwrite(buffer, 1, buffer_size, file);
total_data_size += buffer_size;
}
// Update WAV file size
fseek(file, 4, SEEK_SET);
int file_size = total_data_size + 36;
fwrite(&file_size, 4, 1, file);
fseek(file, 40, SEEK_SET);
fwrite(&total_data_size, 4, 1, file);
// Clean up resources
free(buffer);
snd_pcm_drain(pcm_handle);
snd_pcm_close(pcm_handle);
fclose(file);
printf("Recording complete\n");
return 0;
}
gcc audio_record.c -o audio_record -lasound
./audio_record
Install the PyAudio library:
sudo apt update
sudo apt install python3-pip
sudo apt install portaudio19-dev
pip3 install pyaudio
create audio_record.py
import wave
import pyaudio

# Audio format parameters
FORMAT = pyaudio.paInt16  # 16-bit PCM
CHANNELS = 2
RATE = 48000  # Sample rate
CHUNK = 4096  # Buffer size

# Create a PyAudio object
p = pyaudio.PyAudio()

# Open an audio stream
stream = p.open(format=FORMAT,
               channels=CHANNELS,
               rate=RATE,
               input=True,
               frames_per_buffer=CHUNK)

# Open a WAV file for writing
wf = wave.open('001.wav', 'wb')
wf.setnchannels(CHANNELS)
wf.setsampwidth(p.get_sample_size(FORMAT))
wf.setframerate(RATE)

print("Recording...")

# Record audio data
try:
   while True:
      data = stream.read(CHUNK)
      wf.writeframes(data)
except KeyboardInterrupt:
   print("Recording stopped.")

# Clean up
print("Recording complete. Saved as 001.wav")
stream.stop_stream()
stream.close()
p.terminate()
wf.close()
python audio_record.py
LINE/SPK 使用
- 当连接 Line 输出时,音频从 Line 接口输出;
- 当未连接 Line 输出时,音频自动切换为从扬声器(SPK)输出。
# 配置LINE通路打开
amixer -c 0 cset name='OUT1 Switch' on
# 配置SPK通路打开
amixer -c 0 cset name='OUT2 Switch' on
使用第一个声卡的第一个设备播放001.wav文件。
- Cmd
- C
- Python
aplay -D hw:0,0 001.wav
• -D hw:0,0 指定了播放设备,hw:0,0 是card 0 device 0,也就是第一个声卡的第一个设备。
• 001.wav 指定了音频文件,wav表示文件格式,001表示文件名。
Install the ALSA library and its development headers:
sudo apt update
sudo apt install libasound2-dev
create audio_play.c
#include <stdio.h>
#include <stdlib.h>
#include <alsa/asoundlib.h>
int main(int argc, char *argv[]) {
const char *device = "hw:0,0"; // Set audio device
const char *filename = "001.wav"; // Audio file path
snd_pcm_t *pcm_handle;
snd_pcm_hw_params_t *params;
unsigned int sample_rate = 44100; // Sample rate
int pcm, dir;
snd_pcm_uframes_t frames;
FILE *file;
char *buffer;
int buffer_size;
// Open audio file
file = fopen(filename, "rb");
if (!file) {
perror("Unable to open audio file");
return 1;
}
// Open PCM device
if ((pcm = snd_pcm_open(&pcm_handle, device, SND_PCM_STREAM_PLAYBACK, 0)) < 0) {
fprintf(stderr, "Unable to open PCM device %s: %s\n", device, snd_strerror(pcm));
fclose(file);
return 1;
}
// Set hardware parameters
snd_pcm_hw_params_alloca(¶ms);
snd_pcm_hw_params_any(pcm_handle, params);
snd_pcm_hw_params_set_access(pcm_handle, params, SND_PCM_ACCESS_RW_INTERLEAVED);
snd_pcm_hw_params_set_format(pcm_handle, params, SND_PCM_FORMAT_S16_LE);
snd_pcm_hw_params_set_channels(pcm_handle, params, 2);
snd_pcm_hw_params_set_rate_near(pcm_handle, params, &sample_rate, &dir);
// Apply parameters
if ((pcm = snd_pcm_hw_params(pcm_handle, params)) < 0) {
fprintf(stderr, "Unable to set hardware parameters: %s\n", snd_strerror(pcm));
snd_pcm_close(pcm_handle);
fclose(file);
return 1;
}
// Get frame size and buffer size
snd_pcm_hw_params_get_period_size(params, &frames, &dir);
buffer_size = frames * 4; // 2 channels, each sample is 2 bytes
buffer = (char *) malloc(buffer_size);
// Play audio
while (fread(buffer, 1, buffer_size, file) > 0) {
if ((pcm = snd_pcm_writei(pcm_handle, buffer, frames)) == -EPIPE) {
snd_pcm_prepare(pcm_handle);
} else if (pcm < 0) {
fprintf(stderr, "Playback failed: %s\n", snd_strerror(pcm));
}
}
// Cleanup
free(buffer);
snd_pcm_drain(pcm_handle);
snd_pcm_close(pcm_handle);
fclose(file);
printf("Playback completed\n");
return 0;
}
gcc audio_play.c -o audio_play -lasound
./audio_play
Install the PyAudio and wave libraries:
sudo apt update
sudo apt install python3-pyaudio
create audio_play.py
import pyaudio
import wave

def play_audio(filename):
   # Open WAV audio file
   with wave.open(filename, 'rb') as wf:
      # Initialize PyAudio
      p = pyaudio.PyAudio()

      # Configure audio stream
      stream = p.open(format=p.get_format_from_width(wf.getsampwidth()),
                        channels=wf.getnchannels(),
                        rate=wf.getframerate(),
                        output=True)

      # Read and play audio data
      data = wf.readframes(1024)
      while data:
            stream.write(data)
            data = wf.readframes(1024)

      # Stop and close audio stream
      stream.stop_stream()
      stream.close()

      # Terminate PyAudio
      p.terminate()
      print("Playback completed")

# Play file
play_audio('001.wav')
python3 audio_play.py
RTC时钟
LPB3588使用HYM8563作为RTC时钟。
如何修改RTC时钟为'2025-11-11 12:00:00'
- Cmd
- C
#关闭网络时间协议(NTP)的服务,使得RTC时钟不受网络时间的影响
timedatectl set-ntp false
#设置RTC时钟的时间为2025年11月11日12时00分00秒
timedatectl set-time '2025-11-11 12:00:00'
#将RTC时钟的时间同步到系统时钟,使得系统时钟和RTC时钟保持一致,可加在/etc/init.d/rockchip.sh中
hwclock --hctosys
create time_setter.c
#include <stdio.h>
#include <stdlib.h>
#include <string.h>
#include <time.h>
#include <unistd.h>

void exec_command(const char *cmd) {
    int ret = system(cmd);
    if (ret != 0) {
        fprintf(stderr, "Command failed: %s\n", cmd);
        exit(1);
    }
}

// Set system time
void set_system_time(const char *time_str) {
    char cmd[128];
    snprintf(cmd, sizeof(cmd), "timedatectl set-time '%s'", time_str);
    exec_command(cmd);
}

// Disable NTP
void disable_ntp() {
    exec_command("timedatectl set-ntp false");
}

// Synchronize hardware clock to system clock
void sync_hwclock_to_system() {
    exec_command("hwclock --hctosys");
}

// Print help information
void print_usage() {
    printf("Usage: time_setter -t <time>\n");
    printf("  -t <time>   Set system time (format: 'YYYY-MM-DD HH:MM:SS')\n");
    printf("  -h          Show help\n");
}

int main(int argc, char *argv[]) {
    if (argc != 3) {
        print_usage();
        return 1;
    }

    const char *time_str = NULL;

    int opt;
    while ((opt = getopt(argc, argv, "t:h")) != -1) {
        switch (opt) {
            case 't':
                time_str = optarg;
                break;
            case 'h':
            default:
                print_usage();
                return 0;
        }
    }

    if (time_str == NULL) {
        fprintf(stderr, "Error: Time argument is required\n");
        print_usage();
        return 1;
    }

    // 1. Disable NTP
    disable_ntp();

    // 2. Set system time
    set_system_time(time_str);

    // 3. Synchronize hardware clock to system clock
    sync_hwclock_to_system();

    printf("Time has been set to: %s\n", time_str);
    return 0;
}
gcc -o time_setter time_setter.c
./time_setter -t "2025-11-11 12:00:00"
指示灯
- Power 电源指示灯,常亮表示设备已通电且电源正常供电。
- SYS 系统状态灯,正常运行时周期性闪烁,表示系统主控正常运行。
- STA 状态指示灯,可用于反映系统工作状态、应用层心跳,正常时闪烁。
- 4G 灯,行为由所用拨号模块(如 Quectel EC20)定义,例如:
- 常亮:已注册网络
- 闪烁:正在拨号或数据传输中
- 熄灭:无信号或模块未初始化