接口定义
整机接口定义
LPA-AGX-Orin 提供了丰富的接口,具体如下图:
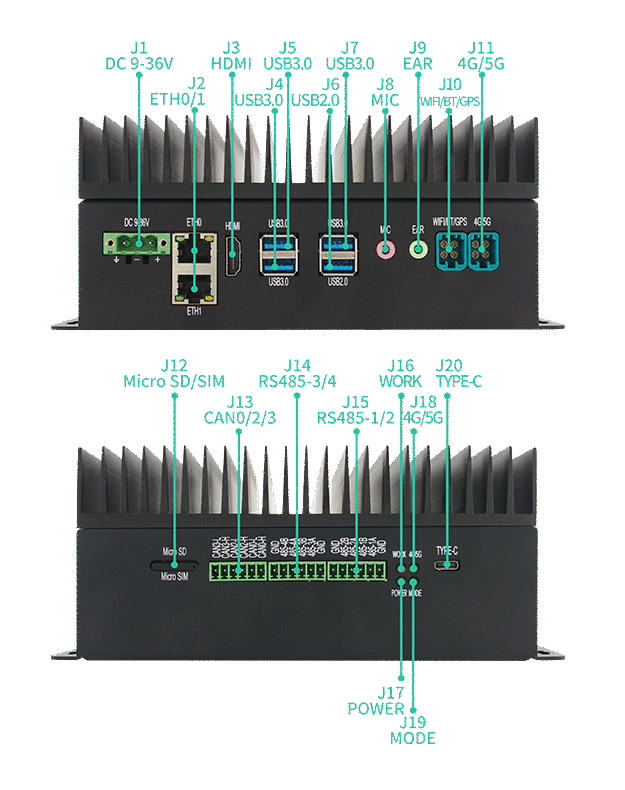
| 丝印 | 设备节点 | 备注 |
|---|---|---|
| 风扇 | /sys/class/hwmon/hwmon4/pwm1 | 根据温度自动调整风扇转速 /usr/sbin/nvfancontrol控制 |
| MIC | 输入声音,录制音频文件 | |
| LINE | 播放音频文件 | |
| HDMI1 | HDMI输出,最高支持4K@60fps | |
| ETH0 | eth0 | 千兆网卡 J3613 |
| ETH1 | eth1 | EtherCAT 千兆网卡,靠近recovery键 |
| ETH2 | eth2 | EtherCAT 千兆网卡,靠近音配端子 |
| WIFI | wlan0 | 2.4/5GHz |
| RS485-1 | /dev/ttysWK0(398) /sys/class/gpio/PI.00 | 串口,默认波特率9600 |
| RS485-2 | /dev/ttysWK2(399) /sys/class/gpio/PH.07 | 串口,默认波特率9600 |
| UART | /dev/ttyTHS4 | 串口,默认波特率9600 |
| PWR LED | 电源灯 不可控 | |
| STATUS LED | 状态灯*3 可控 |
目前需要手动执行 root@tegra-ubuntu:/etc/init.d# sh neardi.sh 加载驱动
设备树与配置文件
- 主要 dts 路径Linux_for_Tegra/source/public/hardware/nvidia/platform/t23x/concord/kernel-dts/tegra234-p3701-0005-p3737-0000.dts
- Pinmux 配置文件bootloader/t186ref/BCT/tegra234-mb1-bct-pinmux-p3701-0000-a04.dtsi
- GPIO 配置文件bootloader/tegra234-mb1-bct-gpio-p3701-0000-a04.dtsi
- defconfig 路径Linux_for_Tegra/source/public/kernel/kernel-5.10/arch/arm64/configs/tegra_defconfig
- neardi 路径Linux_for_Tegra/neardi 配置建议: 尽量采用 overlay 方式增加信息,避免直接修改原始配置,以防功能异常。
- SoC 管脚配置信息下载Jetson AGX Orin Pinmux Config Template
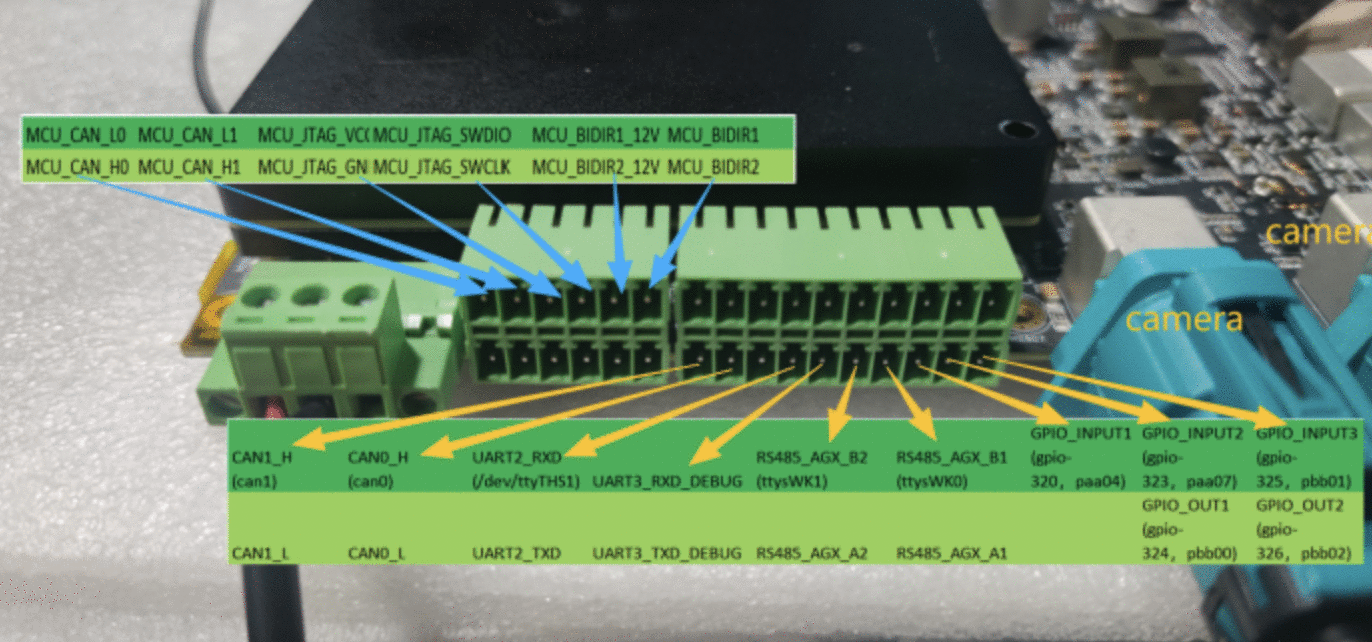
系统按键 说明
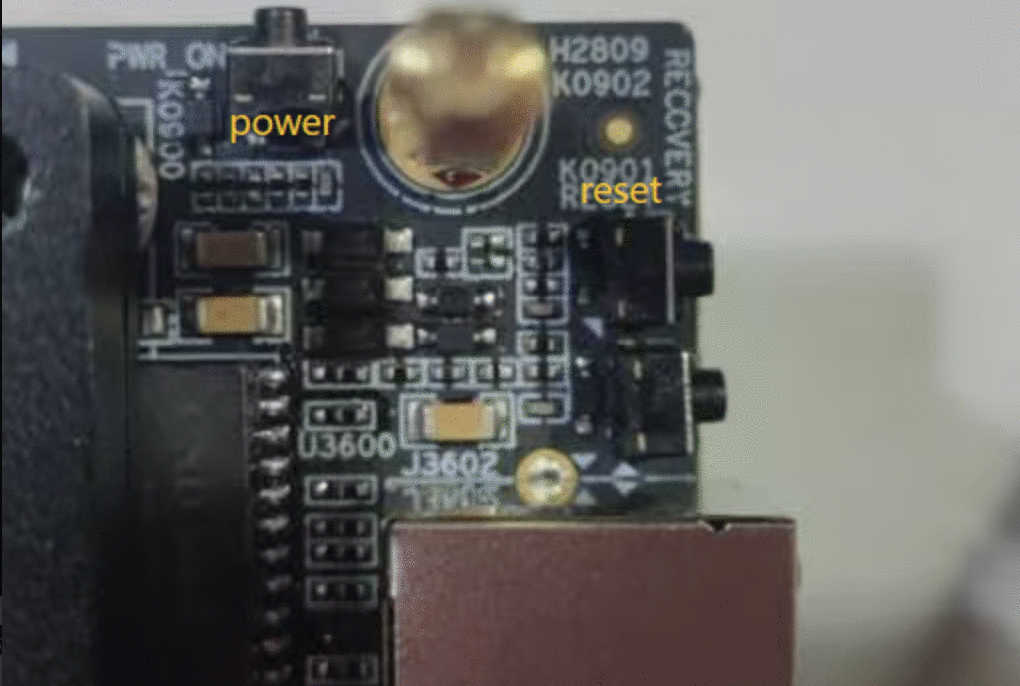
风扇 使用
控制节点: /sys/class/hwmon/hwmon4/pwm1
默认温控自动调节风扇转速,根据温度自动调整风扇转速。
LINE 使用
i2ctransfer -f -y 8 w2@0x11 0x04 0x30 && \
amixer -c APE cset name="I2S1 Mux" ADMAIF1 && \
aplay -D hw:APE,0 they48k.wav
MIC 使用
sudo i2ctransfer -f -y 8 w2@0x11 0x03 0x00 && \
amixer -c APE cset name="ADMAIF1 Mux" I2S1 && \
arecord -D hw:APE,0 -r 48000 -c 2 -f S16 -d 10 output.wav
ETH 说明
可以通过调试串口、ssh查看IP地址,例如:
ETH0
root@tegra-ubuntu:/system/lib/modules# ifconfig
eth0: flags=4163<UP,BROADCAST,RUNNING,MULTICAST>  mtu 1500
        inet 192.168.1.21  netmask 255.255.255.0  broadcast 192.168.1.255
        inet6 fe80::b8a3:6266:f4a8:d724  prefixlen 64  scopeid 0x20<link>
        ether 00:55:7b:b5:7d:f7  txqueuelen 1000  (Ethernet)
        RX packets 647  bytes 65789 (65.7 KB)
        RX errors 0  dropped 0  overruns 0  frame 0
        TX packets 346  bytes 48062 (48.0 KB)
        TX errors 0  dropped 0 overruns 0  carrier 0  collisions 0
        device interrupt 70  base 0x8000
EtherCAT ETH1/ETH2网口说明E
通过如下命令查看当前ETH1/ETH2型号:
root@tegra-ubuntu:/etc/init.d# lspci
0005:01:00.0 Ethernet controller: Intel Corporation I210 Gigabit Network Connection (rev 03)
若没有eth1和2,需要加载igb驱动:
root@tegra-ubuntu:/system/lib/modules# insmod igb.ko
eth1: flags=4163<UP,BROADCAST,RUNNING,MULTICAST>  mtu 1500
        inet 192.168.1.52  netmask 255.255.255.0  broadcast 192.168.1.255
        inet6 fe80::91d4:1ba2:972f:2770  prefixlen 64  scopeid 0x20<link>
        ether 00:a0:c9:00:00:01  txqueuelen 1000  (Ethernet)
        RX packets 13  bytes 1601 (1.6 KB)
        RX errors 0  dropped 0  overruns 0  frame 0
        TX packets 34  bytes 4562 (4.5 KB)
        TX errors 0  dropped 0 overruns 0  carrier 0  collisions 0
        device memory 0x2428000000-242807ffff

eth2: flags=4099<UP,BROADCAST,MULTICAST>  mtu 1500
        ether 00:a0:c9:00:00:02  txqueuelen 1000  (Ethernet)
        RX packets 0  bytes 0 (0.0 B)
        RX errors 0  dropped 0  overruns 0  frame 0
        TX packets 0  bytes 0 (0.0 B)
        TX errors 0  dropped 0 overruns 0  carrier 0  collisions 0
        device memory 0x2b28000000-2b2807ffff
Wi-Fi 说明
通过如下命令查看当前Wi-Fi型号:
root@tegra-ubuntu:/etc/init.d# lspci
0001:01:00.0 Unassigned class [ff00]: Device 1ffe:6316 (rev 01)
0x1ffe:0x6316:FD7352S。
Uart 使用
设备节点: /dev/ttyTHS4
cat /dev/ttyTHS4 &
echo "123" > /dev/ttyTHS4
测试命令: busybox microcom -t 5000 -s 115200 /dev/ttyTHS4
RS485-1 使用
RS485-1 是一种常见的通信接口,用于与外部设备进行串行通信。LPA-AGX-Orin提供了多个串口,分别对应不同的设备节点。在使用串口之前,需要确保串口连接正确,以及波特率和其他参数设置一致。
cat /sys/kernel/debug/gpio | grep PI.00 可以查询对应GPIO的状态
若未加载wk2xxx_spi.ko驱动,需要加载:
cd /system/lib/modules/
insmod /system/lib/modules/wk2xxx_spi.ko
RS485设备文件为/dev/ttysWK0和/dev/ttysWK2。在开发板设备上运行下列命令互相通信:
echo 398 > /sys/class/gpio/export
echo out > /sys/class/gpio/PH.07/direction
echo 1 > /sys/class/gpio/PH.07/value
echo 399 > /sys/class/gpio/export
echo out > /sys/class/gpio/PI.00/direction
echo 0 > /sys/class/gpio/PI.00/value

cat /dev/ttysWK2 &
echo "neardi RS485 test..." > /dev/ttysWK0
LED 说明
STATUS LED 是LPA-AGX-Orin的状态指示灯,用于显示设备的运行状态。LED 有3个,分别对应不同的状态。
查看LED当前状态:
root@tegra-ubuntu:/sys/class/gpio# cat /sys/kernel/debug/gpio
 gpio-440 (PP.00               |sysfs               ) out lo
 gpio-441 (PP.01               |sysfs               ) out lo
 gpio-442 (PP.02               |sysfs               ) in  lo
LED1是POWER灯斜对角
cd /sys/class/gpio
echo 440 > export
cd PP.00
echo out > direction
echo 1 > value # 亮
echo 0 > value # 灭
LED2是POWER灯右方
cd /sys/class/gpio
echo 441 > export
cd PP.01
echo out > direction
echo 1 > value # 亮
echo 0 > value # 灭
LED3是POWER灯上方
cd /sys/class/gpio
echo 442 > export
cd PP.02
echo out > direction
echo 1 > value # 亮
echo 0 > value # 灭
摄像头模块配置
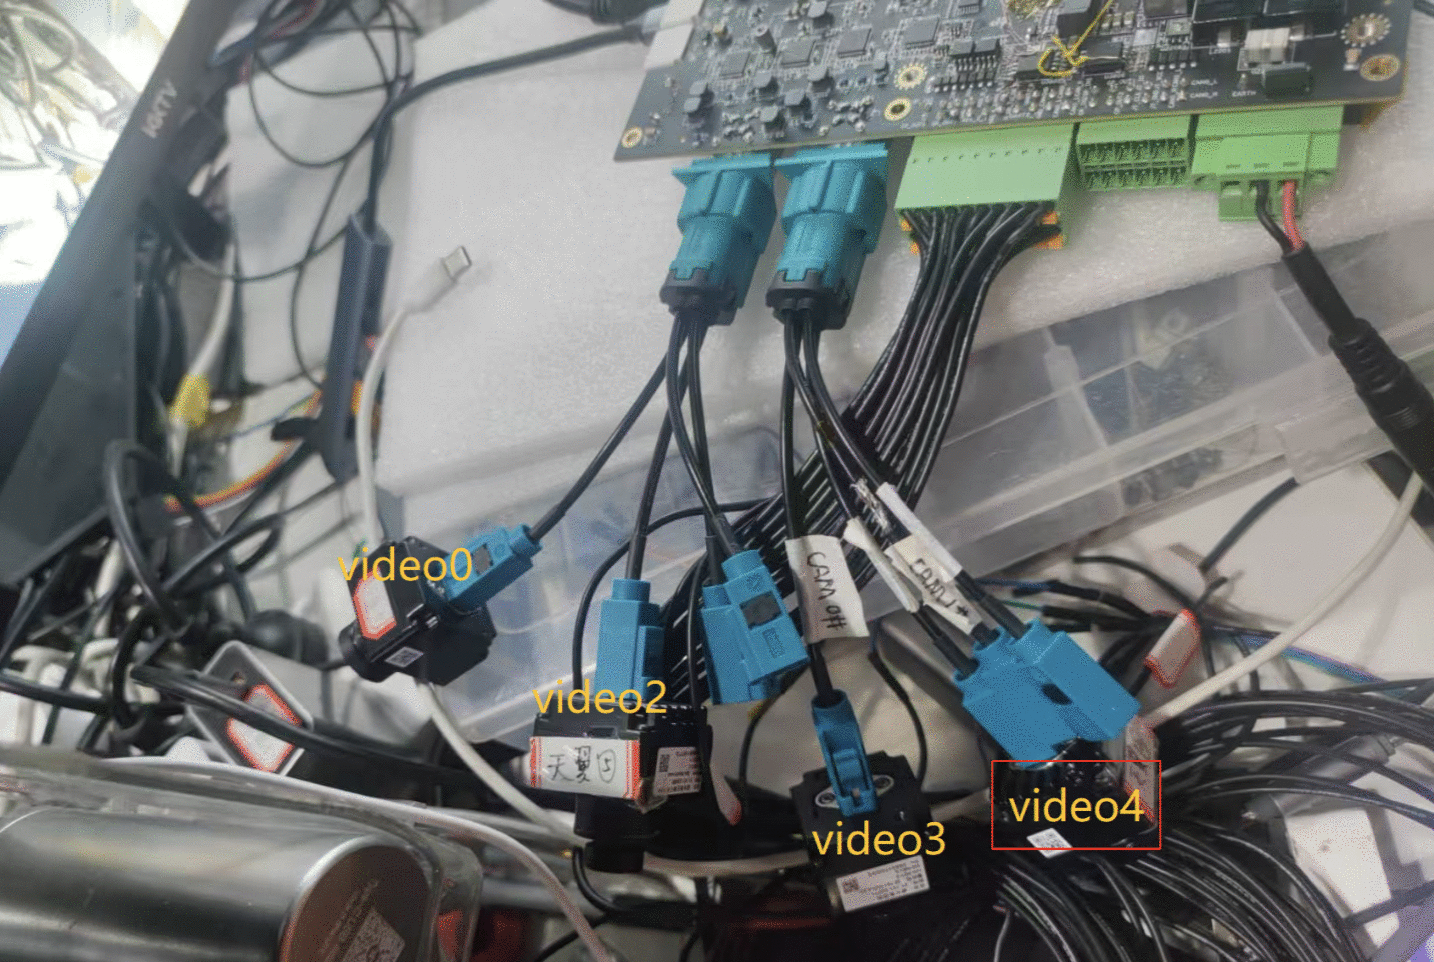
解串MAX9296A芯片 * 4,1个MAX9296A芯片对应2个GMSL端口,总共8个GMSL端口。
频率锁定:
i2cset -y -f 2 0x70 0x04
i2cdump -y -f 2 0x48
i2ctransfer -y -f 2 w3@0x48 0x00 0x01 0x01 //设定频率,具体信息见max9296a文档
i2ctransfer -f -y 2 w2@0x48 0x00 0x01 r1
i2cdetect -y -r 2
i2cdump -y -f 2 0x1a
- 模拟信号输入:CHA,CHB
- 数字信号输出(MIPI):portA,portB
- 当前配置:CHA、CHB 均从 portA 输出(vc0)
- 默认相机模组:丽景 camera
cd /home/neardi
./jetson_gmsl_x1.sh -s 30 -a 48 && v4l2-ctl -d /dev/video0 --stream-mmap --stream-count=1000 --set-fmt-video=width=1920,height=1536,pixelformat=UYVY
./jetson_gmsl_x1.sh -s 31 -a 48 && v4l2-ctl -d /dev/video2 --stream-mmap --stream-count=1000 --set-fmt-video=width=1920,height=1536,pixelformat=UYVY
./jetson_gmsl_x1.sh -s 32 -a 48 && v4l2-ctl -d /dev/video4 --stream-mmap --stream-count=1000 --set-fmt-video=width=1920,height=1536,pixelformat=UYVY
./jetson_gmsl_x1.sh -s 33 -a 48 && v4l2-ctl -d /dev/video6 --stream-mmap --stream-count=1000 --set-fmt-video=width=1920,height=1536,pixelformat=UYVY
TYPEC
结构说明:
Jetson AGX Orin Platform Adaptation and Bring-Up — NVIDIA Jetson Linux Developer Guide https://docs.nvidia.com/jetson/archives/r36.4.3/DeveloperGuide/HR/JetsonModuleAdaptationAndBringUp/JetsonAgxOrinSeries.html#enabling-gpio-as-a-wake-up-source
两个typec都可以烧录/识别typec转u盘
root@tegra-ubuntu:~# lsblk
NAME         MAJ:MIN RM   SIZE RO TYPE MOUNTPOINT
loop0          7:0    0    16M  1 loop
sda            8:0    1  14.3G  0 disk
└─sda1         8:1    1  14.3G  0 part
CAN
modprobe can
modprobe can_raw
modprobe mttcan
ip link set can0 down && ip link set can0 type can bitrate 100000  && ip -details -statistics link show can0 && ip link set can0 up
ip link set can1 down && ip link set can1 type can bitrate 100000  && ip -details -statistics link show can1 && ip link set can1 up
ifconfig
dmesg | grep can
candump can0 &
cansend can0 1F223344#1122334455667788
cansend can1 1F223344#1122334455667788
pkill -9 can*
lsof |grep can0
ps -ef
4/5G
若未加载qmi_wwan驱动,需要加载:
root@tegra-ubuntu:~# lsmod
Module                  Size  Used by
qmi_wwan               36864  0
使用quectel-CM工具配置4/5G模块:
root@tegra-ubuntu:/system/lib/modules# quectel-CM
[02-14_03:27:20:959] QConnectManager_Linux_V1.6.7
[02-14_03:27:20:960] Find /sys/bus/usb/devices/1-4.2 idVendor=0x2c7c idProduct=0x125, bus=0x001, dev=0x003
[02-14_03:27:20:960] Auto find qmichannel = /dev/cdc-wdm0
[02-14_03:27:20:960] Auto find usbnet_adapter = wwan0
[02-14_03:27:20:960] netcard driver = qmi_wwan, driver version = 5.10.216-tegra
[02-14_03:27:20:960] Modem works in QMI mode
[02-14_03:27:20:977] cdc_wdm_fd = 7
[02-14_03:27:21:065] Get clientWDS = 5
[02-14_03:27:21:097] Get clientDMS = 1
[02-14_03:27:21:129] Get clientNAS = 2
[02-14_03:27:21:162] Get clientUIM = 1
[02-14_03:27:21:194] Get clientWDA = 1
[02-14_03:27:21:225] requestBaseBandVersion EC20CEHDLGR08A06M1G
[02-14_03:27:21:354] requestGetSIMStatus SIMStatus: SIM_READY
[02-14_03:27:21:417] requestGetProfile[pdp:1 index:1] cmnet///0/IPV4V6
[02-14_03:27:21:449] requestRegistrationState2 MCC: 460, MNC: 0, PS: Attached, DataCap: LTE
[02-14_03:27:21:481] requestQueryDataCall IPv4ConnectionStatus: DISCONNECTED
[02-14_03:27:21:481] ip addr flush dev wwan0
[02-14_03:27:21:486] ip link set dev wwan0 down
[02-14_03:27:21:546] requestSetupDataCall WdsConnectionIPv4Handle: 0x86d65170
[02-14_03:27:21:675] ip link set dev wwan0 up
[02-14_03:27:21:680] No default.script found, it should be in '/usr/share/udhcpc/' or '/etc//udhcpc' depend on your udhcpc version!
[02-14_03:27:21:680] busybox udhcpc -f -n -q -t 5 -i wwan0
udhcpc: started, v1.30.1
udhcpc: sending discover
udhcpc: sending discover
udhcpc: sending discover
udhcpc: sending discover
udhcpc: sending discover
udhcpc: no lease, failing
[02-14_03:27:36:931] File:ql_raw_ip_mode_check Line:143 udhcpc fail to get ip address, try next:
[02-14_03:27:36:931] ip link set dev wwan0 down
[02-14_03:27:36:936] echo Y > /sys/class/net/wwan0/qmi/raw_ip
[02-14_03:27:36:937] ip link set dev wwan0 up
[02-14_03:27:36:942] busybox udhcpc -f -n -q -t 5 -i wwan0
udhcpc: started, v1.30.1
udhcpc: sending discover
udhcpc: sending select for 10.56.7.209
udhcpc: lease of 10.56.7.209 obtained, lease time 7200
[02-14_03:27:37:063] ip -4 address flush dev wwan0
[02-14_03:27:37:066] ip -4 address add 10.56.7.209/30 dev wwan0
[02-14_03:27:37:069] ip -4 route add default via 10.56.7.210 dev wwan0
测试ping 4/5G模块是否正常连接:
root@tegra-ubuntu:~# ping -I wwan0 124.237.177.164
PING 124.237.177.164 (124.237.177.164) from 10.56.7.209 wwan0: 56(84) bytes of data.
64 bytes from 124.237.177.164: icmp_seq=1 ttl=47 time=165 ms
64 bytes from 124.237.177.164: icmp_seq=2 ttl=47 time=55.1 ms
64 bytes from 124.237.177.164: icmp_seq=3 ttl=47 time=52.6 ms