File Share
Introduction
File Share (File Share) is an array file sharing group control system designed by aBMC for array servers. The Servers page supports providing shared directories externally through NFS and CIFS; the Clients page supports mounting NFS, CIFS, or SSHFS remote resources to target devices.
- NFS is suitable for Linux/Unix-like clients and supports configuring allowed clients, read/write modes, and NFS export options.
- CIFS is suitable for clients requiring Samba/SMB-compatible access and supports shared users, share names, read/write modes, and access lists.
- SSHFS is used for client-side mounting only; it mounts a remote directory to a local path on the device through an SSH account.
Development Vision
- Provide a unified entry point for shared services and directory management in multi-device environments.
- Reduce the risk of shared directories being mistakenly written to or accessed without authorization, through least-privilege, client scope, and read/write mode configuration.
Feature Usage
Opening the File Share Server Page
1. Select **Devices** in the left navigation bar.
2. Select **File Share** in the secondary navigation bar.
3. Select **Servers** at the top of the page.
4. In **Protocol**, select **NFS** or **CIFS**.
5. Use the search, status filter, **Reset**, **Expand all**, and the share operations on the right side of the page.
6. In the list, view device status, service status, and the configured shared directories.
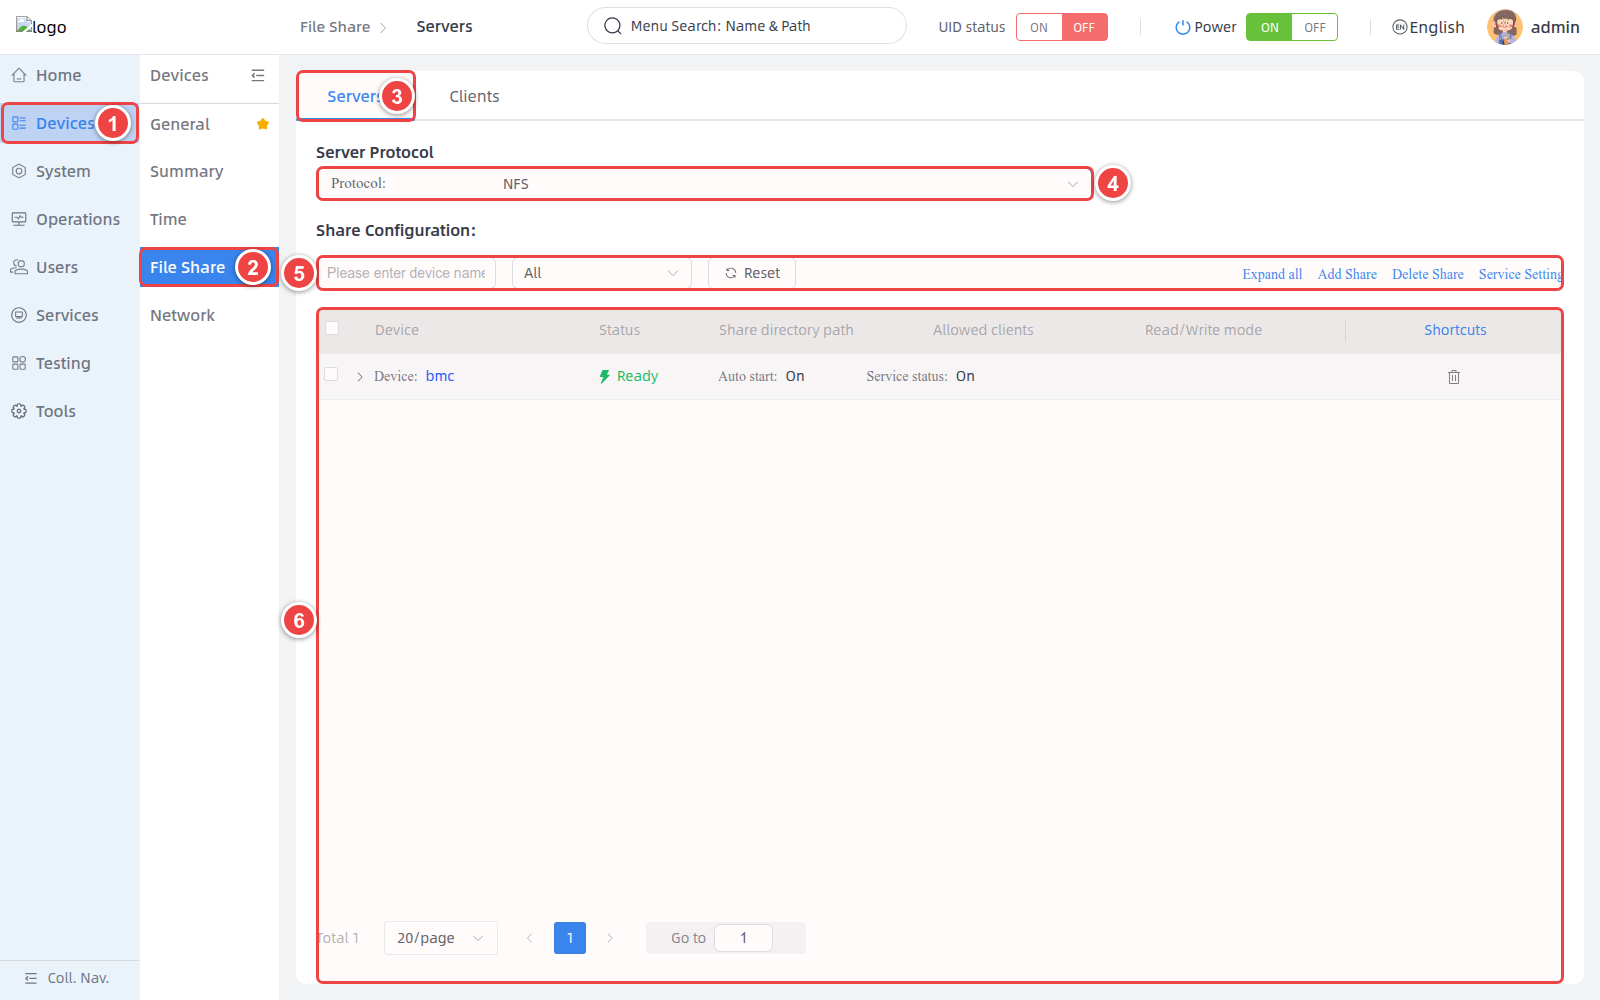
### Page operation description [step]
| Operation | Description |
| --- | --- |
| All / Online / Offline | Filters the list by device online status. |
| Reset | Clears the search and filter conditions. |
| Expand all / Collapse all | Expands or collapses the shared directory details of all devices. |
| Add Share | Adds an NFS or CIFS share on the selected devices. |
| Delete Share | Deletes the selected shared directories. |
| Service Setting | Configures auto start, running status, and ports of the share service. |
<Callout title="About status" type="info">
A device showing **Ready** only means the device is available. **Auto start** indicates whether the share service starts with the system, and **Service status** indicates whether the service is currently running.
</Callout>
Managing NFS Shares
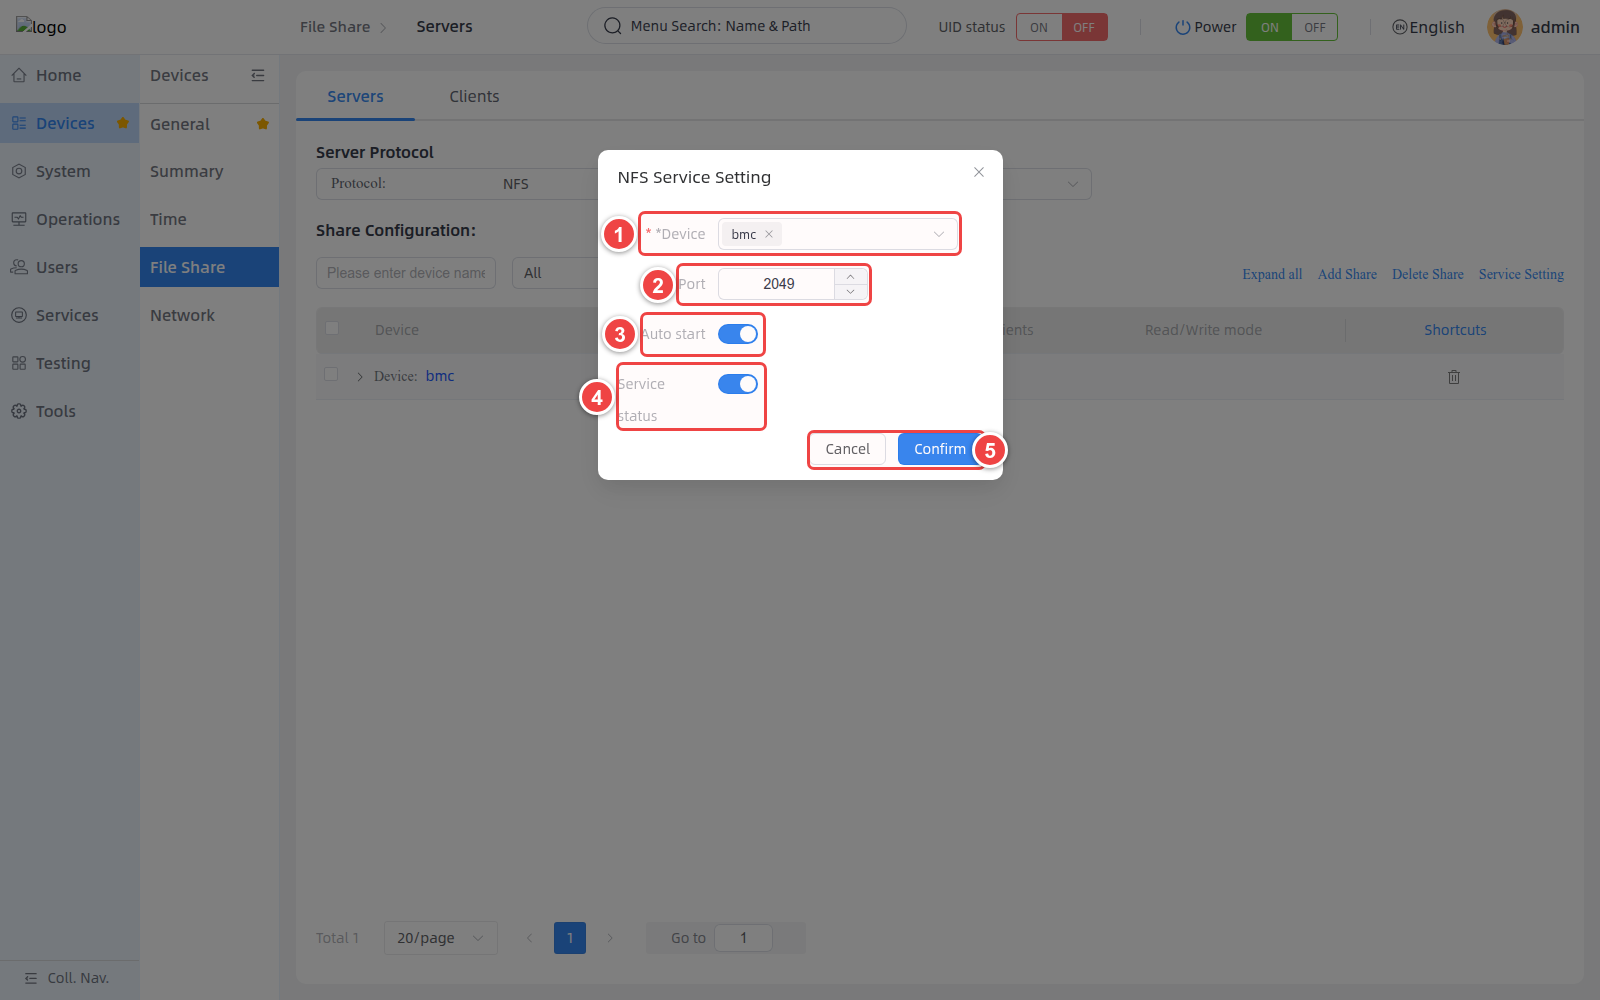
1. Set **Protocol** to **NFS**.
2. Click **Service Setting**.
3. In **Device**, select one or more devices.
4. In **Port**, set the NFS service port; the port range is `1–65535`, and the default port is `2049`.
5. Use **Auto start** to set whether the service starts with the system.
6. Use **Service status** to start or stop the current service.
7. After verifying the configuration, click **Confirm**.
### Add an NFS share [step]
1. Click **Add Share** to open the **Add NFS Share** window.
2. In **Device**, select one or more target devices. Android devices do not support NFS share configuration here.
3. In **SDP**, enter the shared directory path to export, for example `/home/bmc/share`.
4. In **Allowed clients**, enter the allowed client addresses or subnets. `*` allows all clients.
5. In **Read/Write**, select `rw` or `ro`.
6. Configure **Sync write (sync)** and **Advanced options** as needed.
7. Check the advanced options and access scope, then click **Confirm**.
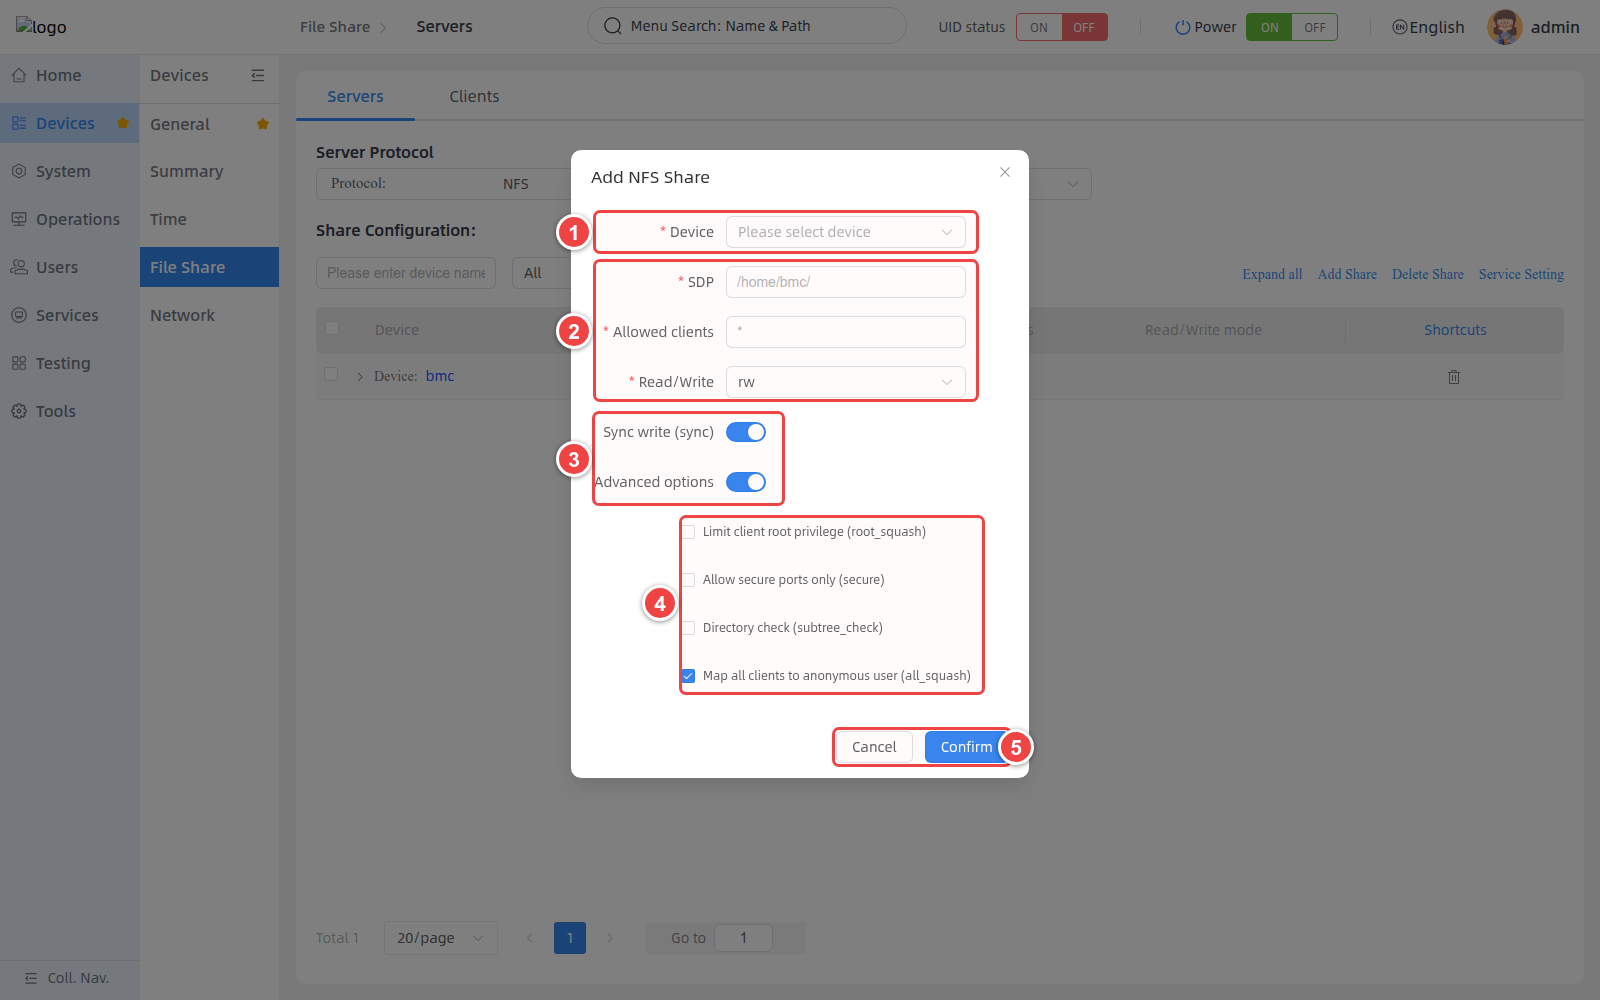
### NFS share parameter description [step]
| Parameter | Description | Configuration advice |
| --- | --- | --- |
| Device | Target devices to apply the configuration to; multiple selection is supported. | Before bulk configuration on multiple devices, confirm the directory is as expected on every device. |
| SDP | Local directory path to export through NFS. | Use an absolute path and confirm the directory and its permissions are correct. |
| Allowed clients | Allowed client addresses, hosts, or subnets. | Prefer trusted subnets; use `*` only in isolated networks. |
| rw / ro | `rw` allows read/write; `ro` allows read-only. | Use `ro` when clients do not need to modify content. |
| sync | Synchronous writes; the server returns only after the data is actually written. | Recommended when data consistency is the priority. |
| root_squash | Maps the client root user to a low-privilege user. | Recommended unless root access requirements have been explicitly evaluated. |
| secure | Allows clients to connect only from privileged source ports. | Confirm clients support this restriction before enabling. |
| subtree_check | Checks whether accessed files are within the exported subtree. | Set according to the directory structure and compatibility requirements. |
| all_squash | Maps all client users to an anonymous user. | Suitable for shares where client user identities should not be preserved. |
<Callout title="Default options" type="info">
The WEB window defaults to `rw`, enables `sync` and advanced options, and selects `all_squash` by default. Re-check these against your actual permission policy before submitting.
</Callout>
### View and delete NFS shares [step]
1. In the NFS list, expand the target device to view **Share directory path**, **Allowed clients**, and **Read/Write mode**.
2. To delete a share, select the corresponding directory and click **Delete Share**, or use the delete icon on that row.
3. When confirming the deletion target, verify both the share path and the allowed clients.
<Callout title="Deletion impact" type="warn">
Deleting an NFS share cancels the directory export; connected clients may immediately lose access. Confirm there are no critical read/write tasks first.
</Callout>
```bash
bmc share server nfs status --protocol http --ip <BMC_IP> --port <BMC_PORT> --user <USERNAME> --password <PASSWORD> --core <NODE_ID>
```

### Configure the NFS service [step]

The following example sets the service to start with the system, run immediately, and use service port `2049`.

```bash
bmc share server nfs set-status --protocol http --ip <BMC_IP> --port <BMC_PORT> --user <USERNAME> --password <PASSWORD> --core <NODE_ID> --enabled --active --service-port 2049
```

To stop the service and disable auto start, pass explicit boolean values while keeping a valid port.

```bash
bmc share server nfs set-status --protocol http --ip <BMC_IP> --port <BMC_PORT> --user <USERNAME> --password <PASSWORD> --core <NODE_ID> --enabled=false --active=false --service-port 2049
```

### View NFS shared directories [step]

```bash
bmc share server nfs show --protocol http --ip <BMC_IP> --port <BMC_PORT> --user <USERNAME> --password <PASSWORD> --core <NODE_ID>
```

### Create an NFS share [step]

```bash
bmc share server nfs create --protocol http --ip <BMC_IP> --port <BMC_PORT> --user <USERNAME> --password <PASSWORD> --core <NODE_ID> --path /share --allow "*" --sync --all-squash
```

### Delete an NFS share [step]

An NFS share is identified by both its share path and allowed clients; deletion must provide `--path` and `--allow` together.

```bash
bmc share server nfs delete --protocol http --ip <BMC_IP> --port <BMC_PORT> --user <USERNAME> --password <PASSWORD> --core <NODE_ID> --path /share --allow "*"
```

### NFS CLI parameter description [step]

| Parameter | Applicable commands | Description |
| --- | --- | --- |
| `--core` | All | Node ID of the target device or sub-board. |
| `--enabled` | `set-status` | Sets whether the service starts with the system. |
| `--active` | `set-status` | Sets whether the service is currently running. |
| `--service-port` | `set-status` | Share service listening port. |
| `--path` | `create` / `delete` | Shared directory path. |
| `--allow` | `create` / `delete` | Allowed client addresses or subnets. |
| `--ro` | `create` | Sets the share to read-only; read/write when not specified. |
| `--sync` | `create` | Enables synchronous writes. |
| `--root-squash` | `create` | Enables root user mapping. |
| `--secure` | `create` | Allows privileged source ports only. |
| `--subtree-check` | `create` | Enables subtree checking. |
| `--all-squash` | `create` | Maps all client users to an anonymous user. |

<Callout title="CLI boolean options" type="warn">
  Unspecified boolean options in the CLI default to `false`, which is not fully identical to the defaults used when adding an NFS share in the WEB. When using `create` or `set-status`, explicitly pass the options you want to enable.
</Callout>
| Operation | Method | URI |
| --- | --- | --- |
| View the NFS share service | GET | `/redfish/v1/Systems/bmc/Oem/Firefly/NFS/ShareService` |
| View NFS shares of a specific device | GET | `/redfish/v1/Systems/{NodeId}/Oem/Firefly/NFS/ShareDirs` |
| Set the NFS share service | POST | `/redfish/v1/Systems/{NodeId}/Oem/Firefly/NFS/ShareService/Actions/SetShareService` |
| Add an NFS share | POST | `/redfish/v1/Systems/{NodeId}/Oem/Firefly/NFS/ShareDirs/Actions/AddShareDir` |
| Delete an NFS share | POST | `/redfish/v1/Systems/{NodeId}/Oem/Firefly/NFS/ShareDirs/Actions/DeleteShareDir` |

**Set NFS share service request body**

```json
{
  "Enabled": true,
  "Active": true,
  "Port": 2049
}
```

**Add NFS share request body**

```json
{
  "DirPath": "/share",
  "AllowCliAddr": "*",
  "Config": {
    "ReadOnly": false,
    "Sync": true,
    "RootSquash": false,
    "AllSquash": true,
    "Secure": false,
    "SubtreeCheck": false
  }
}
```

**Delete NFS share request body**

```json
{
  "DirPath": "/share",
  "AllowCliAddr": "*"
}
```

<Callout title="API notes" type="info">
  `{NodeId}` is the Node ID of the target device. For detailed information about interface authentication, response fields, error codes, and device support, refer to the Redfish API documentation.
</Callout>
Managing CIFS Shares
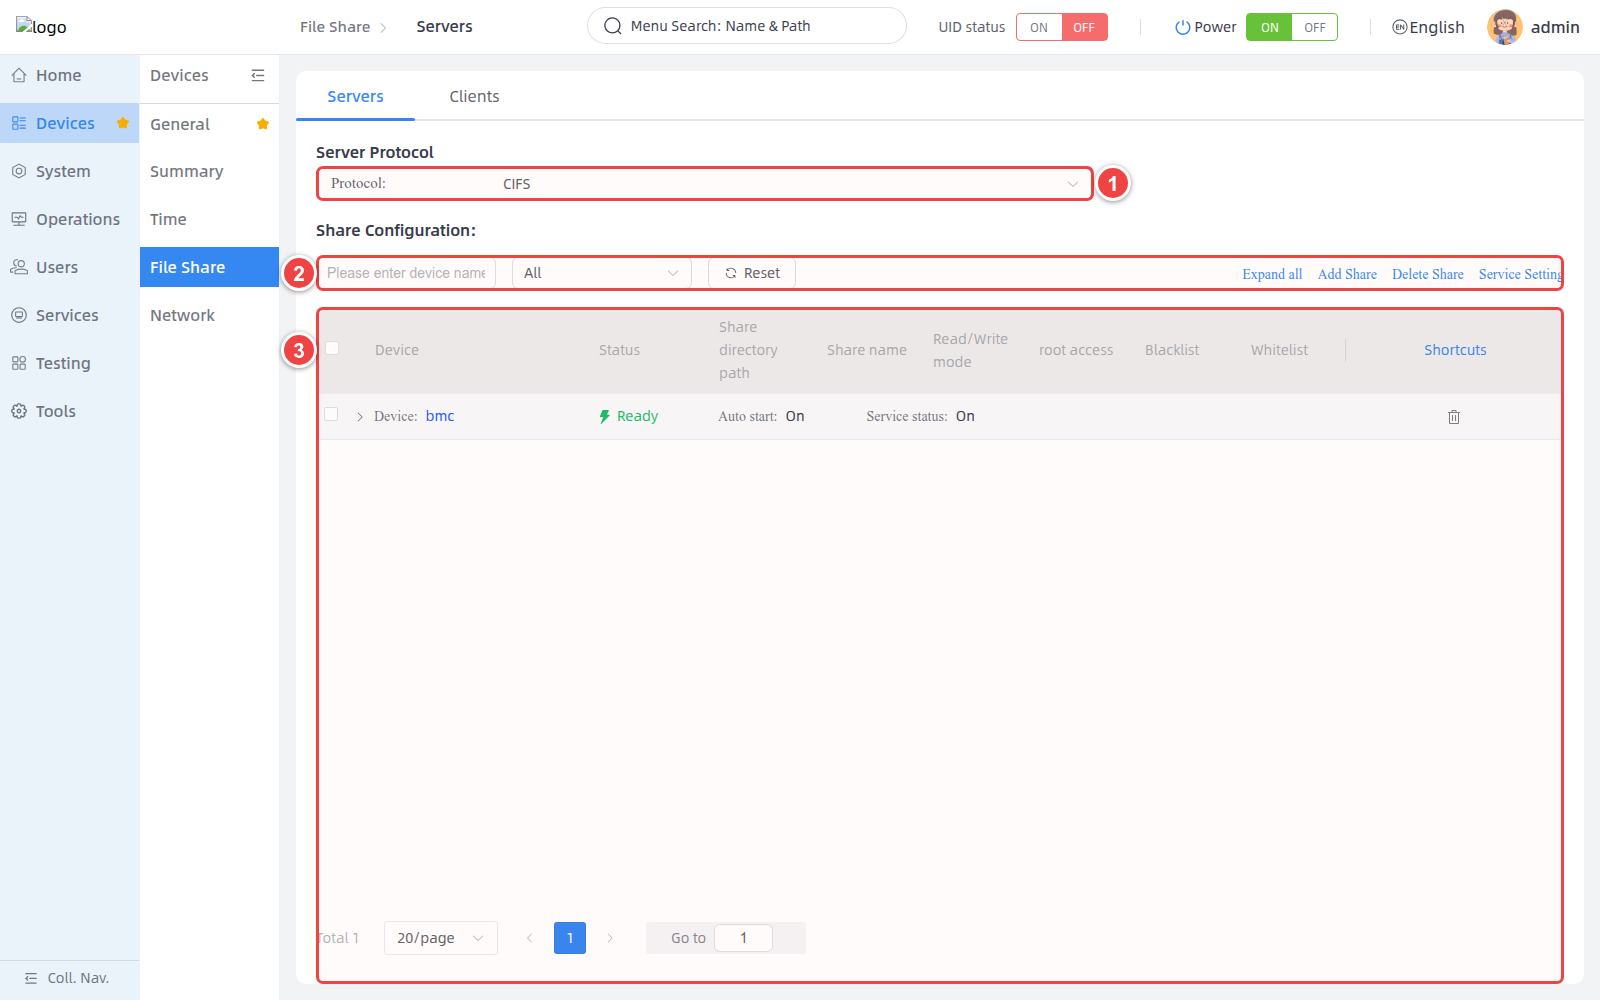
1. Select **CIFS** in **Protocol**.
2. Use the page operation area to search, filter, expand, add or delete shares, or configure the service.
3. In the list, view **Share directory path**, **Share name**, **Read/Write mode**, **root access**, **Blacklist**, and **Whitelist**.
### Configure the CIFS service [step]
1. Click **Service Setting**.
2. Select the target devices, and check the service port, **Auto start**, and **Service status**.
3. The CIFS default service port is `445`, and the port range is `1–65535`.
4. After verifying the configuration, click **Confirm**.
<Callout title="Port compatibility" type="info">
Before changing the CIFS service port, confirm that both the server and clients support custom ports. Without a clear requirement, keep the default port `445`.
</Callout>
### Add a CIFS share [step]
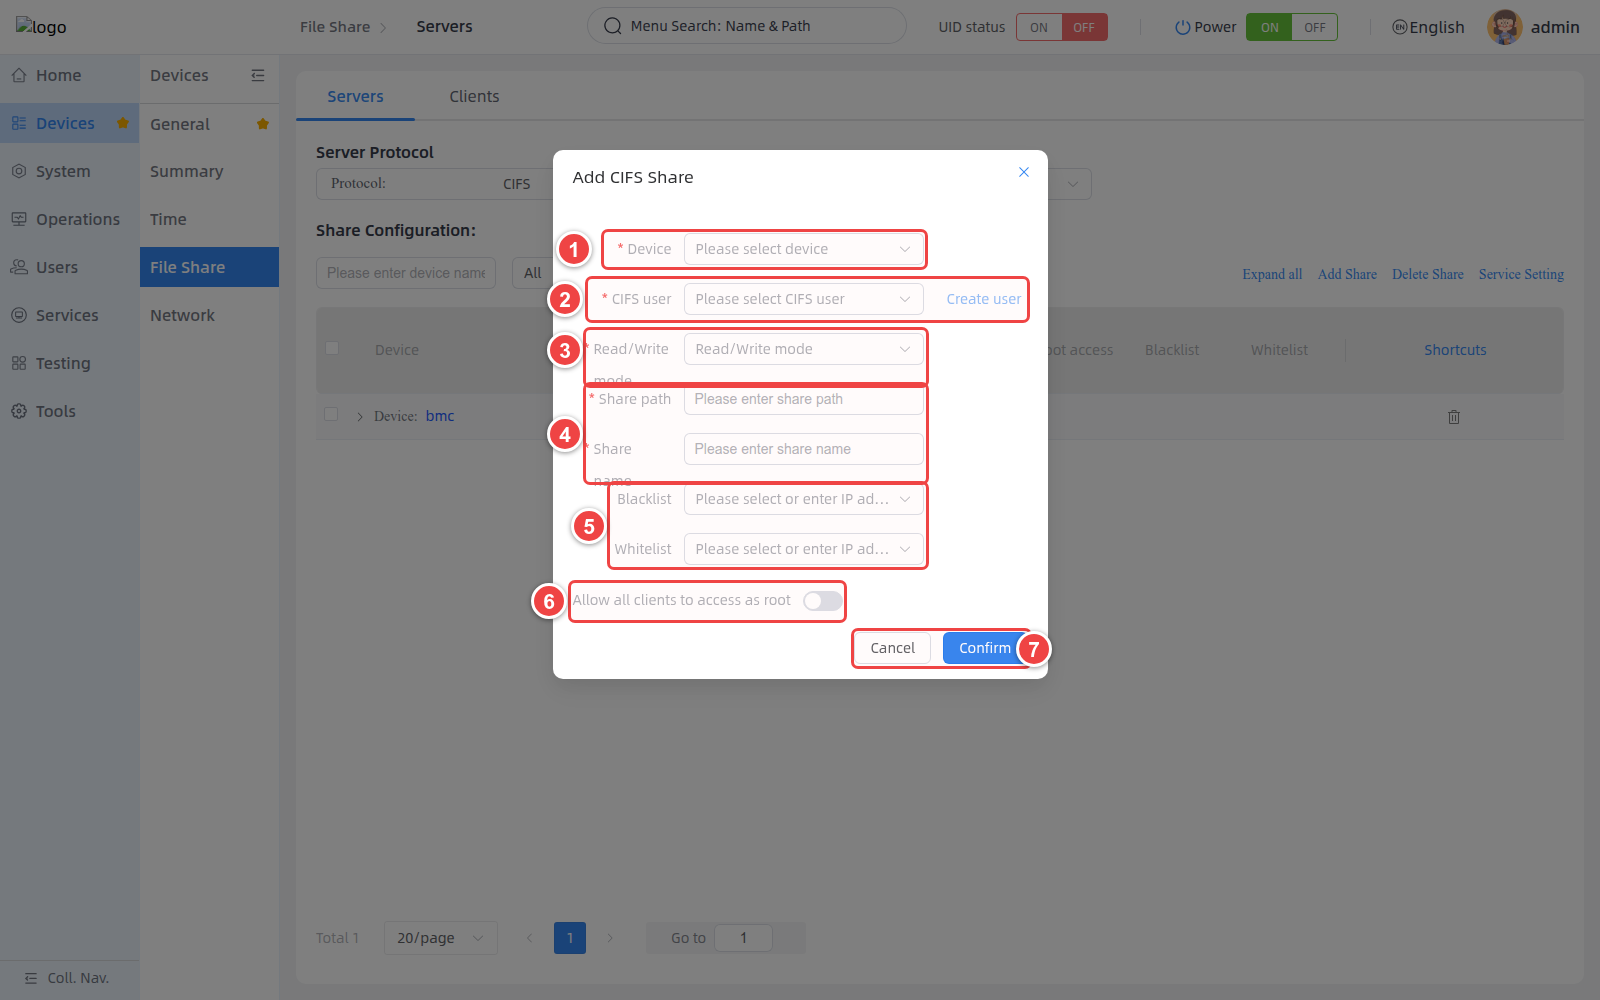
1. Click **Add Share** to open the **Add CIFS Share** window.
2. In **Device**, select the target devices.
3. In **CIFS user**, select an existing user. If no user is available, select a device first, then click **Create user**.
4. In **Read/Write mode**, select read/write or read-only.
5. Enter **Share path** and **Share name**.
6. Configure **Blacklist** and **Whitelist** according to your access policy; list entries must be valid IPv4 addresses.
7. To map all client access to root, enable **Allow all clients to access as root**.
8. After verifying the configuration, click **Confirm**.
### CIFS share parameter description [step]
| Parameter | Description | Configuration advice |
| --- | --- | --- |
| Device | Target devices to apply the configuration to. | The system can load the device's CIFS users only after selecting it. |
| CIFS user | Samba user allowed to access the share. | Use a dedicated low-privilege user; do not share an administrator account. |
| Read/Write mode | Sets the share to read/write or read-only. | Choose read-only when uploading or modifying files is not needed. |
| Share path | Local directory path to export. | Use an absolute path and confirm the directory permissions are correct. |
| Share name | Name used by clients to access the CIFS share. | Use a unique, recognizable name on the same device. |
| Blacklist | List of IPv4 addresses denied access. | Do not put the same address in both the blacklist and whitelist. |
| Whitelist | List of IPv4 addresses allowed access. | Prefer whitelists for shares with a clear access source. |
| root access | Forces client access to be mapped to root. | This option significantly widens permissions; keep it disabled by default. |
### Create a CIFS user [step]
1. In the **Add CIFS Share** window, select **Device** first.
2. Click **Create user**.
3. Enter the username and password; after confirmation, return to the share configuration window and select the new user.
| Field | Requirements |
| --- | --- |
| Username | `4–16` characters; English letters and digits only. |
| Password | `6–20` characters; must contain lowercase letters, uppercase letters, and digits; special characters are not supported. |
<Callout title="CIFS user loading failure" type="warn">
If loading the CIFS user list fails, **Create user** and **Confirm** may be unavailable. Confirm a device is selected first, then check the device online status and the CIFS service status.
</Callout>
### Delete a CIFS share [step]
1. Expand the target device and verify the share path, share name, and current access configuration.
2. Select the corresponding share and click **Delete Share**, or use the delete icon on that row.
3. When confirming the deletion target, focus on verifying the **Share name**.
```bash
bmc share server cifs status --protocol http --ip <BMC_IP> --port <BMC_PORT> --user <USERNAME> --password <PASSWORD> --core <NODE_ID>
```

### Configure the CIFS service [step]

```bash
bmc share server cifs set-status --protocol http --ip <BMC_IP> --port <BMC_PORT> --user <USERNAME> --password <PASSWORD> --core <NODE_ID> --enabled --active --service-port 445
```

### View CIFS shared directories [step]

```bash
bmc share server cifs show --protocol http --ip <BMC_IP> --port <BMC_PORT> --user <USERNAME> --password <PASSWORD> --core <NODE_ID>
```

### Create a CIFS share [step]

The following example allows `user1` and `user2` to access a share named `shareDir`.

```bash
bmc share server cifs create --protocol http --ip <BMC_IP> --port <BMC_PORT> --user <USERNAME> --password <PASSWORD> --core <NODE_ID> --path /share --name shareDir --allow user1,user2
```

To configure client lists, pass comma-separated IPv4 addresses.

```bash
bmc share server cifs create --protocol http --ip <BMC_IP> --port <BMC_PORT> --user <USERNAME> --password <PASSWORD> --core <NODE_ID> --path /share --name shareDir --allow user1 --whitelist 192.168.1.10,192.168.1.11
```

### Delete a CIFS share [step]

```bash
bmc share server cifs delete --protocol http --ip <BMC_IP> --port <BMC_PORT> --user <USERNAME> --password <PASSWORD> --core <NODE_ID> --name shareDir
```

### CIFS CLI parameter description [step]

| Parameter | Applicable commands | Description |
| --- | --- | --- |
| `--core` | All | Node ID of the target device or sub-board. |
| `--enabled` | `set-status` | Sets whether the service starts with the system. |
| `--active` | `set-status` | Sets whether the service is currently running. |
| `--service-port` | `set-status` | CIFS service listening port. |
| `--path` | `create` | Local directory path to export. |
| `--name` | `create` / `delete` | CIFS share name. |
| `--allow` | `create` | List of Samba users allowed access; separate multiple users with commas. |
| `--ro` | `create` | Sets the share to read-only. |
| `--force-root` | `create` | Forces client access to be mapped to root. |
| `--whitelist` | `create` | List of clients allowed access. |
| `--blacklist` | `create` | List of clients denied access. |

<Callout title="CIFS users" type="info">
  The Samba users in `--allow` must already exist on the target device. The current Server CLI provides no subcommand for creating CIFS users; create users through the WEB or the Redfish API.
</Callout>
| Operation | Method | URI |
| --- | --- | --- |
| View the CIFS share service | GET | `/redfish/v1/Systems/bmc/Oem/Firefly/CIFS/ShareService` |
| View CIFS shares of a specific device | GET | `/redfish/v1/Systems/{NodeId}/Oem/Firefly/CIFS/ShareDirs` |
| Set the CIFS share service | POST | `/redfish/v1/Systems/{NodeId}/Oem/Firefly/CIFS/ShareService/Actions/SetShareService` |
| Add a CIFS share | POST | `/redfish/v1/Systems/{NodeId}/Oem/Firefly/CIFS/ShareDirs/Actions/AddShareDir` |
| Delete a CIFS share | POST | `/redfish/v1/Systems/{NodeId}/Oem/Firefly/CIFS/ShareDirs/Actions/DeleteShareDir` |
| View CIFS users | GET | `/redfish/v1/Systems/{NodeId}/Oem/Firefly/CIFS/SambaUsers` |
| Add a CIFS user | POST | `/redfish/v1/Systems/{NodeId}/Oem/Firefly/CIFS/SambaUsers/Actions/AddSambaUser` |

<Callout title="API notes" type="info">
  `{NodeId}` is the Node ID of the target device. Before creating a CIFS share, confirm the users in `AllowUsers` already exist. For detailed information about authentication, response fields, and error codes, refer to the Redfish API documentation.
</Callout>
Managing Client Mount Points
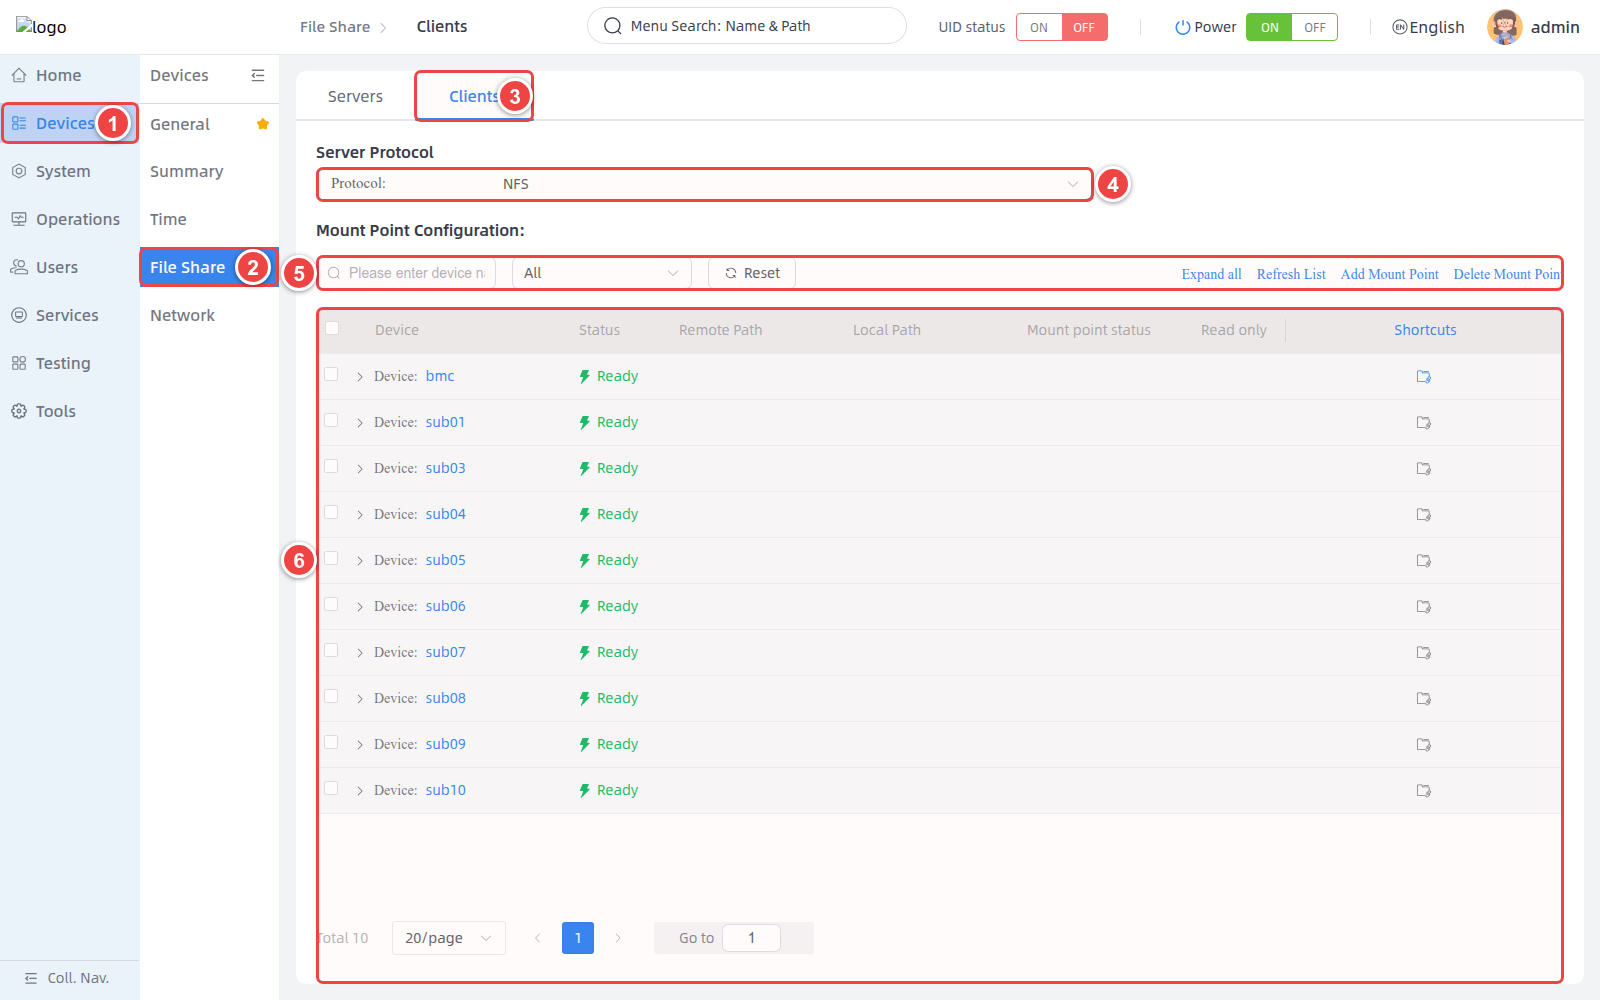
1. Select **Devices** in the left navigation bar.
2. Select **File Share** in the secondary navigation bar.
3. Select **Clients** at the top of the page.
4. In **Protocol**, select **NFS**, **CIFS**, or **SSHFS**.
5. Use the search, status filter, **Reset**, **Expand all**, **Refresh List**, and the mount point operations.
6. In the list, view devices, remote paths, local paths, mount status, and read-only status.
### Clients page operation description [step]
| Operation | Description |
| --- | --- |
| All / Online / Offline | Filters the list by device online status. |
| Reset | Clears the search and status filter conditions. |
| Expand all / Collapse all | Expands or collapses the mount point details of all devices. |
| Refresh List | Fetches the mount points and mount statuses again. |
| Add Mount Point | Adds a mount point of the current protocol for the target devices. |
| Delete Mount Point | Deletes the selected mount points. |
| Shortcuts | Use the mount icon on the right of a device row to add a mount point directly for that device. |
<Callout title="Device scope" type="info">
The Clients list does not show Android devices. If the mount quick icon on the right of a device row is unavailable, check the device status and the service status of the current protocol first.
</Callout>
### Add an NFS mount point [step]
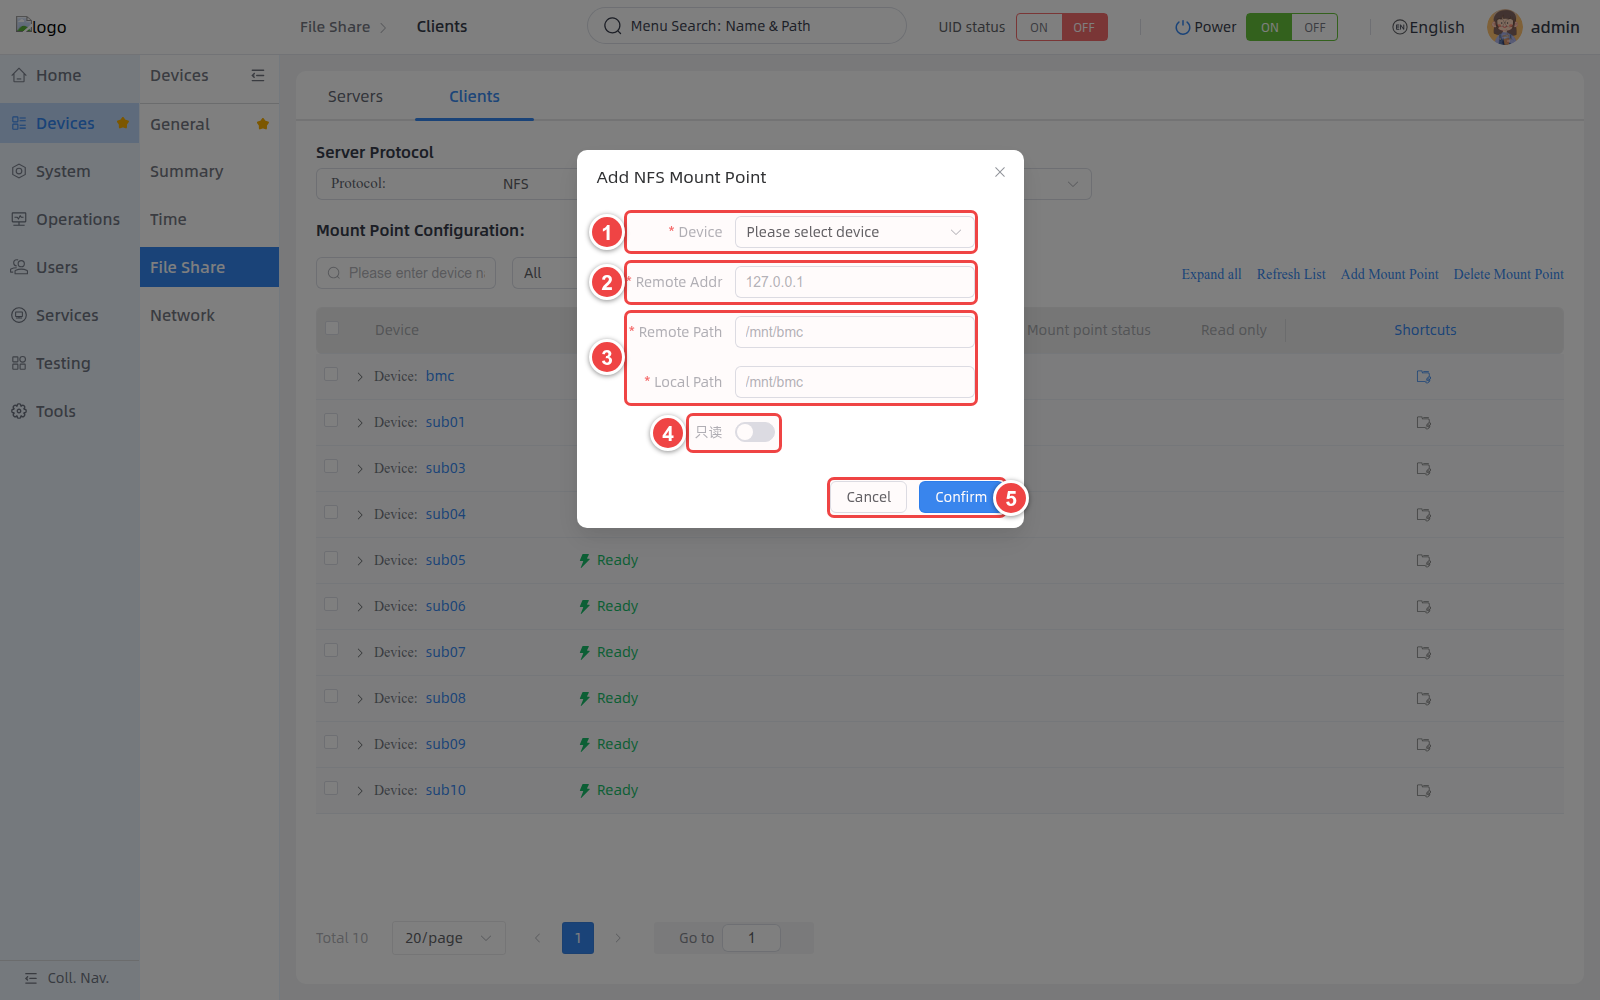
1. Set **Protocol** to **NFS**, then click **Add Mount Point**.
2. In **Device**, select the target device to perform the mount on.
3. In **Remote Addr**, enter the IPv4 address of the NFS server.
4. In **Remote Path**, enter the directory exported by the NFS server; in **Local Path**, enter the local mount path on the target device.
5. To allow reading remote content only, enable **Read only**.
6. After verifying the configuration, click **Confirm**.
| Parameter | Description | Requirements |
| --- | --- | --- |
| Device | Target device to perform the mount on. | The device should be in an available state. |
| Remote Addr | NFS server address. | Must be a valid IPv4 address. |
| Remote Path | Exported directory on the NFS server. | Must be a Unix absolute path without spaces. |
| Local Path | Local mount point on the target device. | Must be a Unix absolute path without spaces. |
| Read only | Sets the mount to read-only. | Disabled by default. |
### Add a CIFS mount point [step]
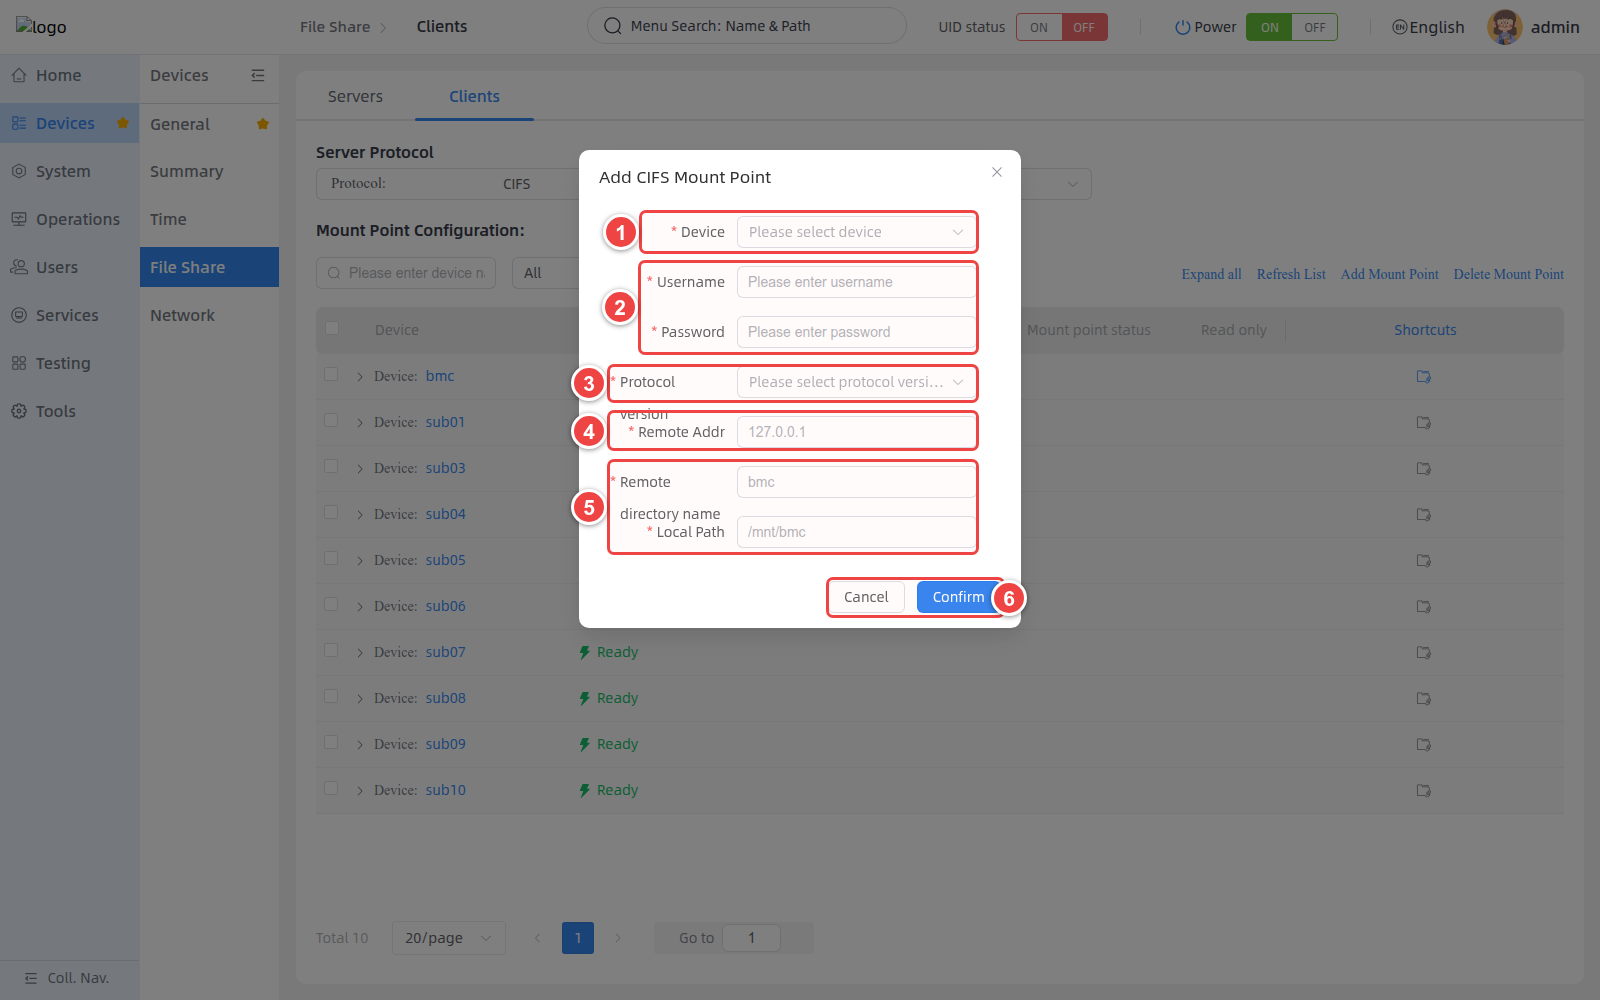
1. Set **Protocol** to **CIFS**, then click **Add Mount Point**.
2. Select **Device**, and enter the remote CIFS server's **Username** and **Password**.
3. In **Protocol version**, select `auto`, `SMB1`, `SMB2`, or `SMB3`.
4. In **Remote Addr**, enter the IPv4 address of the CIFS server.
5. In **Remote directory name**, enter the share name on the server; in **Local Path**, enter the local mount path.
6. After verifying the configuration, click **Confirm**.
| Parameter | Description | Requirements |
| --- | --- | --- |
| Device | Target device to perform the mount on. | The device should be in an available state. |
| Username / Password | Access credentials for the remote CIFS server. | The user must have access to the target share. |
| Protocol version | SMB protocol version. | Prefer `auto` or a newer version supported by the server. |
| Remote Addr | CIFS server address. | Must be a valid IPv4 address. |
| Remote directory name | Share name on the CIFS server. | Enter the share name, not a local file system path. |
| Local Path | Local mount point on the target device. | Must be a Unix absolute path without spaces. |
| Version | Description | Recommendation |
| --- | --- | --- |
| auto | Automatically negotiates a version supported by both sides. | Preferred for general scenarios. |
| SMB1 | Legacy SMB version. | Lower security; use only when legacy server compatibility is mandatory. |
| SMB2 | Good compatibility and performance. | Suitable for environments without SMB3 support. |
| SMB3 | Newer SMB version. | Preferred when the server and network support it. |
### Add an SSHFS mount point [step]
1. Set **Protocol** to **SSHFS**, then click **Add Mount Point**.
2. Select **Device**, and enter the remote SSH server's **Username** and **Password**.
3. In **Remote Addr**, enter the IPv4 address of the remote server; in **Port**, enter the SSH port. The default port is `22`.
4. In **Remote Path**, enter the remote directory; in **Local Path**, enter the local mount path on the target device.
5. After verifying the configuration, click **Confirm**.
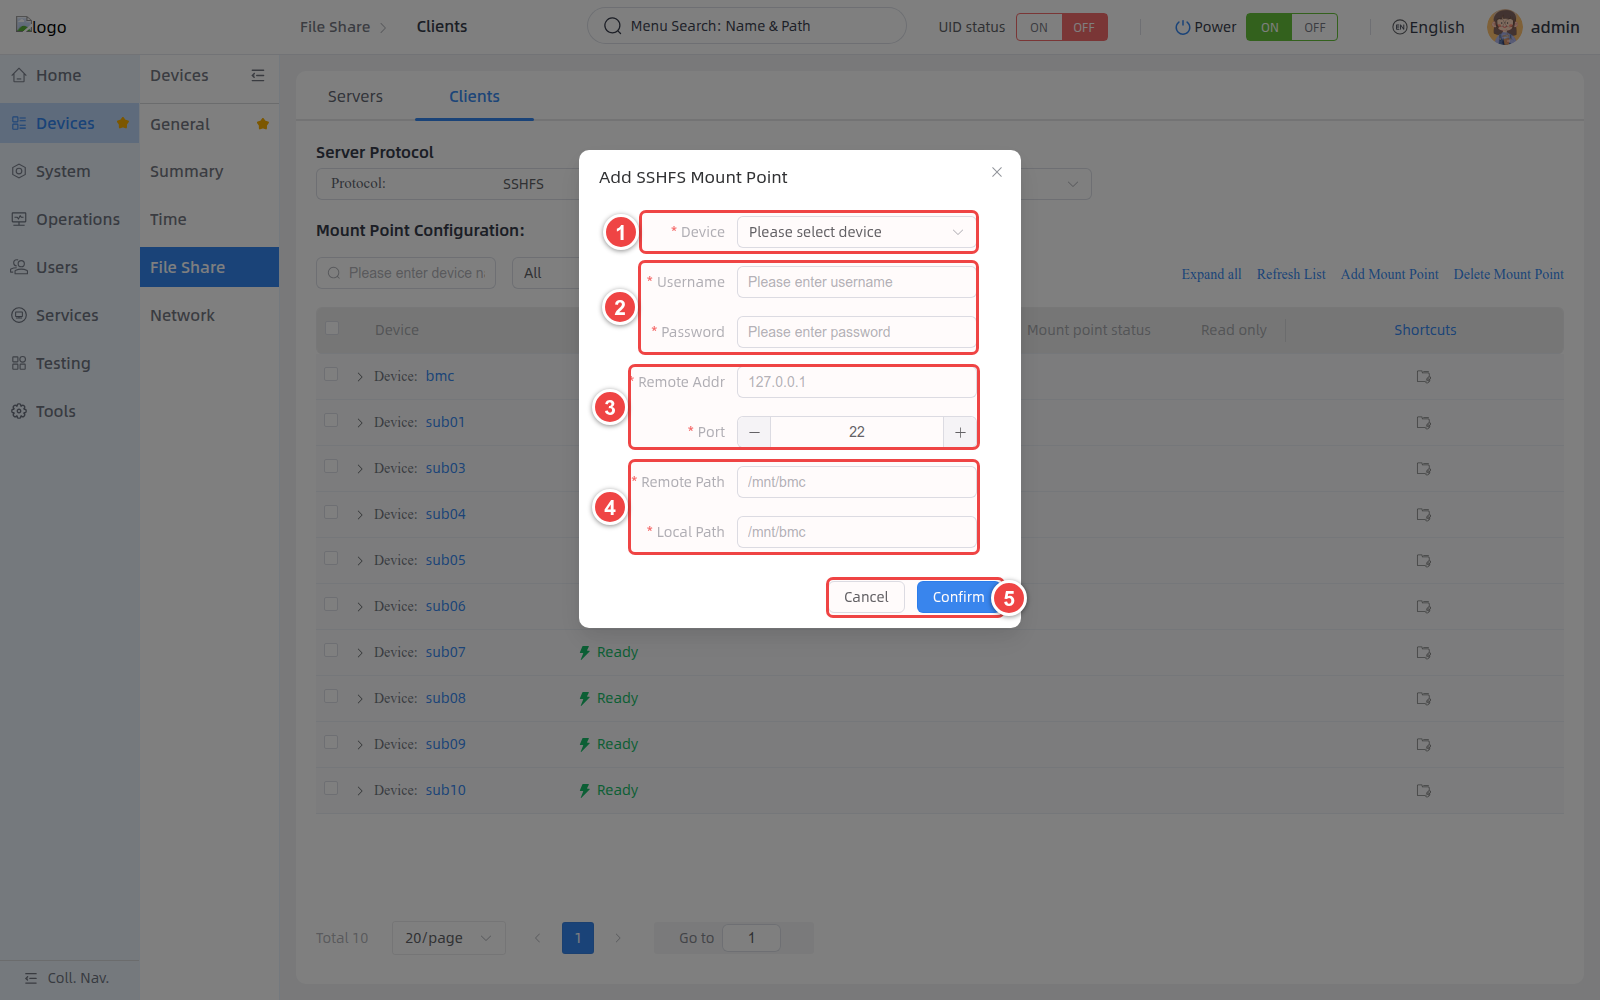
| Parameter | Description | Requirements |
| --- | --- | --- |
| Device | Target device to perform the mount on. | The device should be in an available state. |
| Username / Password | Credentials of the remote SSH account. | The account must have permission to access the remote directory. |
| Remote Addr | SSH server address. | Must be a valid IPv4 address. |
| Port | SSH server port. | Range `1–65535`; default `22`. |
| Remote Path | Remote directory on the SSH server. | Must be a Unix absolute path without spaces. |
| Local Path | Local mount point on the target device. | Must be a Unix absolute path without spaces. |
### View, refresh, and delete mount points [step]
1. Select the target protocol, and expand the device row to view **Remote Path**, **Local Path**, **Mount point status**, and **Read only**.
2. Click **Refresh List** to fetch the mount statuses again.
3. To delete a mount point, select it in the expanded list and click **Delete Mount Point**, or use the delete icon on the right of the mount point row.
4. Before deleting, verify the protocol, target device, and local mount path.
<Callout title="Deletion impact" type="warn">
Deleting a mount point unmounts the remote resource on the target device and clears the mount configuration. Stop processes using the directory first, and confirm there are no unfinished read/write tasks.
</Callout>
**View mount points**

```bash
bmc share client nfs show --protocol http --ip <BMC_IP> --port <BMC_PORT> --user <USERNAME> --password <PASSWORD> --core <NODE_ID>
```

**Create a mount point**

```bash
bmc share client nfs create --protocol http --ip <BMC_IP> --port <BMC_PORT> --user <USERNAME> --password <PASSWORD> --core <NODE_ID> --host 172.16.10.122 --remote-path /share --mount-point /mnt/share
```

**Delete a mount point**

```bash
bmc share client nfs delete --protocol http --ip <BMC_IP> --port <BMC_PORT> --user <USERNAME> --password <PASSWORD> --core <NODE_ID> --mount-point /mnt/share
```

### Manage CIFS mount points [step]

**View mount points**

```bash
bmc share client cifs show --protocol http --ip <BMC_IP> --port <BMC_PORT> --user <USERNAME> --password <PASSWORD> --core <NODE_ID>
```

**Create a mount point**

```bash
bmc share client cifs create --protocol http --ip <BMC_IP> --port <BMC_PORT> --user <USERNAME> --password <PASSWORD> --core <NODE_ID> --host 172.16.10.122 --smb-user user1 --smb-pwd <SMB_PASSWORD> --share-name shareDir --mount-point /mnt/share --smb-version auto
```

**Delete a mount point**

```bash
bmc share client cifs delete --protocol http --ip <BMC_IP> --port <BMC_PORT> --user <USERNAME> --password <PASSWORD> --core <NODE_ID> --mount-point /mnt/share
```

### Manage SSHFS mount points [step]

**View mount points**

```bash
bmc share client sshfs show --protocol http --ip <BMC_IP> --port <BMC_PORT> --user <USERNAME> --password <PASSWORD> --core <NODE_ID>
```

**Create a mount point**

```bash
bmc share client sshfs create --protocol http --ip <BMC_IP> --port <BMC_PORT> --user <USERNAME> --password <PASSWORD> --core <NODE_ID> --host 172.16.10.122 --ssh-port 22 --ssh-user root --ssh-pwd <SSH_PASSWORD> --remote-path /share --mount-point /mnt/share
```

**Delete a mount point**

```bash
bmc share client sshfs delete --protocol http --ip <BMC_IP> --port <BMC_PORT> --user <USERNAME> --password <PASSWORD> --core <NODE_ID> --mount-point /mnt/share
```

### Client CLI parameter description [step]

| Parameter | Applicable protocols | Description |
| --- | --- | --- |
| `--core` | All | Node ID of the target device to mount or unmount on. |
| `--host` | NFS / CIFS / SSHFS | Remote server address. |
| `--remote-path` | NFS / SSHFS | Remote directory path. |
| `--mount-point` | NFS / CIFS / SSHFS | Local mount point on the target device; also used to locate the mount when deleting. |
| `--smb-user` / `--smb-pwd` | CIFS | Credentials for the remote CIFS server. |
| `--share-name` | CIFS | Remote CIFS share name. |
| `--smb-version` | CIFS | SMB protocol version; `auto`, `SMB1`, `SMB2`, or `SMB3`; default `auto`. |
| `--ssh-port` | SSHFS | SSH server port; default `22`. |
| `--ssh-user` / `--ssh-pwd` | SSHFS | Credentials for the remote SSH server. |

<Callout title="CLI read-only option" type="info">
  The current Client CLI `create` subcommand provides no read-only parameter. NFS read-only mounting can be configured through the WEB; whether the API supports the `ReadOnly` field depends on the corresponding device implementation.
</Callout>
| Operation | Method | URI |
| --- | --- | --- |
| View mount points | GET | `/redfish/v1/Systems/bmc/Oem/Firefly/{Protocol}/MountPoints` |
| Add a mount point | POST | `/redfish/v1/Systems/{NodeId}/Oem/Firefly/{Protocol}/MountPoints/Actions/AddMountPoint` |
| Delete a mount point | POST | `/redfish/v1/Systems/{NodeId}/Oem/Firefly/{Protocol}/MountPoints/Actions/DeleteMountPoint` |

 <Callout title="Note" type="info">
  For detailed information about interface authentication, request parameters, response fields, and error codes, refer to the Redfish API documentation.
</Callout>
FAQ
1. A device shows Ready but has no shared directories
Ready only means the device is available, not that shares are configured. Expand the device to check the directory details, and confirm Service status is enabled.
2. An NFS client cannot access a share
Check the NFS service status and port, confirm Allowed clients contains the client address, and check the network firewall, directory permissions, and whether options such as secure and root_squash match the client.
3. The CIFS user list is empty or fails to load
Select the target device in Device first. If it still fails, check the device online status, the CIFS service status, and Redfish API connectivity.
4. Clients cannot connect after the service port is changed
Confirm the port is within 1–65535 and not occupied by another service, and update the firewall and client connection configuration accordingly. NFS uses 2049 by default, and CIFS uses 445.
5. Clients still show the mount point after a share is deleted
The Server-side delete only cancels the directory export. Clients may still keep the original mount record; unmount or clean up the corresponding mount point on the client.
6. The mount point status shows an anomaly
Click Refresh List to fetch the status again. If it is still abnormal, check the remote server address, service port, share name or remote path, access credentials, network connectivity, and local mount point permissions.
7. A CIFS mount reports a protocol version mismatch
Prefer setting Protocol version to auto. If the server supports only a specific version, select SMB2 or SMB3 according to the server configuration. Use SMB1 only when legacy server compatibility is mandatory.
8. The local path or remote path fails validation
The remote paths of NFS and SSHFS, and all local mount paths, must be Unix absolute paths starting with / and containing no spaces. For CIFS, Remote directory name should be the share name, not a local directory path.