BMC Network Management
Introduction
BMC Network Management (BMC Network Manager) is a network status viewing and configuration feature that aBMC provides for the management controller. It consists of the following three modules.
- Net Manage: view physical network port status, and configure IPv4 address, default gateway, gateway priority, and DNS via DHCP or manually.
- Bond Manage: combine multiple available network ports into a Bond aggregation device, and configure the aggregation mode and IPv4 network parameters.
- VLAN Manage: create VLAN sub-interfaces on a specified network port, and configure the VLAN ID, associated port, and IPv4 network parameters.
Development Vision
- Provide a unified, visualized entry point for BMC network status and configuration, making it easy to quickly check the management network, aggregation network, and VLAN network status.
- Reduce the risk of losing BMC connectivity due to mistakenly modifying critical network ports, through NIC type restrictions, parameter validation, and configuration result confirmation.
Feature Usage
Viewing and Configuring BMC Network Ports
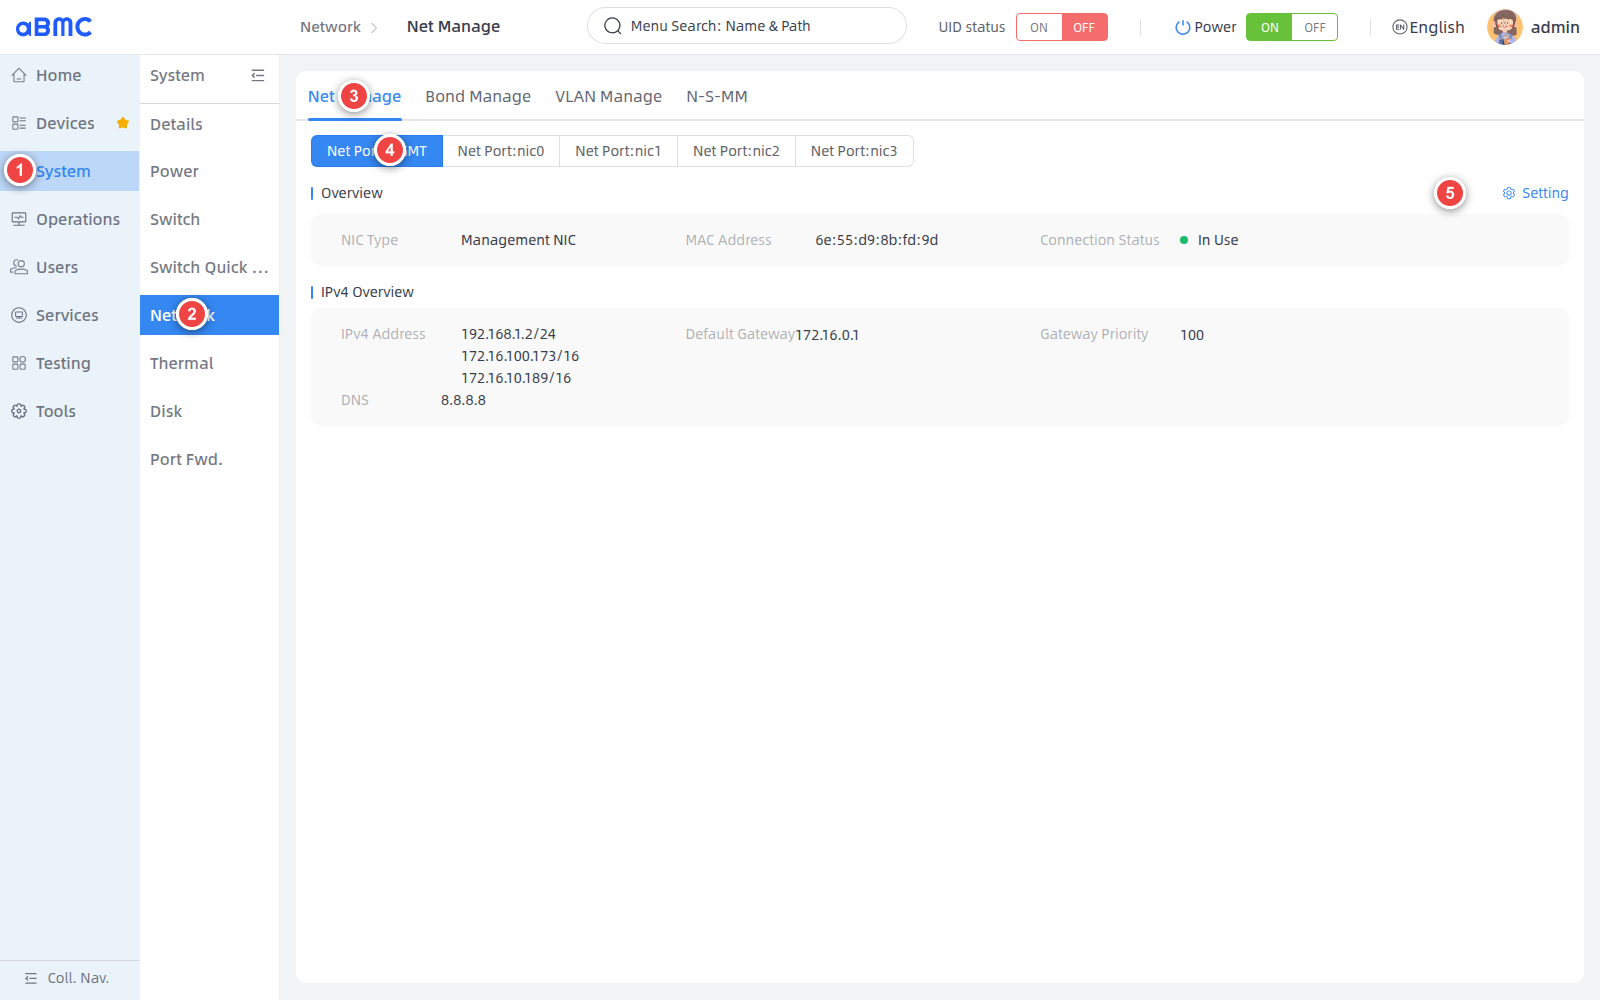
1. Select **System** in the left main navigation bar.
2. Select **Network** in the secondary navigation bar.
3. Select **Net Manage** at the top of the page.
4. In the network port tabs, select the target NIC, for example **Net Port:MGMT** or **Net Port:nic1**.
5. To modify the configuration, click **Setting**.
### View network port information [step]
Before modifying the configuration, identify the target NIC by port name and MAC address, and record the original network configuration.
| Page field | Description |
| --- | --- |
| Net Port | BMC NIC name, for example `MGMT`, `nic0`, or `nic1`. The loopback interface `lo` is not displayed. |
| NIC Type | The management type of the NIC. Hover the pointer over **Setting** to view the purpose and configuration restrictions of the current type. |
| MAC Address | The MAC address of the NIC, used to identify the physical interface. |
| Connection Status | The current connection status of the port, for example **In Use**, **Not In Use**, or **Exception**. |
| IPv4 Address | The current IPv4 address and prefix length. Multiple addresses may be displayed for the same NIC. |
| Default Gateway | The current IPv4 default gateway. |
| Gateway Priority | The routing priority of the current default gateway. |
| DNS | The current DNS servers. |
### Determine whether a NIC allows configuration [step]
- **Setting** available: the current NIC allows the user to modify its configuration.
- **Setting** disabled: the current NIC may be a private NIC used for communication between the BMC and sub-boards, a Bond device, or a Bond member, and cannot be configured directly by the user.
<Callout title="NIC type restrictions" type="warn">
Do not attempt to bypass page restrictions through the CLI or API. Before configuring, confirm that `Oem.Firefly.SettingEnabled` in the NIC resource is `true`.
</Callout>
### Configure IPv4 [step]
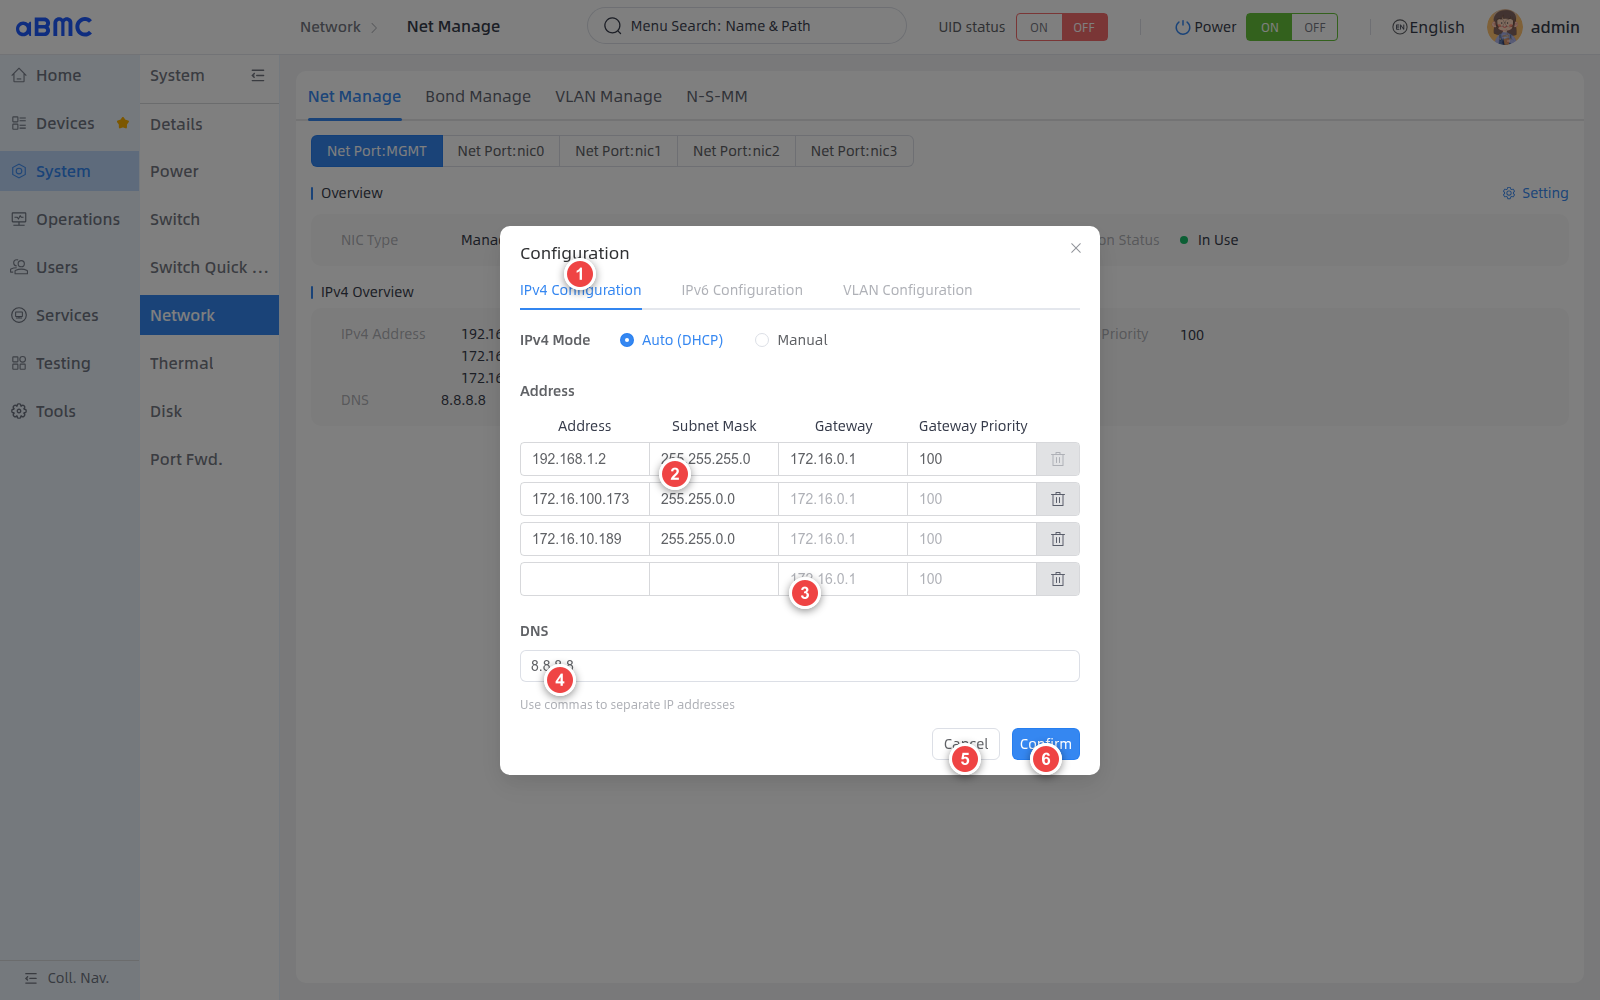
1. Confirm that the current mode is **IPv4 Configuration**. **IPv6 Configuration** and **VLAN Configuration** are currently unavailable.
2. In **IPv4 Mode**, select **Auto (DHCP)** or **Manual**.
3. When using Manual, enter the **Address** and **Subnet Mask**. After a complete address is entered, the page automatically adds a blank row; if a default route is needed, enter the **Gateway** and **Gateway Priority** in the first row.
4. Enter DNS servers in **DNS**; separate multiple addresses with commas.
5. To discard the changes, click **Cancel**.
6. After verifying the parameters, click **Confirm**.
### Configuration rules [step]
| Item | Rule |
| --- | --- |
| Auto (DHCP) | The IPv4 address is assigned by the DHCP service. |
| Address | In Manual mode, at least one valid IPv4 address must be entered; multiple addresses on the same NIC are supported. |
| Subnet Mask | In Manual mode, each static address must be accompanied by a valid subnet mask. |
| Gateway | Optional; must be a valid IPv4 address. In multi-address scenarios, enter it only in the first row. |
| Gateway Priority | When entering a gateway, also enter a positive integer priority. The same gateway and priority combination must not duplicate another NIC or VLAN. |
| DNS | Optional; must be valid IP addresses, separated by commas. |
### Confirm the configuration result [step]
1. Close the settings window and wait for the page to fetch the NIC information again.
2. Select the target **Net Port** again.
3. Confirm that **IPv4 Address**, **Default Gateway**, **Gateway Priority**, and **DNS** have been updated.
4. From the corresponding subnet, verify the BMC address connectivity, default route, and domain name resolution.
<Callout title="BMC network change risks" type="warn">
Modifying the management address, subnet mask, or default gateway currently in use may immediately interrupt WEB, CLI, and API connections. Record the original configuration before operating, and prepare a serial port or another independent recovery channel. The addresses in the screenshots are for illustrating page locations only.
</Callout>
When no configuration parameters are specified, `bmc ethernet` returns BMC NIC information.

```bash
bmc ethernet --protocol https --ip <BMC_IP> --port <BMC_PORT> --user <USERNAME> --password <PASSWORD> --core bmc
```

Use `--interface` to view a specific NIC.

```bash
bmc ethernet --protocol https --ip <BMC_IP> --port <BMC_PORT> --user <USERNAME> --password <PASSWORD> --core bmc --interface <INTERFACE>
```

### Use DHCP [step]

```bash
bmc ethernet --protocol https --ip <BMC_IP> --port <BMC_PORT> --user <USERNAME> --password <PASSWORD> --core bmc --interface <INTERFACE> --interface-dhcp4=true
```

### Configure static IPv4 [step]

The following addresses belong to documentation example subnets and must be replaced with on-site planned values before execution.

```bash
bmc ethernet --protocol https --ip <BMC_IP> --port <BMC_PORT> --user <USERNAME> --password <PASSWORD> --core bmc --interface <INTERFACE> --interface-dhcp4=false --interface-ip 192.0.2.10 --interface-ip-cidr 24 --interface-gateway 192.0.2.1 --interface-gateway-metric 100 --interface-dns 192.0.2.53
```

The CLI can submit only one static address and one DNS server at a time. To configure multiple addresses or multiple DNS servers for the same NIC, use the WEB or API.

### Parameter description [step]

| Parameter | Required | Description |
| --- | --- | --- |
| `--protocol` | Yes | Request protocol, for example `https`. |
| `--ip` | Yes | BMC management address. |
| `--port` | Yes | Redfish service port. |
| `--user` | Yes | HTTP Basic authentication username. |
| `--password` | Yes | HTTP Basic authentication password. |
| `--core` | Yes | BMC network management always uses `bmc`. |
| `--interface` | Required when viewing a single interface or configuring | Target NIC name, for example `MGMT` or `nic1`. |
| `--interface-dhcp4` | Required when configuring | `true` for DHCP, `false` for static configuration. |
| `--interface-ip` | Used for static configuration | IPv4 address. |
| `--interface-ip-cidr` | No | IPv4 prefix length; when an IP is specified but this parameter is not, the CLI uses `24` by default. |
| `--interface-gateway` | No | IPv4 default gateway. |
| `--interface-gateway-metric` | No | Gateway routing priority; must be an integer. |
| `--interface-dns` | No | DNS server. The current CLI accepts one DNS address at a time. |
| `--output-format` | No | Specifies the client output format. |

<Callout title="Credential and network security" type="warn">
  Passwords on the command line may be retained in shell history or process lists. Before executing a configuration command, confirm that the target NIC allows configuration, and prepare an independent recovery channel.
</Callout>
<Callout title="Note" type="info">
  For detailed information about interface authentication, request parameters, response fields, and error codes, refer to the Redfish API documentation.
</Callout>
Configuring BMC Network Bonding
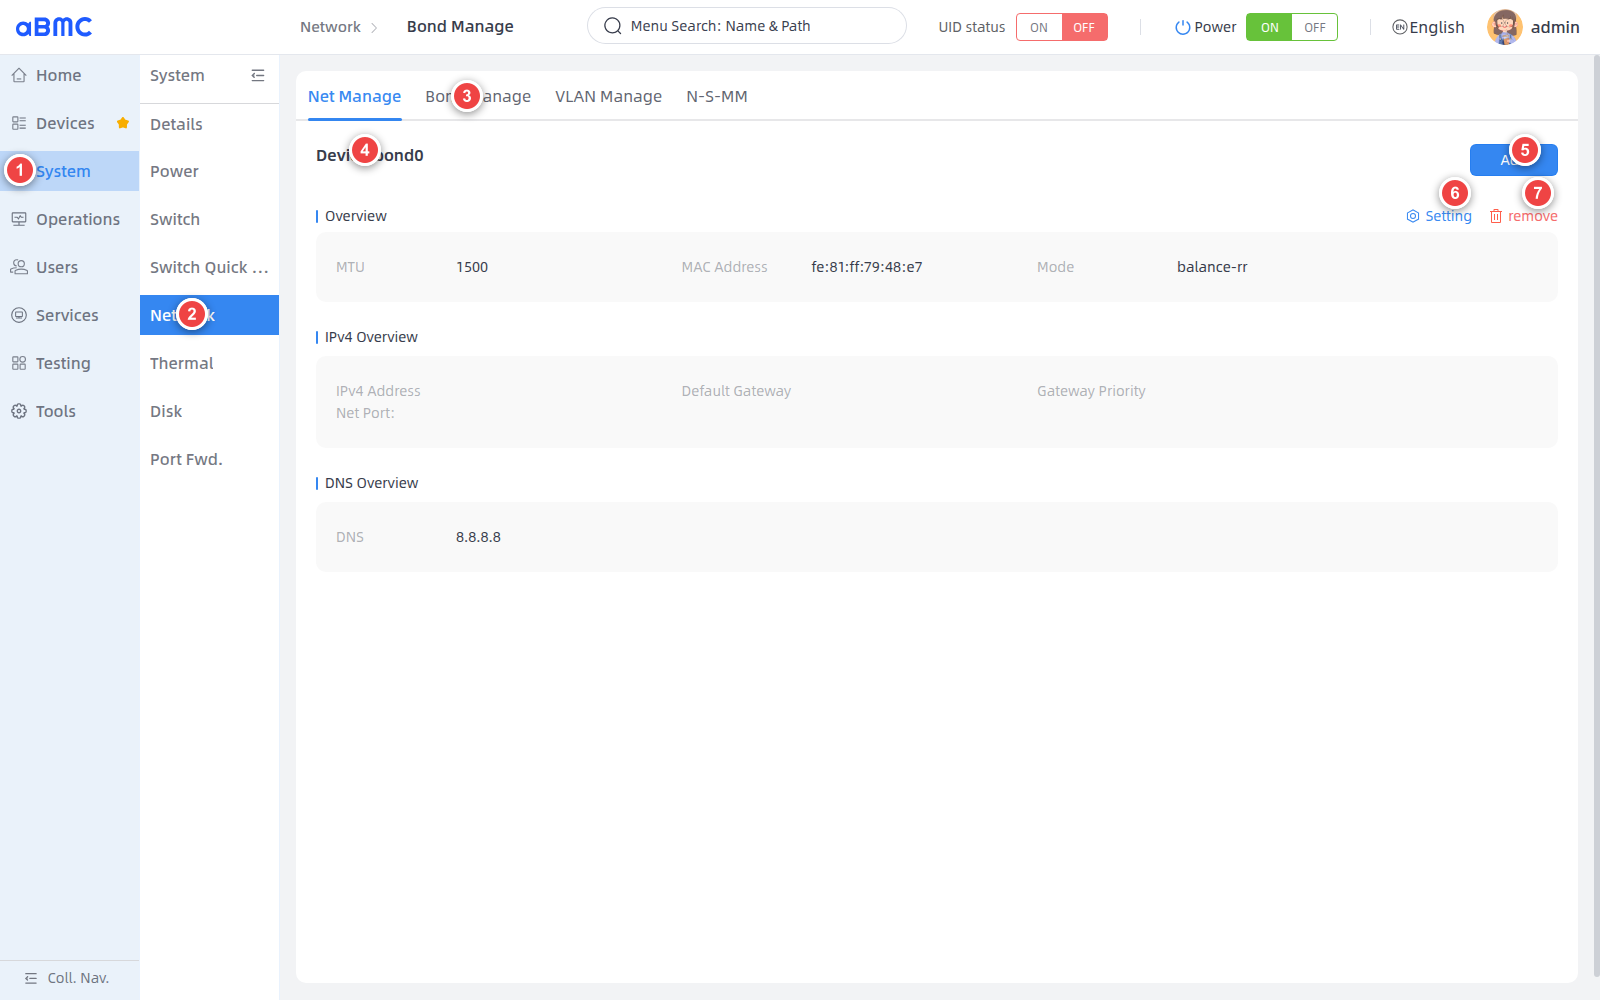
1. Select **System** in the left main navigation bar.
2. Select **Network** in the secondary navigation bar.
3. Select **Bond Manage** at the top of the page.
4. If there are multiple Bond devices, select the target **Device**.
5. Click **Add** to add a Bond device.
6. Click **Setting** to modify the current Bond device.
7. Click **remove** to delete the current Bond device.
### View Bond status [step]
| Page field | Description |
| --- | --- |
| Device | Bond device name, for example `bond0`. |
| MTU | Maximum transmission unit of the Bond device. |
| MAC Address | MAC address of the Bond device. |
| Mode | Current network aggregation mode. |
| IPv4 Address | Current IPv4 address of the Bond device. |
| Default Gateway | Current IPv4 default gateway. |
| Gateway Priority | Routing priority of the default gateway. |
| Net Port | Member ports of the current Bond. |
| DNS | Current DNS servers. |
### Add a Bond device [step]
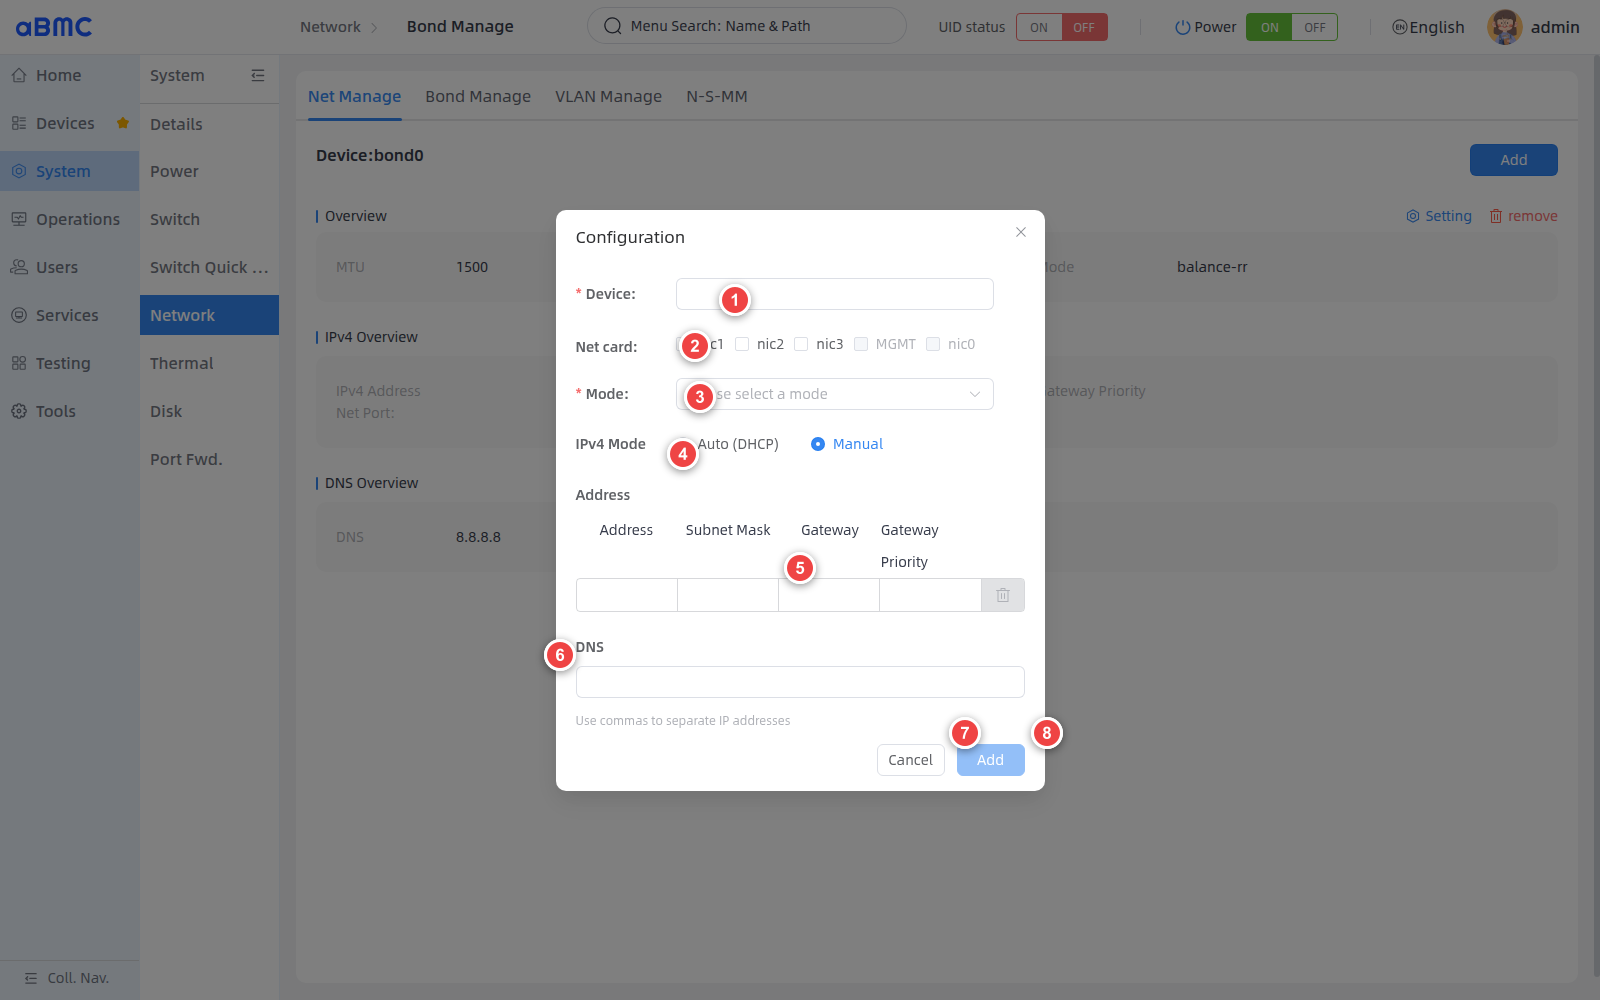
1. Enter the Bond device name in **Device**.
2. In **Net card**, select at least two available ports. Grayed-out ports cannot join a new Bond at this time.
3. Select the aggregation mode in **Mode**.
4. In **IPv4 Mode**, select **Auto (DHCP)** or **Manual**.
5. When using Manual, enter the address, subnet mask, gateway, and gateway priority.
6. Fill in DNS as needed; separate multiple addresses with commas.
7. To discard the changes, click **Cancel**.
8. After checking the configuration, click **Add**.
### Modify or delete a Bond device [step]
When modifying a Bond, the device name cannot be changed; member ports, aggregation mode, and IPv4 parameters can be adjusted. **Modify** can be submitted only after at least two available member ports are selected.
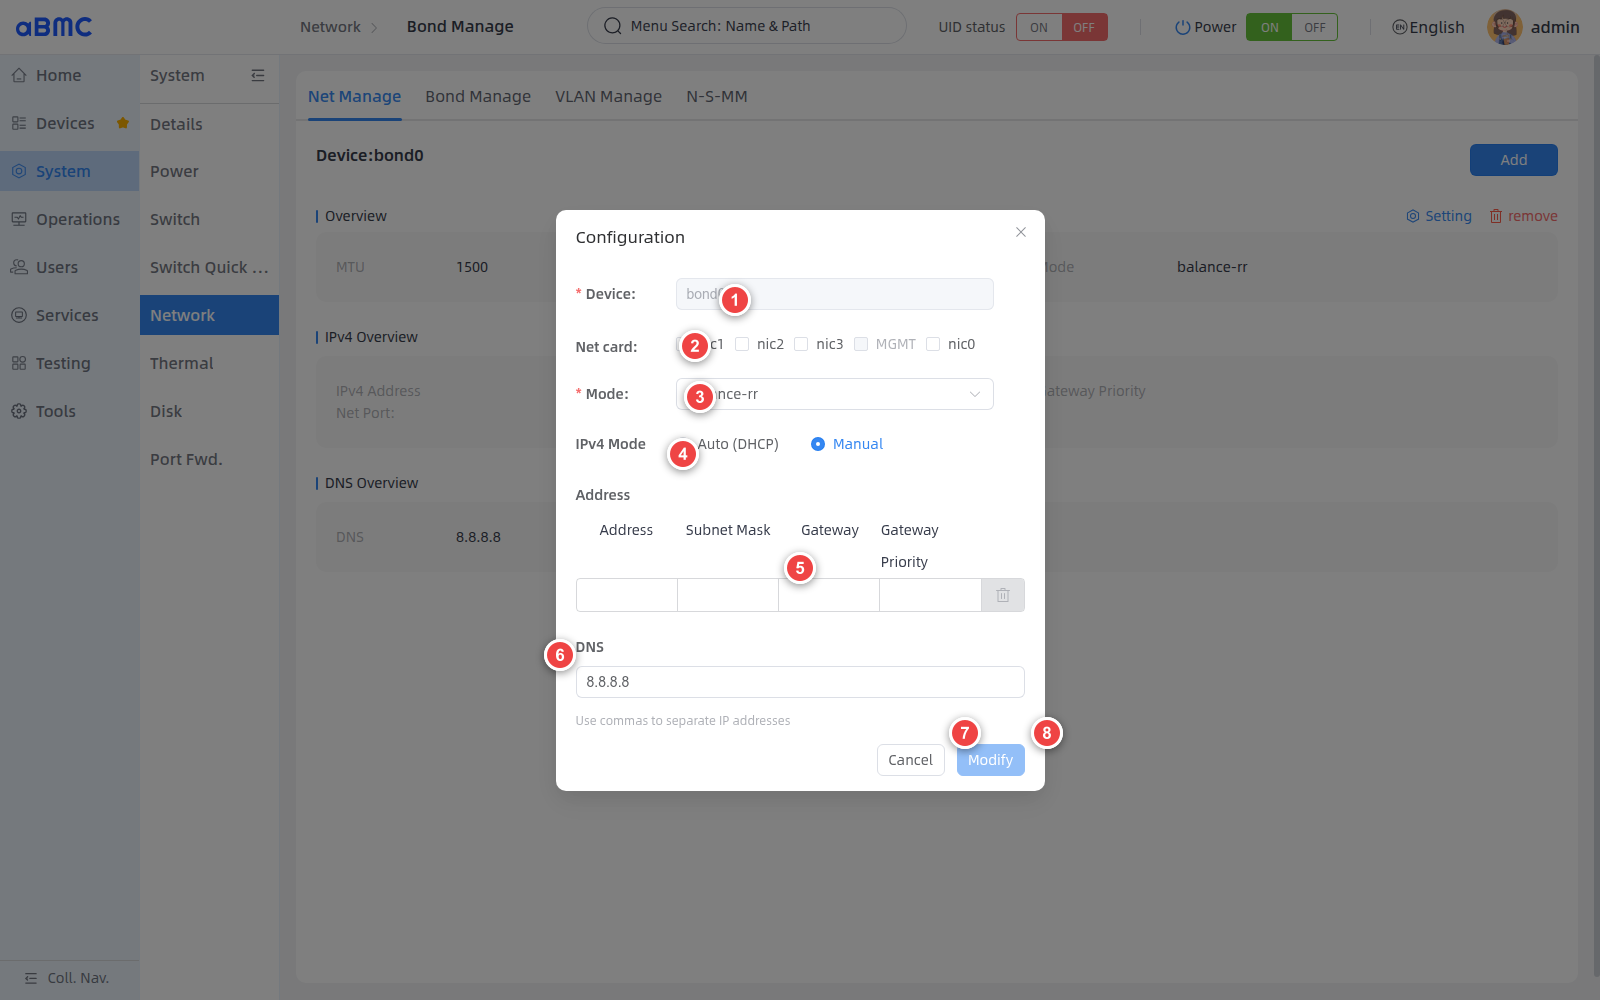
When deleting a Bond, click **remove**, check the device name in the confirmation window, and then confirm the deletion. Before deleting, confirm that the Bond does not carry the current management connection or business traffic.
### Bond configuration rules [step]
| Item | Rule |
| --- | --- |
| Device | Required; `3–15` characters long, must start with `bond`, and can contain only letters and digits. After creation, it cannot be renamed in the modify window. |
| Net card | Select at least two non-loopback ports. Private ports, configuration-restricted ports, and ports already belonging to another Bond are not selectable. |
| Mode | Valid values are `802.3ad`, `active-backup`, `balance-alb`, `balance-rr`, `balance-tlb`, `balance-xor`, `broadcast`. |
| Auto (DHCP) | The IPv4 address of the Bond device is assigned by the DHCP service. |
| Manual | Supports configuring one or more IPv4 addresses, subnet masks, default gateway, gateway priority, and DNS. |
| Setting | Available only when `Oem.Firefly.SettingEnabled` of the Bond resource is `true`. |
<Callout title="Member port impact" type="warn">
After a port joins a Bond, it can no longer be configured directly as an independent port. Changing Bond members or mode may cause a brief link interruption; when using modes such as `802.3ad`, also make sure the peer switch configuration matches the server.
</Callout>
An add request mainly contains `Device`, `Mode`, `Interfaces`, and `IPv4Addresses`; when modifying, the Bond device is specified in the URI and `Device` is not submitted; a delete request submits the target `Device`.

<Callout title="Note" type="info">
  For detailed information about interface authentication, request parameters, response fields, and error codes, refer to the Redfish API documentation.
</Callout>
Managing BMC VLANs
1. Select **System** in the left main navigation bar.
2. Select **Network** in the secondary navigation bar.
3. Select **VLAN Manage** at the top of the page.
4. If there are multiple VLAN devices, select the target **Net Port**.
5. Click **Add** to add a VLAN device.
6. When **Setting** is available, you can modify the IPv4 configuration of the current VLAN.
7. When **remove** is available, you can delete the current VLAN.
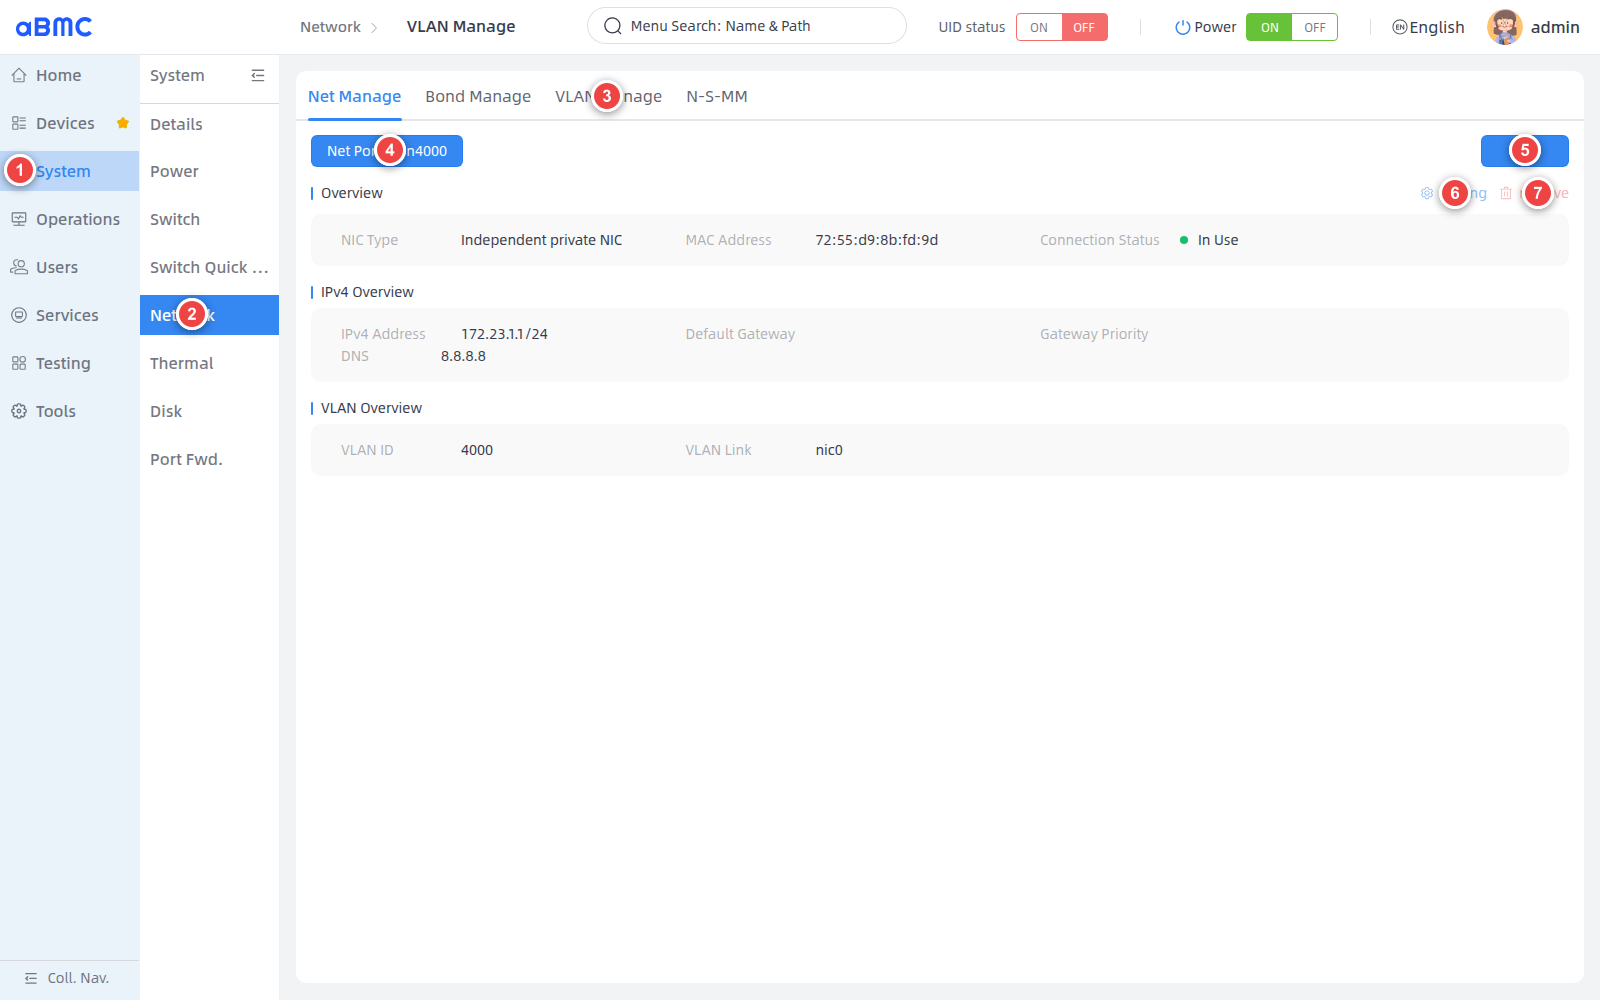
### View VLAN status [step]
| Page field | Description |
| --- | --- |
| Net Port | VLAN device name, for example `vlan4000`. |
| NIC Type | Management type of the VLAN device. |
| MAC Address | MAC address of the VLAN device. |
| Connection Status | Current connection status of the VLAN device. |
| IPv4 Address | Current IPv4 address and prefix length of the VLAN device. |
| Default Gateway | Current IPv4 default gateway. |
| Gateway Priority | Routing priority of the default gateway. |
| DNS | Current DNS servers. |
| VLAN ID | VLAN identifier. |
| VLAN Link | Underlying network port associated with the VLAN sub-interface. |
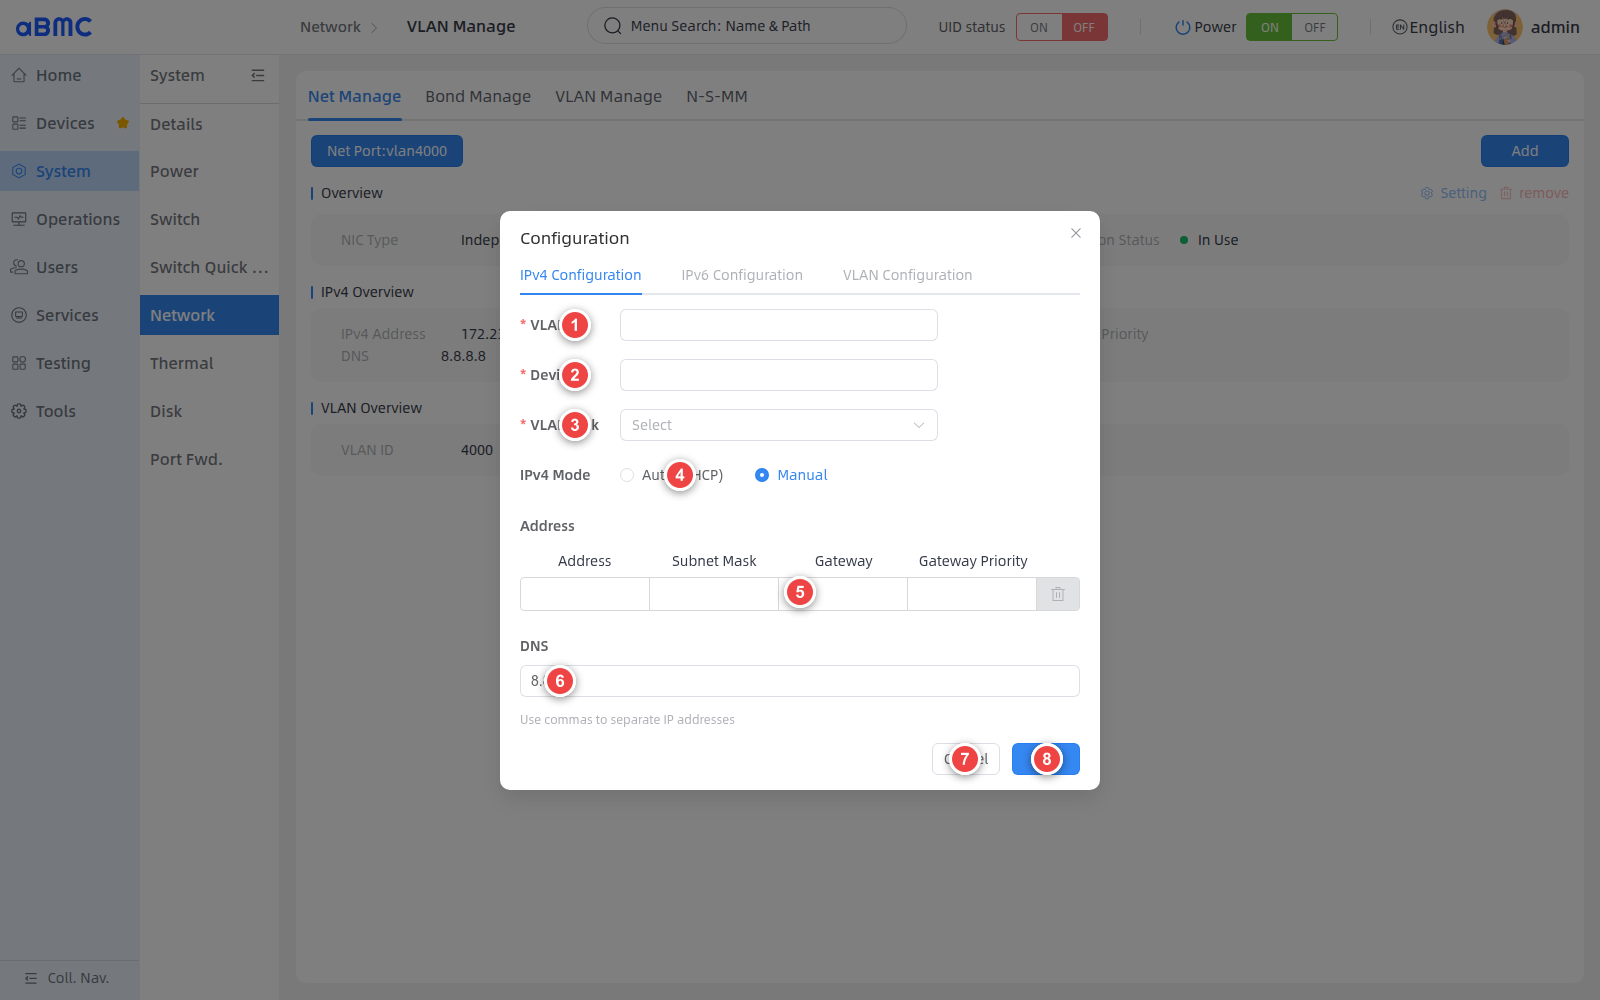
### Add a VLAN device [step]
1. Enter the VLAN identifier in **VLAN ID**.
2. Confirm the VLAN device name in **Device**. After a valid VLAN ID is entered and the input box loses focus, the page automatically generates `vlan<VLAN_ID>` if the field is empty.
3. Select the underlying port in **VLAN Link**.
4. In **IPv4 Mode**, select **Auto (DHCP)** or **Manual**.
5. When using Manual, enter the address, subnet mask, gateway, and gateway priority.
6. Fill in DNS as needed; separate multiple addresses with commas.
7. To discard the changes, click **Cancel**.
8. After checking the configuration, click **Add**.
### Modify or delete a VLAN [step]
- When **Setting** is available, you can modify the IPv4 mode, address, subnet mask, gateway, gateway priority, and DNS. The VLAN ID, device name, and VLAN Link of an existing VLAN cannot be changed in the modify window.
- When **remove** is available, click the button and confirm the deletion in the confirmation window.
- When both **Setting** and **remove** are disabled, the current VLAN's `Oem.Firefly.SettingEnabled` is `false`—for example, an independent private VLAN used for internal system communication. Such VLANs cannot be modified or deleted through the current page.
### VLAN configuration rules [step]
| Item | Rule |
| --- | --- |
| VLAN ID | Required; must be an integer in the range `1–4094`. |
| Device | Required when adding. Generated by default as `vlan<VLAN_ID>`; after creation, it cannot be renamed in the modify window. |
| VLAN Link | Required when adding; select the underlying port that carries the VLAN. The loopback interface `lo` is not available. |
| Auto (DHCP) | The IPv4 address of the VLAN device is assigned by the DHCP service. |
| Manual | Supports configuring one or more IPv4 addresses, subnet masks, default gateway, gateway priority, and DNS. |
| Gateway Priority | The same gateway and priority combination must not duplicate another NIC or VLAN. |
| SettingEnabled | When `false`, both the modify and delete buttons in the WEB are unavailable. Do not bypass the restriction to operate on system-internal VLANs. |
<Callout title="VLAN connectivity requirements" type="warn">
Before creating a VLAN, confirm that the peer switch port permits the corresponding VLAN ID and that the VLAN Link is selected correctly. An incorrect VLAN ID, underlying port, or gateway configuration may make the VLAN address unreachable.
</Callout>
An add request mainly contains `Device`, `Id`, `Link`, and `IPv4Addresses`; when modifying, the VLAN device is specified in the URI, and `Id`, `Link`, and `IPv4Addresses` are submitted; a delete request submits the target `Device`.

<Callout title="Note" type="info">
  For detailed information about interface authentication, request parameters, response fields, and error codes, refer to the Redfish API documentation.
</Callout>
FAQ
1. Setting is unavailable
The current NIC, Bond, or VLAN may be a system-internal communication interface, a configuration-restricted private interface, or a Bond member. Query the corresponding resource and check Oem.Firefly.SettingEnabled; when the value is false, it cannot be modified.
2. Cannot access the BMC after modification
If the modified object is the current communication port, Bond, or VLAN, the original address may become invalid immediately. Reconnect using the new address; if the connection fails, restore the original configuration through the serial port or another independent channel.
3. Why some ports cannot join a Bond
The loopback interface, private ports, ports with SettingEnabled set to false, and ports that already belong to another Bond cannot join a new Bond. A Bond requires at least two available member ports.
4. How to choose a Bond mode
For typical active/standby scenarios, use active-backup; when the Link Aggregation Control Protocol is required, use 802.3ad and configure the switch accordingly; choose other load-balancing modes based on the network topology and peer capabilities.
5. Why both Setting and remove of a VLAN are disabled
The current VLAN's SettingEnabled is false, which usually means the VLAN is used for system-internal or private communication. Do not bypass the restriction through the API to modify or delete it.
6. How to configure multiple IPv4 addresses
In the WEB Manual mode, after completing a row of Address and Subnet Mask, the page automatically adds a blank row. The CLI can submit only one address for a physical NIC at a time; for multiple addresses, use the WEB or API.
7. Gateway priority conflict warning
The same gateway and priority combination is already used by another NIC or VLAN. Adjust Gateway or Gateway Priority to avoid duplicating an existing configuration.